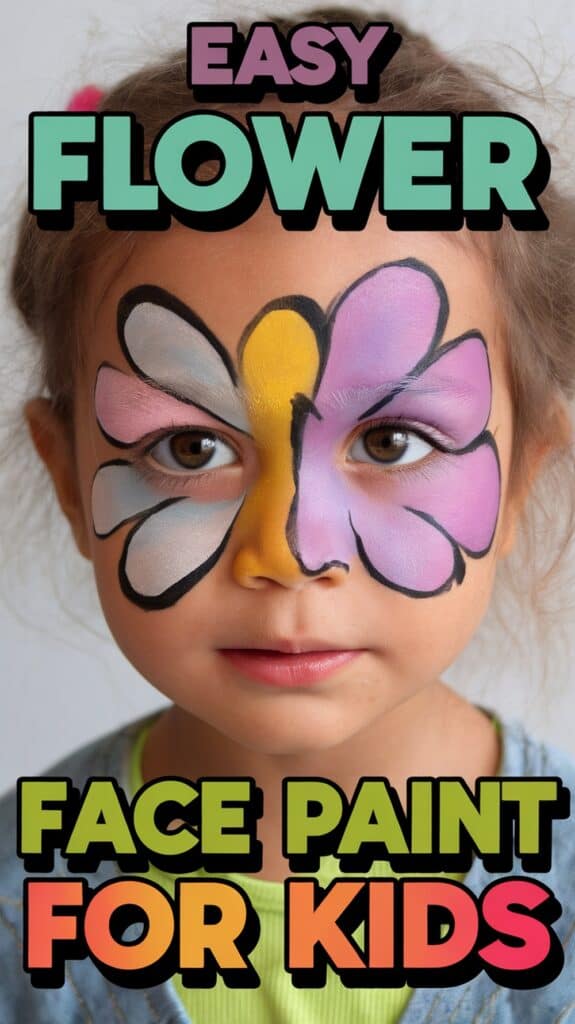
Easy Flower Face Painting That Kids Actually Sit Still For
My boys are a bundle of nonstop energy, especially at birthday parties! I never really believed they’d sit still long enough for face painting, but I took a chance with easy flower face painting and, trust me, it was a total game-changer. All three actually lined up (and stayed put) while I added little petals and bright colors to their cheeks. Moms, if you want something fun and simple that doesn’t have your kids bolting out of the chair, these ideas are for you.
There’s something sweet about seeing kids glow with pride after showing off their painted faces. Even my wiggliest, who usually can’t last two minutes, was obsessed with his flowery design. These ideas need almost no skill, just a bit of patience and some basic supplies. It’s easy, quick, and leaves everyone grinning!
Why Kids Love Flower Face Painting (And How I Get My Boys To Sit Still)
When I first tried easy flower face painting with my boys, I wasn’t sure what to expect. I pictured wiggling, sighs, maybe a runaway or two. But the wildest thing happened. They were thrilled and actually excited to show off their fresh, colorful designs! I’ve learned that even the busiest little ones stop and pay attention when flowers and bright paints come out. Kids, especially mine, are drawn to the simple, cheerful look of flower face painting. There’s just something magical about it.
The Magic of Flowers for Kids

Flowers always catch kids’ eyes. They’re bold, playful, and packed with color. Even if you have tough customers at home who think flowers are only for girls, there’s a way to make them excited.
- Flowers feel happy and safe: Kids connect flowers with sunshine, birthdays, and special days. Painting a flower on a cheek or forehead adds instant joy.
- Bright colors win every time: Petals in red, blue, yellow, or even superhero shades make each face unique.
- Kids love to copy what they see: Once one child has a flower on their face, suddenly everyone wants to join in!
For my boys, it’s not just about looking cute. They like to be included, and flowers are easy to personalize. My youngest always chooses blue petals—he says they look “faster.” My oldest likes his to look more wild, with layers of messy green. Anything bold, and they’re in.
Turning Wiggles Into Willing Models
If you asked me years ago if my boys would ever sit still for face painting, I’d just laugh! But over time, I found some foolproof tricks. Staying calm, keeping things brief, and making the whole experience part of the fun turned squirmy kids into happy participants.
Here’s how I make easy flower face painting work, even with my three little tornadoes:
- Keep the setup bright and inviting
I lay out all the paints, brushes, and glitter ahead of time. Letting the boys see the supplies makes them curious and eager to start. - Offer choices
Instead of telling them what I’m painting, I give two options: a blue flower or a red one? Simple choices make them feel involved. - Give clear, friendly instructions
With a smile, I say, “Freeze like a statue!” or “Let’s see your quiet face for ten seconds!” Kids respond better when things are playful. - Go fast and praise often
Most flower designs take under two minutes. I cheer them on (“Almost done!”) and let them peek in the mirror right away. - Make it a group event
I set up a mini line and let them watch each other. The trick? The more they see, the more they want their turn.
Building Excitement and Confidence
Face painting brings out a new side of my kids. Even the shiest one lights up after getting his face painted. It’s not just the look, it’s that little burst of confidence from being noticed.
- The reveal moment is magic: There’s always a big reveal when they look in the mirror. Faces light up, and suddenly, they’re posing for pictures.
- Everyone feels special: Boys, girls, young or old, each kid walks away with something unique. Even grown-ups get requests for flowers!
- They love the attention: Grandparents, friends, and siblings all notice their “new look.” The smiles just keep coming.
With a few easy flower face painting tricks and a dash of patience, even the bounciest kids will want to stay put. For us, this has become a favorite party treat and an excuse for spontaneous fun, right at home.
Essential Face Painting Supplies For Busy Moms

I get it, moms are always juggling a million things at once—snacks, sibling squabbles, birthday goody bags, and maybe even a last-minute load of laundry. When I first started looking for easy flower face painting ideas, I realized one thing fast: the right supplies make everything smoother! No one wants to drag out a huge kit or spend forever searching for that one good brush. With a handful of must-haves, you can jump right into the fun and keep the action moving, even with a house full of restless kids.
Here are my tried-and-true essentials for face painting with busy little ones. Every single item earns its keep, saving time and a lot of mess!
Paints That Last and Wash Off Fast
Let’s be honest, if it doesn’t wash off easily, it’s not coming near my boys’ faces. For easy flower face painting, always start with quality, kid-safe face paints. Sharpies and acrylics belong on paper, never on skin!
Look for paints that are:
- Non-toxic and hypoallergenic: Skin-friendly matters most.
- Water-based: They wash off with warm water and a gentle soap.
- Brightly pigmented: Vivid colors make the flowers pop and photograph well!
Some brands even come in simple pots or sticks. I keep a pack of face painting crayons for speedy touch-ups, especially when I know we won’t have a full thirty minutes for cleanup.
Brushes, Sponges, and Applicators

You don’t need a full artist’s toolbox, but the right brush makes flower designs faster and neater. I’ve learned that with just three tools, you can paint almost anything.
My face painting toolkit always includes:
- A medium round brush: Good for petals, little swirls, and outlining.
- A flat brush or sponge: Quick for big areas or cheek backgrounds.
- Cotton swabs or makeup sponges: Perfect for soft color blending and mess-free petals.
I like to keep each brush for one color at a time. That way, there’s less mudding and more wow!
Simple Water Cup and Wipes
Kids never want to sit through a big cleanup, and neither do I! A sturdy, non-tippy cup for rinsing brushes is a must. I set out a few wet wipes or a damp cloth for quick fixes and finger cleanups.
- Water cup: For rinsing brushes in between colors.
- Baby wipes: For cleaning hands and emergency oops moments.
- Paper towels: For blotting and drying brushes.
This little station keeps me from running back and forth, which keeps little bottoms in the chair longer!
Glitter and Details for Extra Smiles
I can’t count how many times a pinch of glitter has secured an extra five seconds of patience from my boys! A tiny pot of safe, cosmetic-grade glitter adds instant magic to easy flower face painting. Don’t go wild—a little sparkle at the center of each flower or along a petal edge is plenty.
For details, I love:
- White face paint for highlights: Dots, stars, or outlines.
- Black or dark brown face paint for definition: Outlining gives those little flowers real pop.
- Face-safe glitter gel: More sparkle, less mess.
Handy Face Painting Palette or Plate
You don’t need a fancy art tray. An old plate, plastic lid, or even a washed-out yogurt container works. I use it to mix up new colors or dab off extra paint. If the colors get mixed up, it’s easy to wipe down and start fresh.
Make-Ahead Stencils or Stickers (for Ultra-Fast Fun)
Some days, no one sits still—not even my most patient child. That’s when stencils save the day! I keep a small pack of flower stencils handy for times when I need every advantage. Press the stencil, dab on color, and boom—a perfect flower, no fuss.
- Reusable plastic stencils: Wipe clean and use again.
- Stick-on face gems (optional): Add sparkle in seconds!
The Short List: Everything at Your Fingertips
Here’s my go-to checklist. If I have these, I know I’m ready for easy flower face painting, even if the party starts in ten minutes.
- Kid-safe, water-based face paints (red, yellow, blue, green, white, black)
- Three basic brushes (round, flat, detail)
- Sponges or cotton swabs
- Water cup
- Baby wipes and paper towels
- Cosmetic glitter (skin-friendly)
- Mixing plate or art palette
- Optional: stencils and face gems
I stash it all in a shoebox or plastic container. That way, it’s always ready to grab in a pinch! If you keep things simple and use products made for kids’ skin, you can focus more on the smiles and less on the mess.
Having these essentials at arm’s reach means I’m never stuck searching. When my boys want a quick face paint session—before school, at a party, or just because we’re bored on a rainy day—I can get set up in seconds. It’s simple, fun, and makes it way easier to create memories, one flower at a time!
5 Simple Flower Face Painting Ideas Even Wiggly Kids Will Love
Every mom knows how wild it can get when you ask your kids to sit still, especially if there’s a birthday party happening or cousins around! But easy flower face painting makes it fun for kids to join in, no matter how squirmy they feel. Trust me, I’ve tested these ideas on my own three boys (including the one who never stops moving), and each design is simple, quick, and a true crowd-pleaser.
Here are five playful flower ideas that pop with color, finish fast, and work great for even the busiest little faces. If you want a surefire win with easy flower face painting, these are the designs to try!
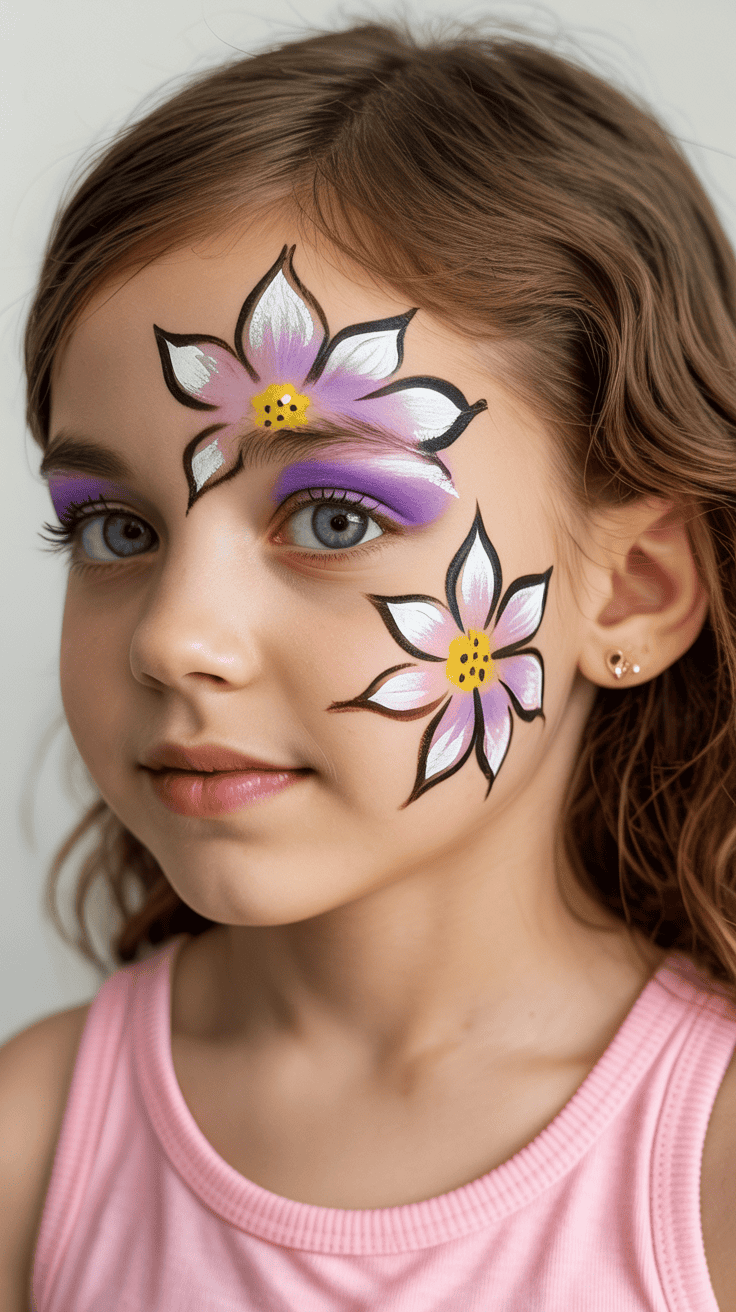
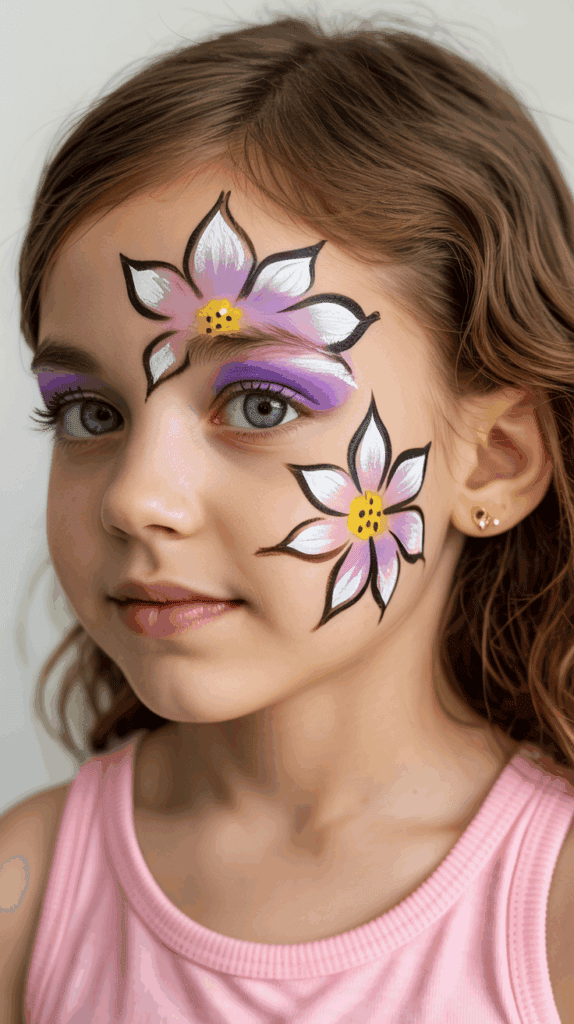
Easy Daisy Design For Active Kids
Daisies are my go-to when I need something sweet and quick, especially for kids who wiggle like worms. The simple white petals and bright yellow center catch their eye, and the best part is you really don’t need steady hands or fancy skills.
- Keep it simple: Start by marking a small yellow circle where you want the center of your daisy. I like to place it high on the cheek or at the corner of the forehead.
- Petal time: Use a round brush and white paint to make five or six small, petal-shaped strokes around the center. The messier, the cuter!
- Add a pop: Dab a tiny bit of glitter right in the middle. Kids love seeing their daisy sparkle in the mirror.
What’s nice is that if you only get three petals on before your child runs off, it still looks adorable and finished. My youngest always grins big when he spots his “tiny garden” in photos!
Sunflower Cheek Art That Stays Put
Nothing says sunshine like a bright yellow sunflower right on the cheek! This is my oldest boy’s favorite. He loves the bold look, and I love how the larger petals are easy to paint (even when he can’t sit still for long).
- Start with a circle: Draw a brown center right in the middle of the cheek. Don’t worry about perfection; it will get covered mostly by petals.
- Layer the petals: Use a wide or flat brush to paint long yellow petals all around the center. Let a few overlap or go wild—kids love the “messy” look.
- Quick details: Add a few green strokes for tiny leaves or a little stem if you’re feeling extra creative.
If you want to help it last through snacks, use a drier brush and work fast. This simple sunflower is always a big hit for summer parties and school events.
Cute Mini Roses Along The Forehead
Kids love the idea of a row of tiny roses, and honestly, so do I! This design is great when you have more than one child waiting (or hovering). It’s fast, colorful, and looks super special in photos.
- Rose dots: Dot small circles of red or pink paint along the forehead, about an inch apart. No perfect circles needed!
- Petal swirls: Using a small brush, add a few quick swirls or touches of white around each dot. This gives the look of simple petals.
- Leafy green: Add quick little green “V” shapes on each side of the roses for leaves.
Sometimes, if you add just three or four roses, the kids feel like royalty. My middle son says he’s a “rose king” every time I paint this on him!
Tropical Hibiscus For Bold Colors

When my boys want something bright and different, I grab orange, pink, yellow, or even purple for a fast and fun hibiscus. Hibiscus flowers are easy to customize, so each child gets to pick their favorite color.
- Draw a big, loose flower: Start with a large petal on the cheek or along the jawline. Use a flat or round brush and bold color (hot pink or bright orange really pops).
- Add petals: Paint three or four more petals, overlapping at the base. Curve them any way you like.
- Finish with fun: Add a yellow or white dot in the middle, then paint a quick stamen line with little dots for an extra tropical touch.
Let the kids choose the colors—they love to mix things up. This design always makes my boys feel like they’re ready for a Hawaiian luau!
Quick Bluebell Accents For Fast Finishes
If your child is ticklish or has zero patience, bluebells are the way to go! These take seconds, not minutes, and still look lovely in photos or at playdates.
- Choose your spot: I like the edge of the cheek or the corner of the eye for this.
- Petal clusters: Use a thin brush and blue paint to make three or four tiny bell-shaped petals in a little cluster.
- Easy green stem: Paint a swish of green for a stem and add a couple of tiny leaves if you have time.
This quick bluebell is perfect for those “just one more flower, please!” moments. Even when the child is halfway off the chair, you’ll have a cute pop of color there.
Each of these easy flower face painting designs makes snack breaks, birthday parties, and lazy afternoons even sweeter for wiggly kids. Moms, if I can get my three boys to line up and show off their faces with pride, you can too! Every flower adds its own special sparkle—just like our wild, wonderful kids.
Troubleshooting: Keeping Kids Happy (And Still!) During Painting Time

Even with the best easy flower face painting tricks, every mom faces one big challenge: getting kids to sit still long enough for a design! I’ve had afternoons where one of my boys is a perfect little statue and, at the same table, his brother manages to twist and giggle the entire time. It’s not always smooth, but I’ve picked up some easy ways to turn those wild moments into fun ones, keep spirits high, and get those cute faces painted with smiles instead of tears.
Quick Engagement Tactics for Wiggly Kids
Paint time is not known for its quiet patience, at least in my house! Here’s what works when I need the boys to “pause” without starting a standoff.
- Make it a game: I ask, “Can you sit as still as a cat watching a bird?” Or I hold a funny “freeze” contest, giving a small prize to the best statue.
- Sing a silly song: Singing a quick song or even humming together distracts them and helps the seconds go by faster.
- Short, simple steps: Breaking the painting into quick bursts (“Let’s do petals—done! Now a center—done!”) helps the kids focus on the next little thing, not the big task.
- Show them the mirror: Letting kids see what’s happening partway through gives them a boost to keep going. It’s like a halfway prize.
Sometimes all it takes is changing up the energy or adding a little humor. My youngest boy loves to make silly faces and then try to “freeze” them, which actually makes him easier to paint!
Managing Restless Hands and Feet
Nothing falls apart faster than a bored, wiggly child with wet paint on their face! If you want to keep easy flower face painting stress-free, set the stage for less fidgeting.
- Keep hands busy: I hand them a soft toy to squeeze or a smooth rock to hold. Sometimes I even give them a clean paintbrush to “help” mix imaginary colors.
- Little feet, big impact: Wiggling starts at the feet! Letting kids rest their feet on a stool or stack of books can make a huge difference.
- Paint smaller sections: Focus on forehead flowers or tiny cheek designs instead of whole-face art. Less area painted means less time—they love it, and so do I.
Sometimes, we paint “practice petals” on their hands first. They feel special that they get bonus art, and I get a few minutes to test the colors—and calm their wiggles.
Rewarding Patience Without Bribery
Every parent knows the line between too many bribes and just enough motivation. For me, it’s all about little positive moments and catching them being good.
- Instant praise: “You’re sitting so still, this is my best flower yet!” Simple words work like magic.
- Countdown to fun: I’ll say, “Five more petals to go!” It helps them see there’s an end in sight.
- Letting them pick details: If a kid is patient, I let them choose an extra glitter dot or “magic” swirl as a finishing touch. That small reward feels like a big deal.
And if all else fails? I pull out the “after-photo” plan! Promise a picture with everyone’s best faces, and suddenly everyone’s back in their seat.
Handling Paint Smears and Oops Moments
No matter how careful you are, something will get smudged or a flower will look more like a blobby circle. That’s okay! Little mistakes don’t mean disaster, and showing how to “fix” things calmly helps everyone relax.
- Keep wipes handy: A quick wipe and a smile reassure your child that mistakes are part of the fun.
- Laugh it off: “Oops, I painted a silly blob! Let’s turn it into a mystery flower.” Kids love seeing art as a game, not a test.
- Go with the flow: If someone just can’t sit still long enough, I make a speedy mini flower or a single petal. It’s fast, still festive, and always earns a grin.
My boys sometimes end up with half-flower, half-scribble masterpieces—but they don’t care, and honestly, I don’t either. It’s the memory that counts!
Involving Siblings and Friends the Right Way
Chaos multiplies when there’s a crowd. What helps most? Giving everyone a job or a role, so kids feel included (and less likely to leap off the chair mid-paint).
- Assign roles: “You’re the mirror holder,” “You’re the line captain.” Even little ones get excited when they’re trusted with a “helper” job.
- Mini viewing party: Let kids peek while others get painted. This usually builds excitement instead of impatience.
- Set a timer for turns: My kitchen egg timer works wonders. Everyone gets their two minutes, and waiting becomes a game.
When kids work together or cheer each other on, they’re less focused on wiggling away.
Keeping the Vibe Light and Fun
Above all, easy flower face painting should be about sharing laughs, not perfection. My boys rarely remember if every flower was centered. They remember the silly snapshots, the applause from Grandma, and how much fun we had together.
- Playful attitude: I tell silly stories about magic flowers or name each design we create.
- Music in the background: Quiet tunes help take the edge off and soothe nerves.
- Take a break if you need it: Sometimes stepping away for a snack or dancing break is the real trick to finishing up with happy, smiley faces.
At the end of the day, keeping painting time peaceful is all about connection, not just cute designs. I remind myself not to sweat the squiggles. Each moment spent together—wiggles, giggles, and all—matters most.
Face Painting Safety: What Every Mom Should Know
Before the kids rush over for their favorite easy flower face painting, every mom should think about safety. I know it’s easy to get swept up in all the colors and fun patterns, but I always remind myself that a few quick checks can make sure everyone stays happy and healthy. I’ve picked up some important habits over the years, especially with three boys who bounce from one activity to the next. It’s simple: safe painting means more fun and fewer worries for everyone!
Choosing Safe and Gentle Face Paints
I never use just any paint for my boys’ faces. Kids have delicate skin, and the wrong products can cause big problems. Here’s what works for us every time:
- Look for face paints made for kids. The packaging should clearly say “non-toxic” and “hypoallergenic.” I skip anything with “craft” or “acrylic” on the label.
- Check the label before you buy. I always scan ingredients for any weird chemicals or things I can’t pronounce.
- Test new products first. A tiny dot of paint on the inside of the arm can show if there’s any reaction. If the spot stays clear for an hour, I know it’s safe to use.
This might sound like an extra step, but it only takes a minute, and my peace of mind is totally worth it.
Practicing Good Hygiene Before Painting
Kids are messy. I don’t want yesterday’s lunch or playground dirt mixing in with my paints! Clean faces make a difference, and it’s super simple to do:
- Wash little faces with mild soap and water before painting.
- Dry skin well so the paint sticks and colors look bright.
- Use clean sponges and brushes every time. I wash mine after each session with warm soapy water and let them air dry.
Fresh tools mean no germs spread from one kid to another. If my boys have friends over, I’m extra careful to use clean supplies for each child.
Spotting Allergies and Sensitivities
Some kids are more sensitive than others. All three of my boys have different skin, so I pay attention to their reactions. If your child has sensitive skin or something like eczema, double-check the paint brand and check for any signs of redness or itching.
Key things I look for:
- Redness, bumps, or sore spots during painting
- Complaints about stinging or itching
- Swelling or watery eyes
If I spot any of these signs, I gently wipe the area with a baby wipe, rinse with cool water, and skip painting for the day. I also keep an eye out for safe brands that offer “sensitive skin” or “dermatologist-tested” labels, especially since my youngest sometimes reacts to random lotions.
Keeping Paint Away From Eyes and Mouth
Kids move a lot, and face painting sometimes gets close to eyes or lips. I like to keep designs away from these spots, especially with flower details. Here’s why:
- Eye and mouth areas are more likely to get irritated.
- Kids rub their faces and can smear paint into their eyes.
- Paint should never be applied on chapped or broken skin.
If my boys want a design near their eyes (they love superhero masks!), I use extra caution, apply less product, and ask them to close their eyes tight.
Cleaning Up Safely and Gently
When the day is over (and yes, my crew always tries to keep the paint on as long as possible), I remove face paint with gentle steps:
- Wet a soft washcloth with warm water and a little mild soap.
- Gently wipe away the paint, working in small sections.
- Skip scrubbing, especially around eyes or sensitive spots.
For any stubborn bits, I add a dab of coconut oil or baby lotion, let it sit for a minute, then wipe it off. My boys love this because it feels like a mini spa session!
Knowing When to Skip Face Painting
Sometimes, the safest choice is waiting for another day. If the kids have any of the following, I skip the easy flower face painting and offer stickers or a headband instead:
- Rash or open cuts on the face
- Fever or visible illness
- Major allergies or very sensitive skin
Better safe than sorry.
My Face Painting Safety Checklist
I keep this simple checklist in my bag, just in case the excitement gets the best of me!
- Use only face paints labeled for kids (no acrylics or markers)
- Double-check ingredients for known allergies
- Wash hands and brushes before and after painting each child
- Avoid broken skin, eyes, and lips
- Remove paint gently, without harsh scrubbing
I want everyone to have fun and look adorable, but nothing matters more than keeping my kids’ skin happy and healthy. With these quick safety steps, easy flower face painting stays one of our favorite activities—and I get to enjoy all those bright, paint-covered smiles without worry!
Conclusion
Easy flower face painting has turned simple afternoons and wild parties into some of my very favorite family memories. When I first started, I doubted my three boys would ever sit through it, but seeing them wait their turns, faces bright with color and grins, felt like a little mom victory. The process is as sweet as the results. Once, at my youngest son’s birthday, every child wanted a flower—even the ones who didn’t know me well. They all joined in, and nobody wanted to wash theirs off!
If you want big smiles and calm moments at your next family event, try these ideas. Don’t stress about skill; the fun truly outweighs perfection. Thank you for sharing your time with me here. If you give easy flower face painting a shot, share your stories in the comments or post your photos—I’d love to cheer you on too!
This post may contain affiliate links. Read the full disclosure here.