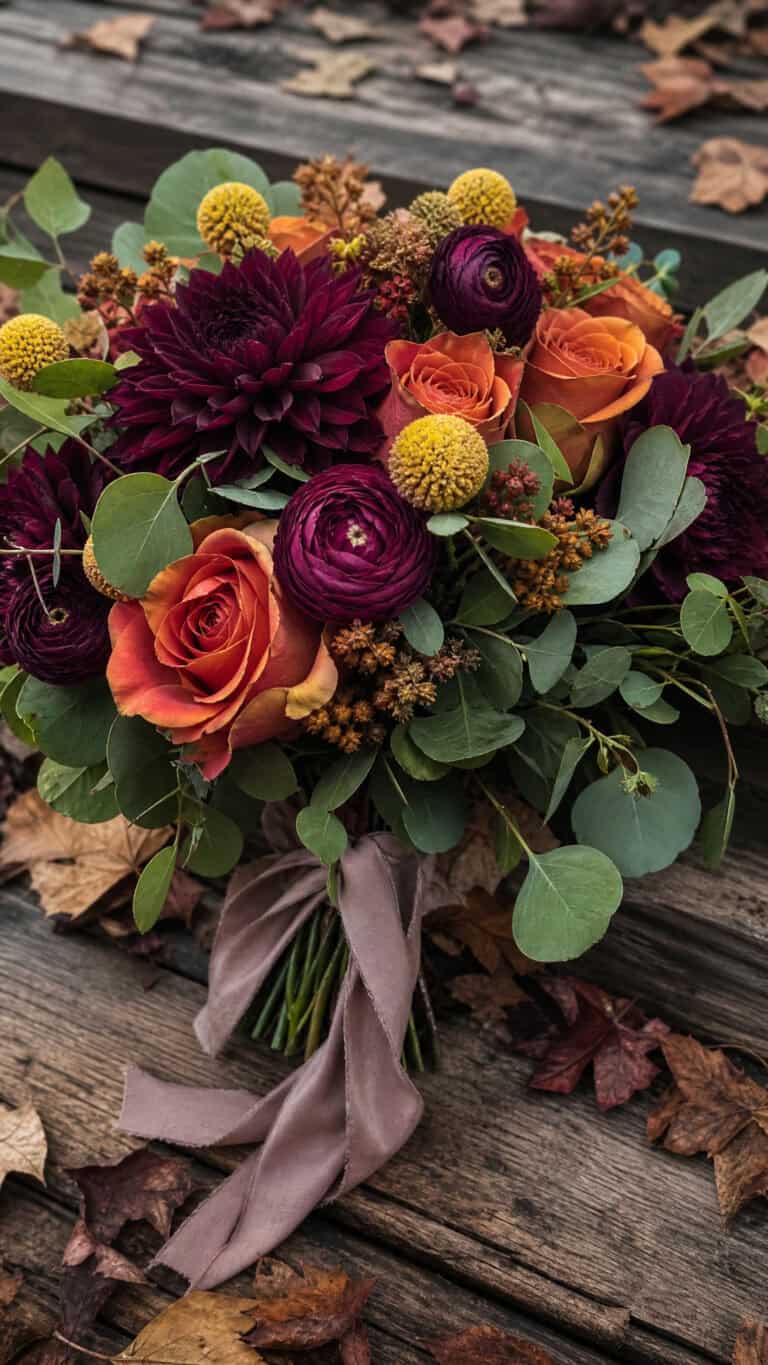
How To Style Floral Arrangements In Pumpkins For Fall
If you’ve ever watched fall roll in and wished your home felt a little cozier, you’re not alone! There’s just something about the glow of pumpkins and the warm colors of autumn that instantly puts me (and my three busy boys) in a happy mood. That’s why floral arrangements in pumpkins are my favorite simple trick when I want the house to feel extra special for fall. It’s an easy, hands-on way to bring a bit of nature right into the kitchen or living room, and trust me, the kids love pitching in!
You don’t need to be a florist or have hours to spare. With a few supplies and a quick trip to the pumpkin patch, you can create beautiful, mess-friendly displays that look like a million bucks but only take minutes to pull together. Whether you set these on the dining table or line them up on your front steps, these floral pumpkin projects are fun, festive, and perfect for family time. Let’s get ready to make some happy messes and bring that cheerful fall feeling inside!

Why I Love Decorating with Pumpkins and Flowers in the Fall
There’s something about pumpkins and flowers in my house that makes fall feel absolutely magical. When I start putting together floral arrangements in pumpkins, my boys know it’s officially autumn and that a cozy, happy season has arrived! It’s not just about making things look pretty. These decorations invite warmth, fun, and a touch of whimsy that the whole family can enjoy (even if you have three rowdy kids running around the kitchen like I do).
Pumpkins Add Instant Fall Charm
Pumpkins just say “fall” in big, bold letters! Whether I’m picking them up from the pumpkin patch or grabbing a few while grocery shopping, they always bring that cheerful, seasonal feeling right to the front door. Their shapes and colors are so inviting. Orange, white, green, speckled—no two pumpkins ever look exactly the same, which keeps things exciting for my boys, too. Sometimes we even pick the silliest or bumpiest ones just for a laugh.
- Pumpkins work with any room’s style—rustic, classic, or farmhouse.
- They’re budget-friendly and easy to find.
- Their sturdy shells make perfect, natural “vases” for flowers.
Having pumpkins on the table or by the entryway is a quick way to show guests (and yourself!) that fall is here.
Flowers Keep Everything Fresh and Bright
I’ll be honest: I love everything about fall, but the shorter days can get a little gloomy. That’s where the flowers come in! Arranging seasonal flowers in pumpkins instantly brightens a space and chases away those gray skies. Sunflowers, mums, and even a few late-summer blooms from the yard can fill the house with color and cheer.
- Flowers add softness to the bold look of pumpkins.
- They let me get creative with color—yellow, red, orange, even soft purples or creamy whites.
- Swapping out flowers each week keeps things fun and never boring.
Even just a handful of fresh flowers in a little pumpkin on the windowsill makes washing dishes more enjoyable. My kids love helping choose the blooms, too. Sometimes they’ll sneak in a wildflower or two from the yard, which always makes me smile.
It Brings Our Family Together

When the pumpkins and flowers come out, it’s a family event at our house. My boys love to help scoop, wash, and design each pumpkin “vase.” Those little moments—sticky fingers, goofy faces, pumpkin seeds everywhere—add up to big memories. Plus, it helps pass on a love for creating and decorating to them.
Here’s why decorating together is such a hit:
- Simple steps: Kids can help at every stage, from picking pumpkins to placing flowers.
- No need for perfection: The messier the arrangement, the more personality it has!
- A chance to talk: We end up sharing stories, laughing, and learning together.
The finished floral pumpkins always look wonderful, but it’s the process that really counts for us.
The Best Kind of Seasonal Decor
One thing I love most is how long these little creations last. Pumpkins are sturdy enough to hold up for weeks if you prep them right, and you can swap in fresh flowers any time. This helps me keep my home looking festive all season without a lot of work. Plus, when Thanksgiving rolls around, these floral arrangements in pumpkins make perfect centerpieces for our table.
Decorating with pumpkins and flowers isn’t just about looks. It’s a happy, hands-on way to make fall feel extra special for everyone—kids and grownups alike!
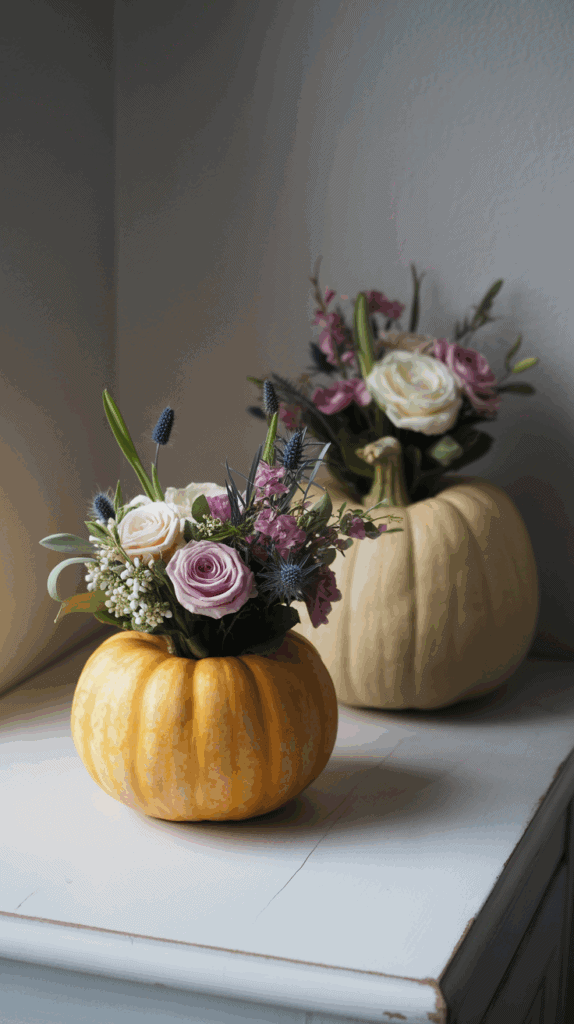
Choosing the Right Pumpkins and Flowers for Your Arrangements
Picking the right pumpkin and flowers is the secret sauce that makes floral arrangements in pumpkins shine! After lots of trial and error (plus a few pumpkin mishaps with my boys), I’ve learned some easy tricks for making sure these displays last and look amazing. Whether you want something sturdy for the kitchen or a little something cute for your entry table, there’s a way to keep things cheerful and stress-free. Plus, letting the kids help choose colors and shapes is half the fun. Here’s how I make sure our pumpkin arrangements are both pretty and practical!
Types of Pumpkins: Real or Faux? Which to Use When
The pumpkin “vase” sets the stage for your whole arrangement. The choice between real and artificial pumpkins really depends on how much time you have, how much mess you can handle, and where you plan to display your masterpiece.
Real Pumpkins
- Pros:
- Nothing beats the look, texture, or smell of a plump, fresh pumpkin.
- You get that classic fall vibe, and each pumpkin is wonderfully unique.
- Perfect for kitchen tables, porches, or anywhere you want pure autumn charm.
- The process of scooping and gutting becomes a fun family project (even when it gets messy).
- Cons:
- Real pumpkins have a short shelf life once cut. After about a week, they start to soften or get moldy.
- Scooping out pumpkins takes a little time. Plan on some cleanup (and probably a kitchen full of seeds).
- They’re heavier and can drip if the lining isn’t sealed or if water spills.
Faux Pumpkins
- Pros:
- These can be re-used year after year. Just pop out the flowers, wipe, and store.
- No mess, no seeds, and no time crunch. Faux pumpkins never rot and are super lightweight.
- Great for busy weeks, little hands, or when you want arrangements in every room.
- Cons:
- Some fake pumpkins look plasticky or too shiny. Choose ones with a matte finish for a more natural look.
- You might need a sharp craft knife to cut the “lid” or opening.
- They don’t offer the special scents and organic feel of the real thing.
When I use which: I go for real pumpkins if we plan to show off the arrangement for a few days or if it’s a centerpiece for a fun family dinner. Faux pumpkins are my go-to for window sills, the school desk, or anywhere I want low maintenance and zero worries. And if you’re hosting a fall party? I mix them up!
Best Fall Flowers and Foliage for Lasting Arrangements

Nothing says fall more than big, bold blooms paired with autumn leaves and extras from the garden. Over the years, I’ve figured out which flowers play nicely together and last the longest (which is a lifesaver with three boys who love to “peek” inside the vases).
Here are my favorites for lasting floral arrangements in pumpkins:
- Sunflowers: Big, bright, and bold. Kids love them and they last for days.
- Mums (Chrysanthemums): Tons of colors, super sturdy, and they hold up so well in a pumpkin.
- Asters: Sweet and cheerful, with pretty little petals.
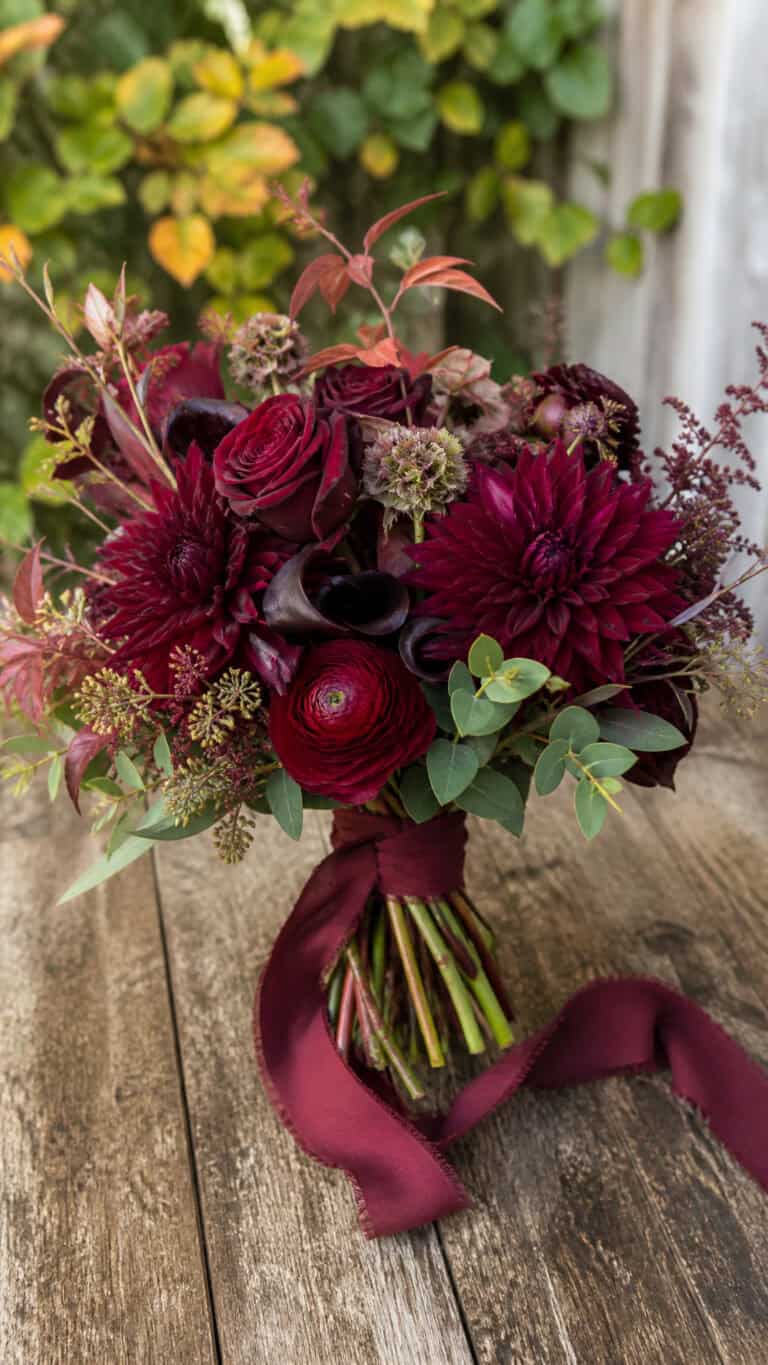
- Dahlias: These add drama and depth. Pick darker shades for warmth.
- Zinnias: Colorful and happy. Great for filling out arrangements.
- Marigolds: Orange and yellow blooms that match fall leaves.
- Roses (in deep oranges or reds): For a more elegant look. They mix well with wildflowers.
- Eucalyptus or Seeded Eucalyptus: Offers a lovely, minty scent, plus a soft green color.
- Branches with Berries (hypericum, bittersweet, or viburnum): These pop and give texture.
- Wheat Stalks: Add rustic charm and last a long time.
- Maple or Oak Leaves: Perfect for tucking into gaps. Look for reds, oranges, and golds.
If I’m feeling extra playful, I’ll toss in:
- Pinecones (mini): A little hot glue keeps them in place.
- Feathers: Especially if the boys find some outside.
- Seed pods or wild grasses: Adds a “country” feel to the mix.
Mix sturdy flowers for structure and then layer in the extras. I like to tuck softer greenery (like eucalyptus or parsley) around the base so everything feels full and lush.
Color Coordination: Making Your Arrangement Wow
Now for the fun part—choosing colors! This is where you can let your creativity shine and get the kids involved. Picking color combos for floral arrangements in pumpkins makes the whole room pop and ties everything together with your fall decor.
My go-to color strategies:
- Classic Fall: Deep oranges, rich reds, buttery yellows, and warm browns. These scream autumn and look great with orange or white pumpkins.
- Monochrome Magic: Use one main color (all reds or all yellows) for a dramatic, modern feel.
- Soft and Neutral: Creamy whites, pale peach, soft pink, matched with muted greens. I love these for a calm, cozy space.
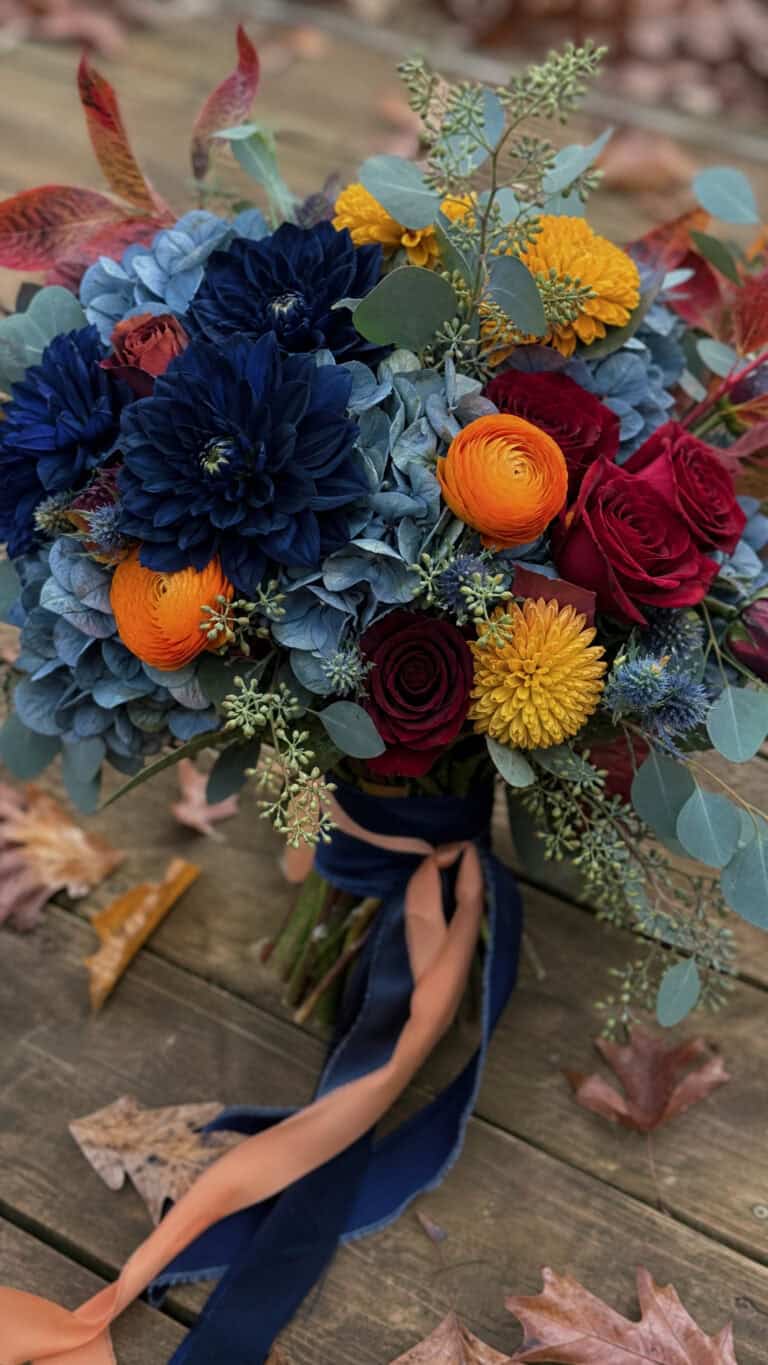
- Bold Contrasts: Mix purple asters with yellow sunflowers or blue thistle with orange mums for a “wow” effect.
- Kid’s Choice: Let your children pick their favorite shades! We’ve had rainbow pumpkin vases before, and they always get the most compliments.
Some ways I involve my boys:
- Lay out flower options at the store or farmer’s market and let everyone pick one stem.
- Use color swatches or paint chips as a game—match blooms to the pumpkin.
- Turn “picking the greens” into a scavenger hunt in the backyard.
A quick rule: Pick a main color, add two accent shades, and mix in greens. Contrast bold flowers with soft foliage or pop a single white bloom among dark colors for balance. Bright colors cheer up gray days, while neutrals bring peace and warmth to busy spaces.
Choosing the right pumpkin and flowers is like setting up a cheerful welcome sign for fall. The colors and textures you pick set the mood and keep your house feeling happy and together—all through one little pumpkin vase!
Step-by-Step Guide: Creating Floral Arrangements in Pumpkins with Your Kids
If you’re ready for an easy, happy fall project that the whole family can do together, let’s jump right into creating floral arrangements in pumpkins. I promise, you don’t have to be super crafty or a florist to make this look really good. My three boys and I pull this off every year, and if we can do it with sticky fingers and a few giggles, so can you! Let’s break it down into fun, simple steps.
Tools and Supplies You’ll Need (and Kid-Safe Options!)
Before you start, gather everything you need in one spot. This makes everything smoother—especially when little hands want to help. Here’s what I keep on hand:
For the grown-ups:
- Sharp, sturdy knife (for cutting the pumpkin top)
- Large spoon (for scooping out seeds)
- Floral foam (or a small jar or cup to hold water inside the pumpkin)
- Scissors or garden shears (for trimming flower stems)
- Paper towels/rags (for wiping messes)
For kids:
- Kid-safe pumpkin carving tools (these look like mini saws and are much safer)
- Plastic spoons or scoopers (think beach toys or ice cream scoops)
- Blunt-ended scissors (for trimming soft stems)
- Latex-free gloves (if your kids don’t like sticky hands)
Other fun add-ons:
- Washable aprons
- Wet wipes for quick cleanup
- Old newspaper or a tablecloth (to protect your working space)
Keeping everything kid-friendly keeps everyone safe and involved. The more my boys can do on their own, the prouder they are of the finished pumpkin.
Preparing Your Pumpkin Vase Without the Mess
I used to dread the clean-up, but over time, we’ve perfected the “less mess” method for getting pumpkins ready for flowers.
Here’s how I keep it stress-free:
- Cover your work area with newspaper, a plastic tablecloth, or even an old shower curtain.
- Cut open the pumpkin. I make a simple circle at the top, just big enough to fit a small drinking glass or cup inside. This step is for adults or older kids with supervision.
- Scoop and dump seeds. Give everyone a spoon or scoop and let them dig in. Tip the seeds right into a bowl, then move them away from the workspace (or start roasting them for a treat later).
- Wipe out the inside. Use paper towels to dry up as much moisture as you can from the inner wall. This helps slow down the pumpkin getting soft or moldy.
- Add your liner. If you have floral foam, soak it in water, then nestle it inside. If not, a small glass or jar works just as well. This also helps the pumpkin last longer and keeps water from leaking through.
My boys actually race each other to see who scoops the fastest— it’s become a family tradition! I’ve found the less we stress about perfection, the easier (and more fun) this part gets.
Arranging Flowers Like a Pro — Even When Little Hands Help
Here’s where the real magic happens. Kids love poking flowers into pumpkins! To make sure your floral arrangements in pumpkins look full and lively (instead of falling flat), I follow a simple, foolproof method.
I encourage my kids to help with these steps:
- Sort all the flowers by color, size, or type so everyone can see what’s available.
- Start with greenery. Let the kids tuck in any leafy stems, ferns, or eucalyptus first. This gives structure and hides the floral foam or glass inside.
- Add your “big show” flowers. We put the largest, boldest blooms in the center. Push them into the foam or place them in the jar so they stand up tall.
- Fill in with medium flowers. Next, use mums, asters, or whatever you have in smaller bunches to fill around the center.
- Tuck in accents. Berries, wheat, and little extras go last—this is always my boys’ favorite part.
- Twirl the pumpkin around as you go to check for gaps. We take turns spinning and adjusting.
If a little one wants full control, I let them have their own mini pumpkin for freestyle arranging. The results are always adorable (and they love showing them off).
Tips for Longer-Lasting and Fresher-Looking Arrangements
No one likes droopy flowers by day two! After a lot of trial and error (and a few floppy displays on the kitchen table), here are my top tricks for keeping floral arrangements in pumpkins looking bright and happy for as long as possible.
- Pick the freshest flowers you can find. Farmers markets are perfect for this time of year.
- Use floral foam. It keeps blooms secure and moist longer.
- If you use a jar or cup inside the pumpkin, change the water every two days. Flowers stay perky and the pumpkin doesn’t get slimy.
- Keep the arrangement out of direct sunlight and away from heaters. Heat wilts both flowers and pumpkins fast.
- Remove any wilted blooms right away. This keeps bacteria down and helps the rest stay fresh.
- Rub petroleum jelly along the cut edges of the pumpkin. It slows down mold and softening.
- Store the arrangement in a cool spot overnight if you want it to last for a special party.
I set our pumpkin vases on trays or plates to catch extra drips, and I’m always amazed at how vibrant they look all week long. With a few simple tweaks, you get a beautiful, budget-friendly fall centerpiece that the whole family made together!
Creative Ideas and Inspiration for Pumpkin Floral Arrangements
When I start filling my kitchen and porch with floral arrangements in pumpkins, I always look for new ways to make each display feel special. You can go traditional, try something playful, or even set up a little DIY station outside for the neighbors to admire. The options are endless, and I promise, you do not need to be especially crafty to make these ideas work. Here are some of my favorite ways to style pumpkins with flowers that always surprise and delight everyone in the house.
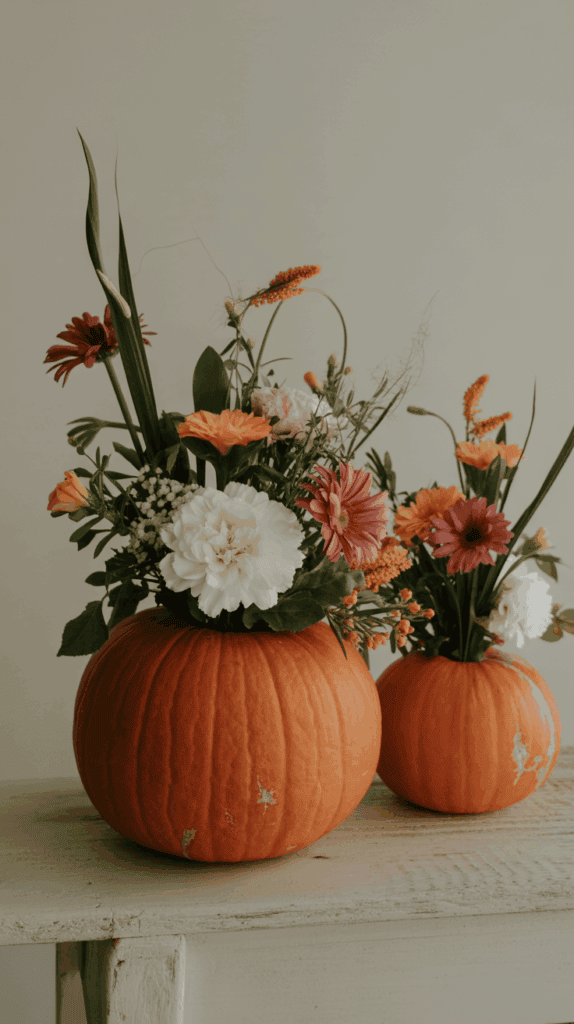
Classic Fall Table Centerpiece Ideas
If you want a fall table that says “welcome” and feels like a big hug, a classic pumpkin floral arrangement is the way to go. It’s simple to create and instantly adds warmth.
Here’s how I like to mix things up for a beautiful table look:
- Pick a medium or large pumpkin in a rich orange or clean white.
- Scoop out the inside just enough to fit a block of wet floral foam or a jar, then add water.
- Go for a cluster of fall blooms like sunflowers, mums, dahlias, and aster.
- Tuck in a few maple or oak leaves for a rustic touch.
- Pop in some sprigs of eucalyptus or wheat for that farmhouse vibe.
- Add berries (hypericum or bittersweet are favorites) for a little extra color.
For a really showy table, I sometimes cluster two or three pumpkins of different sizes together. A large one in the middle with a smaller pumpkin on each side gives instant dimension. Use white pumpkins with deep red and golden blooms for a little drama. If I’m feeling fancy, I add a few mini pumpkins or votive candles around the base—this makes everything glow after dark!
If you want a more neutral look, choose pale blooms like creamy roses, blush mums, and soft green ferns. This pairs so nicely with soft gray or green pumpkins (my boys always call them “ghost pumpkins” and think they’re magical).
Whimsical Arrangements for Kids’ Rooms or Playdates
Kids see pumpkins and immediately think of fun! For bedrooms or a playdate table, I make pumpkin floral arrangements silly and sweet.
Here are a few kid-approved tricks:
- Use mini pumpkins so everyone gets their own.
- Let the kids pick wildflowers, dandelions, or clippings from the yard to add a personal touch.
- Add pops of color with bold zinnias, asters, and bright marigolds.
- Go wild with texture—mini pinecones, feathers, twisty willow branches, or little flags look adorable.
- For extra charm, have the kids glue googly eyes to the outside, tie on ribbons, or stick on leaf-shaped stickers.
My boys love making these as party favors or for their desks. Sometimes, we create “pumpkin friends” by drawing faces on the pumpkins with washable markers before filling them up with flowers and grasses. The results are always silly and bright—perfect for cheering up their space!
If you have a playdate or class party, set up a flower and pumpkin bar. Lay out buckets of blooms, small pumpkins (real or fake), some safe scissors, and cups to hold water inside each pumpkin. Kids can build their own arrangements, which turns into a happy mess that everyone talks about for days.
Front Porch and Outdoor Decor Tips
Nothing says “fall has arrived!” like a pumpkin floral arrangement on the porch or front steps. These are so easy to make and give your home that extra friendly, festive feeling before you even open the door.
Here’s how I get the porch ready for fall:
- Pick sturdy pumpkins that sit flat so they don’t wobble.
- Use weather-resistant flowers if you want the arrangement to last a bit longer outside—think mums, pansies, or ornamental kale.
- Add hardy greenery like seeded eucalyptus, boxwood, or even some branches from the yard.
- For extra height, use tall grasses or curly willow branches popping out from the center of the pumpkin.
- Nestle a few smaller floral pumpkins or piles of gourds around the big one for a layered look.
- If you expect rain or chilly nights, use faux flowers in your pumpkins to keep things looking fresh with zero fuss.
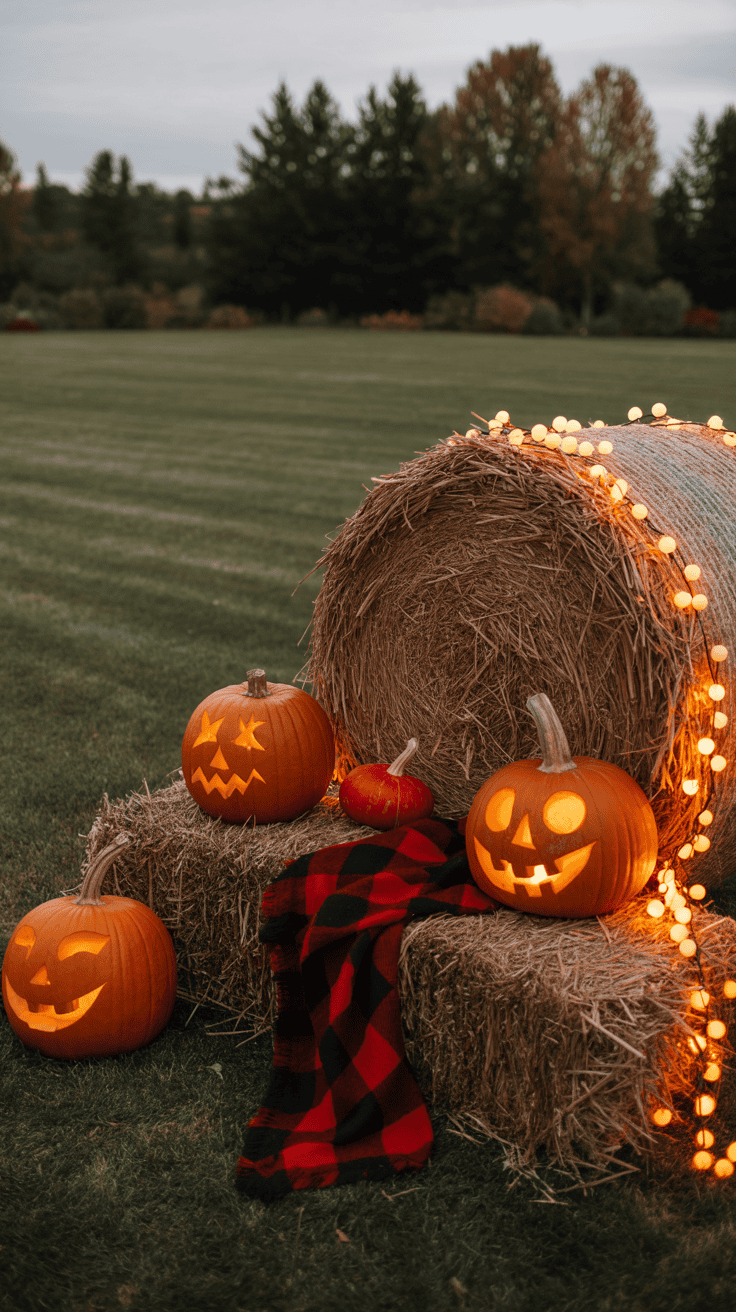
I sometimes set out a big white pumpkin packed with burning orange mums and golden sunflowers, then surround it with mini pumpkins for contrast. At night, I love lining the steps with little pumpkin vases and tea lights in between. The glow makes the whole porch sparkle, and everyone who comes by comments on how welcoming it feels.
For a quick morning refresh, snip a few new flowers from the garden and pop them right into the pumpkin. This keeps things looking lively, even if you haven’t had time to sweep the leaves. The kids like to help, and sometimes they sneak in a little treasure (an acorn, a feather, even a Lego if I’m not watching closely).
These creative spins on floral arrangements in pumpkins keep my home looking fresh and happy through the entire fall season. Whether it’s the dining room table, kids’ bedrooms, or the front steps, a little pumpkin and flower magic goes a long way!
Troubleshooting and Frequently Asked Questions from Fellow Busy Moms

I’ve heard from so many moms who want to try floral arrangements in pumpkins, but hit a few snags along the way. Let’s be honest, things can get messy, pumpkins sometimes refuse to cooperate, and fresh flowers don’t always last as long as we hope! If you’re juggling soccer practice, school lunches, and a pumpkin project that suddenly starts wilting, you’re not alone. I’ve gathered the most common questions I hear from friends and other moms, along with my own tried-and-true fixes. I hope this helps you skip the headaches and enjoy more smiles—and maybe even a few minutes to yourself with that pumpkin spice coffee.
Why Do My Flowers Wilt So Fast?
This is probably the number one question I get! Moms want their floral arrangements in pumpkins to look pretty for more than a day or two. While pumpkins make charming “vases,” they do have quirks. Here are the common culprits for droopy blooms, plus easy fixes:
- Insufficient water: Pumpkins dry out quickly. Use soaked floral foam or add a glass of water inside your pumpkin. Check every day and top off as needed.
- Bacteria buildup: Change the water every two days if you’re using a glass or cup. Clean water really extends flower life.
- Hot spots: Keep arrangements away from sunny windows, heaters, or kitchen stoves. Direct heat makes both flowers and pumpkins break down quickly.
- Old flowers: Start with the freshest stems from the store, market, or yard. Older flowers just won’t bounce back, no matter what you do.
- Pumpkin prep: Dry the inside well before adding flowers. A soggy pumpkin invites mold and soft spots, which can make flowers wilt sooner.
I also snip off any wilted blossoms as soon as I notice them. The rest of the flowers stay fresher this way, and your arrangement keeps on looking amazing!
My Pumpkin Is Getting Mushy or Moldy—Help!
You put in all that effort, and now the pumpkin itself looks sad. This is a pretty common challenge, especially if your house runs warm or humid. Here are tricks I use to keep pumpkin vases fresh for as long as possible:
- Dry well: Wipe out the inside of the pumpkin and let it air-dry for at least 30 minutes before adding anything.
- Petroleum jelly magic: Rub a bit along the cut edges and inside the rim; this really slows down mold.
- Lining trick: Use a waterproof liner (like a drinking glass or food storage cup) inside the pumpkin to hold the flowers and water. This keeps excess moisture from soaking into the pumpkin flesh.
- Keep it cool: At night, move your arrangement to a cooler spot if you can, like the porch or an unheated mudroom.
- Swap out early: If the pumpkin starts to soften, you can lift the whole arrangement into a fresh pumpkin or pop it into a cute bowl. No need to toss those flowers!
Most real pumpkin vases will last about 5 to 7 days with good care. Faux pumpkins can last all season, so if you want less drama, they’re a great option.
How Do I Stop Water Drips and Stains?
Nothing brings out my cautious side like the thought of water rings on the dining table! Here’s what keeps my house (mostly) drip-free:
- Set the pumpkin on a tray, plate, or platter to catch any leaks.
- Choose smaller pumpkins for arrangements in tricky spots like windowsills.
- Use a liner inside the pumpkin. Any waterproof cup or jar will work. It doesn’t have to fit perfectly, just keep the water contained.
- If you notice condensation or leaking, pour out a little water and wipe up the inside.
For extra peace of mind during a party or on wood furniture, I use pretty placemats or even a bed of fall leaves under the pumpkin vase.
My Kids Want to Help Cut—How Can I Involve Them Safely?
With three boys, safety is my constant worry (and yes, they ask for the sharp stuff every year). Here’s how I keep fingers safe and still let everyone feel included:
- Use kid-safe pumpkin carving tools for opening and scooping. They work great and keep everyone’s hands happy.
- Let little ones scoop seeds, help wipe out the inside, or decide where every flower goes.
- For trimming blooms, give child-safe scissors and pre-cut some flowers for younger kids.
- Assign mini pumpkins to smaller children, so they have their own project and don’t feel left out.
Honestly, the joy for kids is mostly in the messy parts—so I let go of perfection and focus on memories. Even if our arrangements turn out a little wild, they’re always extra special.
Should I Use Floral Foam or a Glass Inside the Pumpkin?
This is an easy one! Both options work, but each has its perks:
- Floral foam: Easy for kids to poke stems, keeps blooms extra stable, and stays moist, which helps flowers last.
- Glass or cup: Simple, reusable, and perfect if you don’t have floral foam on hand. Just remember to change the water often.
If your pumpkin sits in a spot where it might get bumped by little hands (or tails, if you have pets), I prefer floral foam. Everything stays anchored, so there’s less chance of a fall bouquet on your kitchen floor.
How Can I Keep Pumpkins for More Than One Week?

I get asked this a lot by moms who want their fall decor to last all month. If you love the look but would rather not swap pumpkins every week, here are a few shortcuts:
- Use faux pumpkins! They look great, can be re-used, and don’t mind a little rough handling.
- Plan for a quick flower refresh every week. Pull out any sad blooms and tuck in a handful of fresh ones.
- Store arrangements in a cool spot overnight, especially before a big gathering or dinner.
For special occasions, I sometimes “cheat” by prepping an extra pumpkin the night before as a backup. This way, I’m never scrambling for a fresh one last-minute, especially with busy kids in the mix.
What If I Don’t Have the “Right” Flowers?
Don’t stress—almost anything works for floral arrangements in pumpkins! I’ve used yard flowers, grocery store bouquets, and even wild weeds with great results. Some simple tips:
- Mix and match what you have on hand. Bright leaves, herbs, grasses, and branches all look beautiful.
- Choose hardy blooms for longer-lasting color, like mums, sunflowers, zinnias, or marigolds.
- For a little kid flair, let your children pick their own—even clover and dandelions get big smiles in a pumpkin vase.
Sometimes the most beautiful arrangements are the happy accidents. It’s all about the fun and togetherness, not sticking to any “rules.”
Can I Make These Ahead for a Party?
Absolutely! Here’s how I prep my pumpkin arrangements early when I know we’ll have guests:
- Carve and hollow out the pumpkin the night before, then store it (empty) in the fridge in a plastic bag.
- Prep your flowers and keep them in water until you’re ready to arrange.
- The morning of your event, quickly assemble everything. If needed, mist the blooms with a spray bottle for extra freshness.
- For extra-long parties or outdoor events, go for faux blooms. No one will know and you get peace of mind.
With a quick prep like this, you’ll have gorgeous arrangements ready to go before anyone even rings the bell.
Why Does My Arrangement Look Lopsided or Sparse?
I can’t count how many times our pumpkins have come out looking a little “unique.” Here’s what turns things around when your arrangement feels off:
- Start with the biggest blooms in the middle, then fill in with smaller ones and greenery around the edges.
- Check every angle by spinning the pumpkin as you work.
- Tuck in foliage, herbs, or even more flowers if you see empty spots.
- Remember, kid-made arrangements are always full of personality—embrace the chaos!
Half the fun is in experimenting and seeing what looks best in your space. There’s really no wrong way, which is why I love it so much.
Quick Tips Recap for Busy Moms
Because time is always short, here’s a rapid-fire list you can glance at next time you bring home a pumpkin:
- Use floral foam or a glass for less mess and longer-lasting flowers.
- Dry the inside of your pumpkin well.
- Rotate arrangements every so often and fill in gaps for a full look.
- Check water daily—top off or swap out as needed.
- Let kids help, but supervise the sharp tools.
- If things go sideways, laugh and enjoy the memories (and maybe grab a backup pumpkin next grocery run).
Every year, our floral arrangements in pumpkins end up looking different—and honestly, that’s the best part! Embrace the mess, celebrate the wins, and let your family’s personality shine in every fall display.
Conclusion
Styling floral arrangements in pumpkins has quickly become one of my family’s favorite ways to celebrate fall together. It’s simple, joyful, and always brings a pop of color right into our home during the cozy months. These little pumpkin vases create memories my boys and I laugh about for weeks, and it feels extra special knowing we made them ourselves. I hope you give it a try with your own family—no magic skills needed, just a willingness to have fun and maybe get a little messy!
If you have your own tips, tricks, or photos of your beautiful pumpkin arrangements, I’d love to see them! Drop a comment below or tag me so we can inspire other busy moms. Thanks so much for joining me on this autumn adventure. Let’s keep making fall feel warm, bright, and filled with family-made magic!
This post may contain affiliate links. Read the full disclosure here.