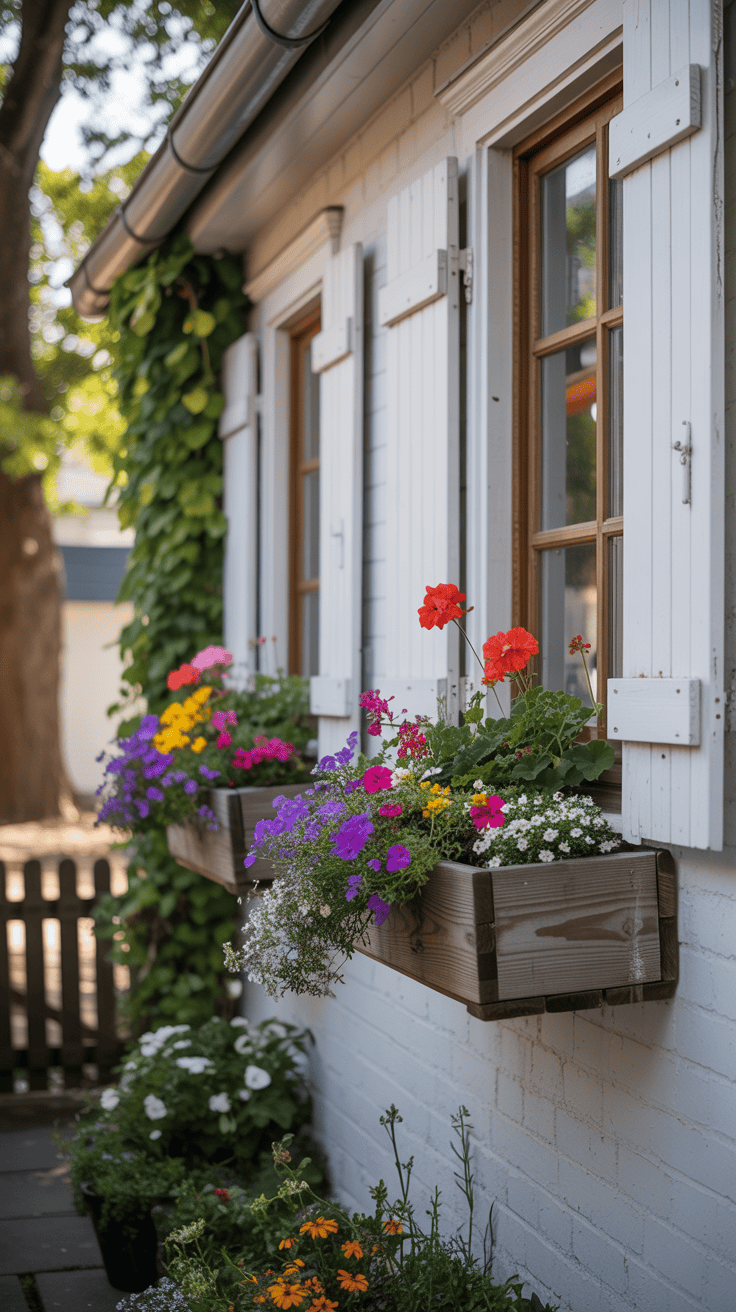
Window Boxes for Flowers That Brighten Your Curb Appeal
Nothing perks up a house like window boxes for flowers. They add instant charm and boost curb appeal, even on a busy week. I love how a simple splash of color makes the whole place feel welcome.
My three boys help water every evening, which is always an adventure. Tiny hands, big smiles, and plenty of splashes. Our neighbors notice the blooms, and they often stop to say how cheerful the house looks!
Here’s what I’ll cover so you can get the same happy look. I’ll show you how to choose the right boxes for your windows and style. We’ll pick plants that thrive in sun or shade, with simple design recipes that anyone can copy. I’ll share easy care routines, from soil and watering to quick trims. It’s simple and fun, and you can start small today!

Why I Love Window Boxes for Instant Curb Appeal

I love how window boxes for flowers add color right where people look first. Bright petals at eye level feel happy and inviting. The best part, they make even a simple house look styled without a big project. My boys notice them from the car and shout out the flower colors every day!
The first-look effect: small boxes, big wow

Flowers at window height pull the eye up, then across, like a picture frame for your home. When the blooms match in color or style, your whole front reads neat and cared for. Symmetry does a lot of work here, and it is easy to get right.
- Matching pairs: One box under each front window gives a tidy, balanced look.
- Simple color story: Pick one bold color and a trailing green for calm, pretty lines.
- One and done: Even a single box over the kitchen sink window pops, inside and out.
Here is a quick before and after you can picture. Before, a plain white ranch with bare windows. After, two black boxes with red geraniums, white alyssum, and ivy. The house looks taller, more finished, and a whole lot friendlier. Even one small box changed the view from the driveway and made the sink window my favorite spot.
Where to place window boxes for a balanced front

Placement is simple if you follow a few easy rules. I use these every time, and they never fail.
- Center under windows: Line the box with the window center for clean symmetry.
- Top just below the sill: Keep the top edge 1 to 2 inches below the sill.
- Match widths to trim: Choose a box the same width as the window trim, or slightly shorter if gutters or shutters crowd the space.
- Repeat for rhythm: If you have two or more front windows, repeat the same size and style across.
Think about views from both sides. From the street, you want tidy lines and strong color. From inside the room, you want blooms that sit high enough to see, but not so high that they block light. I check by standing inside and outside before I hang brackets. A little painter’s tape helps me mark height so I get it right the first time.
Budget and time: a weekend project that pays off

This is a true weekend win. You can keep costs low and still get a big style boost.
Here is a quick price guide I use when planning:
| Item Type | Typical Cost Range | Notes |
|---|---|---|
| Basic plastic or wood | $30 to $80 | Good for starter projects |
| Larger or composite | $100 to $200 | Durable, low maintenance |
| Potting mix and soil | $10 to $25 | Per box, depends on size |
| Plants | $15 to $40 | Per box, seasonal choices vary |
My one-Saturday plan keeps things moving and fun:
- Morning install: Measure, mark centers, mount brackets, hang boxes. I set a level across the top to keep lines straight.
- Afternoon planting: Add liner, fill with soil, mix in slow-release fertilizer, plant tall in back and trailing in front.
- Early evening cleanup: Sweep, water deeply, tuck in any roots, and snap a photo. That photo is the best motivation to keep them looking pretty.
Kid help that actually helps
Kids love being part of projects, and they can do real jobs that matter. I set up a little station on the lawn and keep tasks short.
- Filling liners: Little hands can scoop soil into the liners or the boxes.
- Poking drainage holes: If you use coco liners, kids can poke holes with a dull pencil.
- Adding slow-release fertilizer: Let them sprinkle the right amount, then mix it in gently.
- Watering: Small watering cans are perfect, and toddlers feel like pros.
Safety first, always. I skip ladders when my kids are nearby. I place boxes on the ground to fill, then lift them to the brackets once everyone steps back. It keeps the project calm, quick, and safe for everyone.
Choose the Right Window Box: Materials, Size, and Safe Mounting

Picking the right box is the secret to healthy blooms and a tidy front. I focus on three things, the material, the size, and how it mounts. When those pieces line up, my window boxes for flowers stay pretty and safe, even with three curious boys helping water!
Materials that last: cedar, composite, metal, and vinyl

I want boxes that look good and hold up to sun, rain, and kid splashes. Here is how the common choices compare, with real-life pros and cons from my porch.
| Material | Look and Feel | Pros | Cons | Care Level | Notes |
|---|---|---|---|---|---|
| Cedar | Warm, classic wood | Naturally rot resistant, light | Needs sealing or paint every 1 to 2 years | Medium | Ages to a soft gray if left bare |
| Composite | Smooth, painted wood look | Durable, low maintenance, won’t warp | Heavier, pricier than basic wood | Low | Great for long boxes and busy seasons |
| Powder-coated Metal | Sleek, modern | Strong, thin profile, crisp lines | Can heat up in full sun, watch rust if coating chips | Medium | Line interior to protect the finish |
| Vinyl | Simple, clean | Light, budget friendly, easy to clean | Can fade over time, may flex under weight | Low | Use a rigid liner for support |
A few tricks make any material last longer and look fresh:
- Use a liner: Plastic inserts or coco liners keep soil off the box, slow rot, and make replanting fast.
- Seal edges: If you choose cedar, seal inside edges before the first planting.
- Protect metal: Add a plastic liner so damp soil does not sit against the metal.
- Add drainage plugs: If your box comes without holes, drill a few to prevent soggy roots.
My favorite combo is a composite box with a plastic insert. It looks upscale, drains well, and cleans up fast after each season.
Get the size right so plants thrive

Good sizing keeps plants happy and the watering routine sane. Small boxes dry out fast. Bigger boxes give roots room and hold moisture longer.
- Width: Match the box to the window or trim width. Slightly shorter is fine if shutters or gutters are tight.
- Depth: Aim for 8 to 10 inches.
- Height: Aim for 8 to 10 inches for solid soil volume and stable roots.
Why those numbers matter:
- Root space: More soil means roots can spread, which makes plants sturdier and less fussy.
- Moisture buffer: Extra soil holds water longer, so blooms stay perky on hot days.
- Design flexibility: Deeper boxes fit a mix of thrillers, fillers, and trailers without crowding.
Quick example that works for me:
- A 36-inch wide kitchen window gets a 36-inch box, 9 inches deep and 9 inches tall. I fit three main plants in the back, three fillers in the middle, and a tidy line of trailers in front. Watering stays easy, even in July.
Mounting basics for different walls
A safe mount is everything. Wet soil is heavy, and I have kids running around and tugging on ivy. I follow the manufacturer’s bracket guide, then choose anchors for the wall type. I always test the weight after watering.
Wood or siding with studs:
- Mark the box center and bracket spacing with a level.
- Locate studs with a stud finder.
- Pre-drill and install brackets with exterior screws or lag bolts.
- Hang the box, set the liner, and check for level.
- Fill halfway with soil, water to check stability, then finish planting.
Brick:
- Mark bracket positions and level them.
- Drill holes with a masonry bit, in the mortar joints, not the brick face.
- Insert masonry anchors or sleeves.
- Fasten brackets with masonry screws.
- Test with a partial fill of wet soil before final planting.
Stucco:
- Mark and level bracket positions.
- Drill with a masonry bit, then add specialty stucco anchors rated for the load.
- Seal holes with exterior-grade sealant before setting anchors.
- Secure brackets, hang the box, and test with a wet soil load.
A few extra tips that save stress:
- Use manufacturer brackets: They are designed for the weight and shape of the box.
- Check weight when wet: Soil doubles in weight when soaked. Choose anchors rated for that load.
- Add a safety screw: A small set screw through the bracket into the box keeps it from shifting in wind.
Drainage, liners, and siding protection

Happy blooms start with healthy roots. That means steady drainage, a clean liner system, and a little space between the box and your siding.
- Drainage holes: Make sure the box or liner has several holes. Water should run out in a slow stream after a deep soak.
- Skip gravel: Modern potting mix drains on its own. Gravel creates a perched water layer that can trap moisture and stress roots.
- Smart liners: Coco liners breathe well and look natural. Plastic inserts hold moisture a bit longer and are easy to swap by season. I use plastic in summer, then switch to coco for winter greens.
- Seasonal swaps: Keep a second liner ready with fresh mix for the next season. Lift out, pop in, done.
- Spacers for airflow: Add rubber or composite spacers behind the box. A quarter inch of space keeps air flowing, protects paint, and prevents mildew on siding.
- Splash control: Extend the liner edge slightly inside the box so water runs out the bottom, not back toward the wall.
What I check before I plant:
- Drainage holes are open and smooth.
- Liner fits snug, not tight.
- Spacers are in place, and the box feels solid after a good soak.
With the right material, size, and mount, your boxes will feel like tiny gardens on the wall. Safe, sturdy, and full of color, which is exactly what I want when my boys and I head outside with our watering cans!
Best Plants for Window Boxes in Sun, Shade, and Every Season

I pick plants that match my light and my schedule, then I mix textures and colors like a tiny front yard. It keeps my window boxes for flowers looking full and happy, even when our days feel packed with school pickup and snack time.
Sun lovers that bloom nonstop
If you have south or west windows, go with bold bloomers that love heat. These are my easy winners that keep color coming all summer.
- Petunias: Big blooms, tons of color, and they trail beautifully. Trim lightly every few weeks to keep them dense.
- Calibrachoa (million bells): Smaller flowers, but they never stop. They handle light rain and bounce back fast.
- Geraniums: Classic, tidy, and bright. I tuck them in the back for height, then let trailers spill over the front.
- Verbena: Airy clusters, great for filling gaps. Loves sun and good drainage.
- Lantana: Heat proof and colorful. Hummingbirds visit ours at breakfast time.
- Vinca (periwinkle): Clean, glossy leaves and steady blooms. Tough in dry spells.
Heat makes boxes dry out fast, so I build in a little help:
- Self-watering inserts keep a small water reservoir. My boys can miss a day, and flowers still look fresh.
- Water-holding crystals mixed into the potting soil slow down drying on south-facing windows.
- Morning watering keeps plants hydrated before the sun spikes.
- Light mulch on top, like sphagnum moss, reduces splash and slows evaporation.
- Fertilizer routine: I use a slow-release at planting, then a liquid feed every 2 weeks. Flowers need food to bloom nonstop.
Quick sun combo I love: geraniums in back, calibrachoa in the middle, verbena and trailing petunias in front. It feels lush and bright without fuss.
Shade heroes for north or covered windows

Shade boxes can be stunning. The trick is to let leaves do the heavy lifting, then sprinkle in blooms where they shine.
- Impatiens: Bright color even in low light. I plant them close for a cushy, full look.
- Begonias (wax or tuberous): Glossy leaves that catch light, with soft blooms that last.
- Coleus: All about the foliage. Lime, burgundy, and chocolate tones pop in shade.
- Torenia (wishbone flower): Sweet little blooms that handle humidity.
- Creeping jenny: Chartreuse trailing plant that lights up the edge.
- Ferns: Soft texture and height without crowding. Boston fern fronds look so pretty against brick.
Why foliage matters in shade:
- Color that sticks: Leaves stay vibrant all season, even when flowers pause.
- Texture drama: Ruffled coleus next to smooth begonias adds depth.
- Light play: Glossy and lime leaves brighten dark corners like little mirrors.
Favorite shade recipe: a tall fern or upright begonia in back, a mix of coleus and impatiens in the middle, then creeping jenny spilling over the front. It looks calm and layered, like a mini woodland garden.
Simple seasonal swaps that stretch your budget
I treat my boxes like a tiny stage and swap by season. I reuse the same box and brackets, then pop in fresh liners and a quick soil refresh. It saves time and money.
Here is the yearly flow that works for me:
| Season | Plant Picks | Quick Tip |
|---|---|---|
| Early spring | Pansies, violas, mini daffodils, tulips | Tuck bulbs deep, then hide gaps with moss |
| Summer | Petunias, geraniums, calibrachoa, verbena | Add slow-release feed at planting |
| Fall | Mums, ornamental kale, pansies | Mix sizes for layers, keep colors tight |
| Winter | Evergreens, pine cones, red twig cuttings | Add ribbon and lights for cozy sparkle |
How I make swaps simple:
- Keep two liners: One planted, one prepped. I swap in minutes while the kids ride bikes.
- Refresh soil by thirds: Remove one third, add fresh mix and compost, then replant. It keeps roots happy without waste.
- Stick to a color story: Pick 2 to 3 colors per season so the front stays calm and pulled together.
Budget tip I love: save fall ribbon and pine cones in a labeled bag. I reuse them with fresh greens every winter, which makes decorating fast and fun.
Kid safe and pollinator friendly picks

With three curious boys and a dog that loves to sample, I stay mindful about what I plant. I aim for blooms that are safe for little hands and also kind to bees and butterflies.
Non-toxic favorites that still bring color:
- Snapdragons
- Pansies
- Zinnias
- Herbs like basil and thyme for texture and scent
Pollinator magnets that behave well in boxes:
- Lavender (needs sun and good drainage)
- Salvia (spikes that bees adore)
- Zinnias (single and semi-double are best for pollinators)
- Alyssum (sweet scent and tiny nectar-rich blooms)
Smart safety steps I follow:
- Check plant lists before buying if your kids or pets nibble.
- Skip known toxic plants when little ones explore with their mouths. Oleander, foxglove, and certain bulbs are not worth the risk. Lantana can be toxic if eaten, so I avoid it near play zones.
- Teach a simple rule: look, sniff, do not taste. It sticks by preschool age.
A sweet box that checks all the boxes: lavender in back, snapdragons and zinnias in the middle, and a trim of alyssum and thyme in front. It smells amazing, bees visit all day, and I do not worry when tiny hands reach in to help water.
Easy Design Recipes and Color Combos That Wow

I like simple rules that work every time, especially with three boys racing around the yard. If you want fast style, mix height, color, and spill. That balance makes window boxes for flowers look lush, even when you are short on time. Let’s build a few foolproof combos you can copy today!
Use the thriller, filler, spiller formula
This is my go-to layout. It never fails, and it looks full from the street and the sink.
- Thriller: The tall star in the back. I grab a compact upright grass, like blue fescue, or a tidy salvia for spikes and bees.
- Filler: The middle crowd that ties everything together. Petunias bloom hard in sun, and begonias shine in part shade.
- Spiller: The trailing edge that softens the front. Sweet potato vine gives big leaves, and ivy adds classic lines.
Plant from back to front for easy depth:
- Set the thrillers against the back edge, root balls touching but not packed. I use two or three, spaced evenly.
- Tuck fillers in the middle, shoulder to shoulder. Leave a little room for growth.
- Finish with spillers along the front lip, tipping the roots forward so they trail early.
- Water deeply, then pinch a few tips to encourage a fuller shape in two weeks.
A few tiny tweaks make a big difference:
- Keep heights stepped: tallest in back, medium in the center, trailing in front.
- Repeat colors: use the same bloom shade in thriller and filler to pull it together.
- Mind light: salvia and petunias love sun; begonias and ivy stay happier in part shade.
Color palettes that match your siding and trim

Picking colors that play nice with your house is half the magic. Here are three stress-free palettes I use again and again.
| Home Style | Palette Focus | Example Plants that Fit Well |
|---|---|---|
| White siding, navy door | Pinks and purples | Petunias in pink, salvia in deep purple, blue lobelia, ivy |
| Brick front | White and chartreuse | White geraniums, sweet alyssum, creeping jenny, dusty miller |
| Gray or blue siding | Warm coral and yellow | Coral calibrachoa, yellow lantana, golden marigolds, variegated ivy |
Tips I swear by:
- Repeat your door color in one plant, even a tiny bloom.
- Use chartreuse as a bridge. It brightens brick and calms bold blooms.
- Keep it to three colors. Two bloom shades and one green reads clean and polished.
Example that always looks tidy: on a white house with a navy door, I plant purple salvia in back, pink petunias in the middle, and a thin line of blue lobelia up front. Ivy trails a little for softness. It feels crisp and happy.
Copy these window box recipes
These recipes fit a 30 to 36 inch box. I listed plant counts that stay full without crowding. Adjust by one plant if your box is on the long or short side.
| Recipe Name | Plants and Counts | Light | Quick Note |
|---|---|---|---|
| Coastal Fresh | 3 white petunias, 2 blue lobelia, 2 silver dusty miller | Full sun | Cool tones, airy edges, steady summer color |
| Warm Welcome | 3 red geraniums, 2 white sweet alyssum, 2 lime sweet potato vine | Sun to part sun | Cheerful contrast, loads of curb appeal |
| Shade Glow | 3 wax begonias (pink or white), 2 dwarf coleus, 2 creeping jenny | Part shade | Leaf glow, soft blooms, easy care |
Planting pattern that keeps the balance:
- Back row, set 2 or 3 of the tallest plants, spaced evenly.
- Middle row, nest the fillers between the gaps.
- Front edge, angle the trailers toward the sidewalk for a quick spill.
Care boosters I use:
- Slow-release fertilizer at planting, then a light liquid feed every two weeks.
- Pinch once after week two to thicken growth.
- Water in the morning so roots drink before the heat.
Herbs and edible blooms my family loves
I like to keep one edible box by the kitchen window. The boys think picking leaves is a secret mission, which makes dinner more fun.
- Simple herb mix: basil, flat-leaf parsley, and mint. Line the box, add fresh potting mix, and space plants with breathing room. Mint can take over, so I tuck it in its nursery pot before setting it in the soil.
- Edible flowers: nasturtiums for peppery petals and violas for sweet little faces. Both bloom fast and look pretty on salads.
- Sun and water: morning sun is perfect. Water at soil level to keep leaves clean.
- Clean growing: keep edibles in fresh potting mix every season, and skip harsh chemicals. I use organic fertilizer and hand-pick any pests.
Quick layout:
- Back, basil plants for gentle height.
- Middle, parsley and violas for a soft cushion.
- Front, mint on one side and a trailing nasturtium on the other for a playful spill.
The best part, the kids snack while I cook. Fresh basil on pizza night is always a win!
Care Made Simple: Watering, Feeding, and Year-Round Maintenance
I keep care easy so I can enjoy the color while juggling snacks and soccer cleats. My window boxes for flowers stay healthy with a simple routine I can stick to, even on busy weeks. Think small habits, quick checks, and a few smart tools that save time. Let’s make care feel calm, not cluttered!
Watering that fits a busy schedule
Every house runs on a different rhythm, so I match the watering plan to my day. Three options work well, and each one keeps blooms happy without a lot of fuss.
| Watering Option | How It Works | Best For | My Take |
|---|---|---|---|
| Self-watering insert | Hidden reservoir feeds roots from below | Busy mornings, hot sun, vacation weeks | Reliable, kids can help fill the spout |
| Drip line on a timer | Tiny tubing with emitters on a set timer | Consistent care without thinking | Set it and forget it, check weekly |
| Morning hand watering | Watering can or hose at soil level | Small setups, shade boxes | Peaceful routine, good bonding time |
Quick test for dryness, perfect for kids:
- Stick your finger 1 inch into the soil.
- If it feels dry, water. If it feels cool or damp, wait a day.
Simple schedule that works:
- Hot weeks (high 80s or more, lots of sun): water daily, or every other day with a self-watering insert. Soak until water runs from the drainage holes.
- Mild weeks (60s to 70s, part sun): water every 2 to 3 days. Always adjust after rain or strong wind.
- Vacation backup: fill self-watering reservoirs, mulch the top with moss, and set a timer to run 10 to 15 minutes, 3 times per week.
Watering tips I swear by:
- Morning wins. Plants drink before the heat, and leaves dry fast.
- Aim at the soil, not the leaves. Fewer disease issues, cleaner petals.
- Lift the liner edge to peek at water flow. You want a steady trickle from the bottom.
Potting mix and fertilizer for steady blooms
Bloom power comes from fresh mix and steady food. I keep it simple so I do not overthink it.
- Use a lightweight potting mix, not garden soil. Potting mix drains well and keeps roots happy.
- Skip compost-heavy blends in tiny boxes. Too much holds water and can make soil heavy.
- At planting: mix in a slow-release fertilizer according to the label. This gives a gentle base feed.
Summer feeding routine:
- Start with slow-release at planting.
- Add a liquid feed every 2 to 3 weeks from late spring through August. I use a balanced or bloom-boost formula, mixed at the mild rate.
- Pause feeding if plants are stressed from heat or drought. Water well first, feed the next day.
Prevent salt buildup with a monthly flush:
- Water until it runs out, rest 10 minutes, then water again to push salts through.
- Do this the day before you plan to liquid feed.
Simple soil refresh plan:
- Midseason, pull out a few tired roots and add one scoop of fresh mix to each gap.
- Top off low spots after heavy rain to keep roots covered.
Kid friendly pest and disease fixes
I reach for safe tools first, then keep airflow and watering in check. My boys help patrol the boxes like tiny garden detectives!
- Hand picking: Drop caterpillars or beetles into a cup of soapy water. It is quick and oddly satisfying.
- Strong water spray: Blast aphids and mites off leaves in the morning with a hose nozzle. Repeat every couple of days until numbers drop.
- Insecticidal soap: Good for soft-bodied pests like aphids and whiteflies. Spray leaf tops and bottoms. Do it on a cloudy day or evening to prevent leaf spot.
- Neem oil: Helps with aphids and mildew. Apply lightly, repeat as the label suggests, and avoid spraying flowers to protect bees.
Airflow and moisture habits that prevent problems:
- Do not crowd. Leave small gaps at planting so air can move.
- Water at the soil line. Wet leaves invite mildew.
- Pinch dense growth every few weeks. Light pruning keeps air moving and blooms coming.
- Clean up spent blooms. Dropped petals can hold moisture and invite gnats.
When I skip chemicals:
- During heavy bloom and peak bee hours. I stick to water sprays and hand picking first.
Fall cleanup and winter refresh
When summer plants tire out, I switch the stage fast so the front still looks cared for.
- Pull tired annuals in early fall. Shake off extra soil back into the box.
- Refresh the top third of the mix. Add fresh potting mix and a small dose of slow-release if you plan to add fall plants.
- Plant fall stars like mums, ornamental kale, and pansies. Keep colors tight for a neat look.
Winter style I love:
- Evergreen clippings tucked into the soil, plus pine cones, twigs, and a ribbon. It looks fresh and costs almost nothing.
- Add a few red twig dogwood stems or dried hydrangeas for height. Kids can help place pine cones and pretend they are tiny trees!
Care tips that stretch the life of your boxes:
- Store removable liners in a dry spot for winter. I stack mine in the garage so they do not crack.
- If boxes are removable, take them down and store out of the weather. Less freeze and thaw means longer life.
- Check brackets in late winter. Tighten screws, clean debris, and make sure nothing shifted.
Spring reset plan, quick and tidy:
- Empty leftover winter greens.
- Wash liners with mild soapy water, then rinse.
- Fill with fresh potting mix, add slow-release fertilizer, and plant your new show.
With a steady rhythm for water, food, and seasonal swaps, your boxes will look bright without stealing your afternoon. Simple care, pretty payoff. My boys love helping, and I love how easy it stays!


Conclusion
Here is the quick path I use for instant curb appeal with window boxes for flowers. Pick the right box for your wall and weather, choose plants that match your light, use a simple thriller, filler, spiller recipe, and follow a quick care routine for water and feed. Keep colors tight, repeat shapes, and let a little spill soften the edges. Small habits, big payoff.
If you feel busy, start with one box this weekend. Set your brackets, pop in fresh mix, plant for your light, then water well. Keep a slow-release feed in the soil, pinch here and there, and check moisture with a finger test. You will smile every time you pull into the driveway.
I would love to see what you create. Snap a photo and share it with neighbors or friends!
This post may contain affiliate links. Read the full disclosure here.