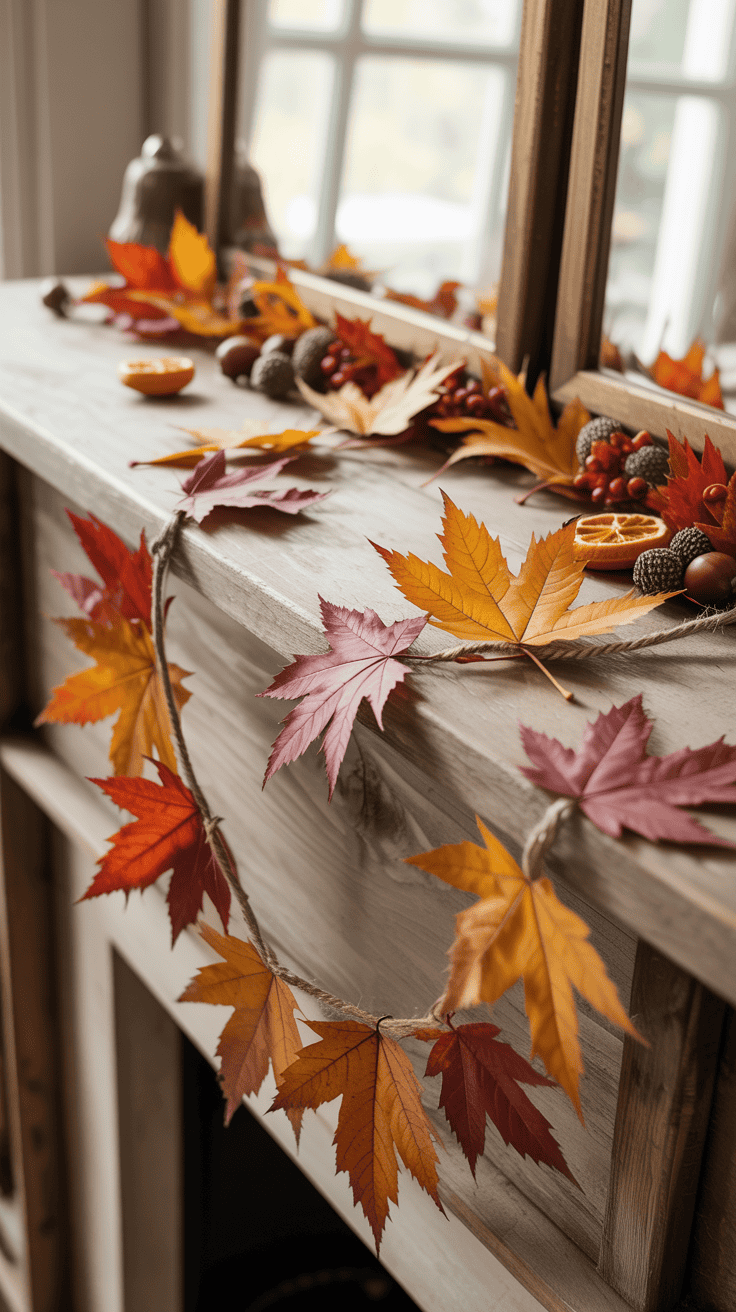
How To Make A DIY Fall Leaf Garland In Under 30 Minutes
If your house is anything like mine, the moment the air turns crisp, my three boys are on a mission to bring the outdoors in. I can’t count how many fistfuls of crunchy leaves they’ve handed me this week alone! That’s why I love making a diy fall leaf garland with them—it’s a simple, joyful way to dress up your home for autumn without fuss or mess.
For busy moms, quick and easy projects are a must. This garland comes together in under half an hour, which is hard to believe but absolutely true. It’s budget-friendly and kid-approved, and best of all, it’s something your kids will actually want to help make (and hang up with pride)!

Gathering Your Supplies: What You’ll Need for a DIY Fall Leaf Garland

Before you start threading that perfect strand of autumn color, you’ll want to have everything close at hand. I always set up at the kitchen table and let my boys scoop up their favorite leaves first. We keep it simple, but the right supplies make a big difference! Here’s everything you’ll need for your diy fall leaf garland so you can jump in and have fun right away.
Fall Leaves: Real or Faux
First things first, gather your leaves! This is definitely the most fun step for little hands.
- Real Leaves: If you’re like us and love a walk to the park, bring grocery bags. Pick leaves that aren’t too brittle or wet. Go for a mix of colors, shapes, and sizes—mismatched is best!
- Faux Leaves: Not in the mood for another trip outside? No judgment. You’ll find pretty fabric or paper leaves at craft stores or online. No crumbling, no drying, and they’re reusable year after year.
I usually mix both for extra texture. My boys have strong opinions about which oak leaf is “the coolest,” and that’s half the fun!
String or Twine
You’ll need something sturdy to string your garland. Here are my favorites:
- Baker’s twine (colorful and cute)
- Jute or hemp twine (classic, holds up well)
- Cotton yarn (soft, comes in bright colors)
- Fishing line (practically disappears for a floating look)
If you’re using real leaves, pick something thick enough to handle a little weight.
Clips or Glue
Decide how you want to secure the leaves. There’s no single “right” way, so do what works for your family.
- Mini clothespins: My kids love clipping these on. They’re mess-free and let you swap leaves around.
- Clear tape: Quick and easy, great for faux leaves. I sneak on a bit if a leaf refuses to stay in place.
- Hot glue gun: For grown-ups only! It’s strong but gets hot, so I use it if I want the garland to last a whole season.
- Needle and thread: Older kids or detail-loving mamas might enjoy sewing leaves directly onto the string. Not my usual with little ones, but it’s a pretty look.
Scissors
Have scissors on hand for trimming string, yarn, or leaves that are a little rough around the edges. I always keep a blunt pair nearby because somehow, someone is always snipping the wrong end!
Optional Add-Ons
This is where you make your garland your own. I lay out a tray of extras, and my boys turn into mini decorators.
- Pinecones
- Acorns
- Cinnamon sticks
- Mini felt pumpkins
- Wooden beads
You don’t need them, but they’re a fun way to add even more fall flair.
A Flat Workspace
Set up an area with enough room for everyone. I lay down an old tablecloth for easy cleanup. Trust me, even with “no-mess” projects, little bits of leaf sneak everywhere!
Once everything is gathered, you’re ready for the best part: making your fall garland. With everything at your fingertips, you won’t have to pause to dig through drawers or head back outside.
Step-By-Step: How To Make a DIY Fall Leaf Garland in Under 30 Minutes
Making a diy fall leaf garland with my kids always feels joyful, a little messy, and completely worth it. It sounds simple, but a few smart tricks can save so much time. We like to get the leaves ready and dive straight into stringing, all in under half an hour. Let’s turn a pile of crunchy leaves into a beautiful garland, quick enough for even the busiest moms.
Prepping the Leaves: Cleaning, Pressing, or Styling
Prepping your leaves is the real secret to a lovely garland. Whether you’ve raided the yard, found a stash at the park, or opened a fresh pack from the craft store, a little prep makes assembly speedy and stress-free.
If you picked fresh leaves outside, shake off any dirt or bugs first. Kids love this step, and somehow it always turns into a giggle fest. Spread leaves on a towel and pat them dry if they’re damp. If you want leaves to stay soft and keep their shape, press them for a few minutes between paper towels under a heavy book. You don’t have to wait hours—ten minutes is enough for most leaves to flatten out a bit.
For a true speed hack, zap leaves in the microwave between two paper towels for 10-20 seconds. This trick firms up leaves just enough so they won’t fall apart when you string them. My boys think it’s like a leaf “spa day”!
If you’re using artificial leaves, you’re already ahead of the game. Run your fingers over each leaf to fluff out any bent spots. Sometimes the edges stick together, so a few gentle tugs bring them back to life. If you have fabric leaves, smooth out any creases. Dusty? Shake them in a bag for a quick clean.
Ways kids can help:
- Shaking out leaves outside.
- Sorting leaves by size or color.
- Patting leaves dry or laying them flat.
- Fluffing up faux leaves.
Tip: Put leaves in a shallow basket or tray so little hands don’t scatter them all over the table—or the floor!
Stringing the Garland: Assembly Tips
Now the real fun starts! Stringing your fall leaves brings the whole project together. I let my boys do most of it, and there’s something special about letting their small fingers decide where each leaf goes. Here’s how we make the magic happen:
How to attach leaves:
- If you’re using mini clothespins, simply clip each leaf onto the string. This method is fast and lets kids move leaves around as many times as they want.
- For tape lovers, put a roll of clear tape on the table and show your kids how to stick each leaf in place. Quick, mess-free, and easy for any age.
- If you want a sturdy garland to use year after year, a hot glue gun is best. Grown-ups should handle this step. Dab glue on the leaf stem, then press to the string.
- Older kids enjoy using a large, blunt needle to thread leaves right through the center vein. This looks so pretty, almost like a floating line of color.
Spacing and style ideas:
- Clustered: Bunch leaves close together for a fuller look.
- Spread out: Leave space (an inch or two) between each leaf for a lighter, breezier feel.
- Patterned: Alternate colors or shapes for a rainbow effect.
- Freeform: Let your kids decide the order. Messy, mixed-up garlands are always the most charming!
If you want extra fun, add in pinecones, beads, or bits of ribbon in between leaves. My boys love stringing wooden beads every few leaves—it adds color and keeps the garland from feeling too “grown up.”
Safe ways for kids to help:
- Handing you leaves in their favorite order.
- Clipping or taping leaves with adult supervision.
- Spacing leaves out on the table first, then helping string them.
- Threading leaves onto yarn with a blunt tapestry needle (great for hand-eye coordination).
Customization takes this project to the next level. Have the kids write their names, little thankful notes, or even jokes on plain leaves with a marker before adding to the string. It turns your diy fall leaf garland into a sweet family keepsake you’ll want to pull out every year.
With a bit of prep and teamwork, your fall leaf garland will be ready before the timer dings and little hands lose interest. This is one project where “done is better than perfect”—and the memories last much longer than the leaves.
Creative Variations: Make It Your Own

The fun part about making a diy fall leaf garland is that it’s completely customizable. I love watching my boys put their own twist on every project, and this one is a blank canvas for creativity! You don’t have to stick to the plan, and honestly, the most memorable garlands are the ones that show off your family’s personality. Whether you’re in a bold mood or want a classic, cozy look, there’s a way to make it all yours.
Mix and Match Colors and Textures
You know what makes a diy fall leaf garland pop? Playing with different colors and textures! I let each of my boys gather leaves they think are “the coolest.” Some years, we have wild orange and deep reds, other times it’s all about browns and golds with a soft, woodsy look. Here’s how we like to make things extra special:
- Use a mix of real and faux leaves for plenty of texture.
- Add in green leaves for late-fall vibes or keep it to warm tones for a cozy, classic feel.
- If you buy faux leaves, choose some with glitter or velvet details for a little sparkle.
- Mix in shiny acorns, mini pinecones, or wooden beads to break up the color and give it a charming, homemade look.
When colors and textures are mixed up, the garland feels alive—like a memory book of all your autumn walks and cozy afternoons.
Add Personal Touches
A diy fall leaf garland is extra special with little details from your family. My boys love grabbing permanent markers and writing thank you notes or jokes on the plain leaves. Some of our garlands have goofy faces, names, or even simple handprints!
Try one or more of these ideas:
- Add names or messages: Let each family member write something to be thankful for on a leaf.
- Include photos: Use mini clothespins to attach small family pictures between the leaves.
- Hang keepsakes: Tuck in drawings, tiny artwork, or any small mementos from the season.
- Seasonal smells: Thread in cinnamon sticks or dry orange slices for a garland that smells as good as it looks.
The personal moments become a keepsake—every glance at the garland is a reminder of shared laughter and creativity.
Play with Shapes and Patterns
Kids are always full of ideas. Sometimes, mine want all the maple leaves in one spot, then a cluster of little oaks, then a giant golden leaf right in the center. Getting playful with patterns can turn a simple strand of leaves into something eye-catching.
If you want to try this, here are some simple pattern ideas:
- Alternate big and small leaves: This makes the garland look playful and full.
- Space out bright colors: Place the brightest leaves every few inches for a pop of color.
- Add clusters: Put two or three leaves together, then leave more space, for a whimsical touch.
- Mix in naturals: Drop in acorns, pinecones, or little felt balls every fourth or fifth spot.
Rearrange as much as you like! Use mini clothespins or tape so kids can keep tweaking.
Swap in Different Materials
Sometimes, we run out of leaves (or someone forgets them in the stroller). No big deal! There are plenty of quick swaps to keep the project moving and add something unexpected.
Some of our favorite last-minute swaps include:
- Paper leaves: Trace and cut out leaves from colored construction paper.
- Felt shapes: Use precut felt leaves or cut your own for a softer garland.
- Doilies: Dye paper doilies in tea or coffee and cut them into leaf shapes for a vintage look.
- Ribbons or bows: Tie little bits of ribbon in fall colors in between the leaves for extra detail.
If you’re running low, never stress—just get creative with what you have on hand!
Let the Kids Lead
Now, here’s the true magic: let your kids take the lead. When I step back and hand over the clippers or tape, it becomes their show. The garland may not be symmetrical or “picture perfect,” but it shines with personality. My boys are always so proud to say, “Look what we made!”
- Give each child their own section of the garland to decorate.
- Set out bowls with different decorations and let everyone pick their favorites.
- Hang the finished garland somewhere visible so your little designers see their work every day.
Letting go of perfect brings out the best stories and the sweetest, most joyful results.
Change Up the Display
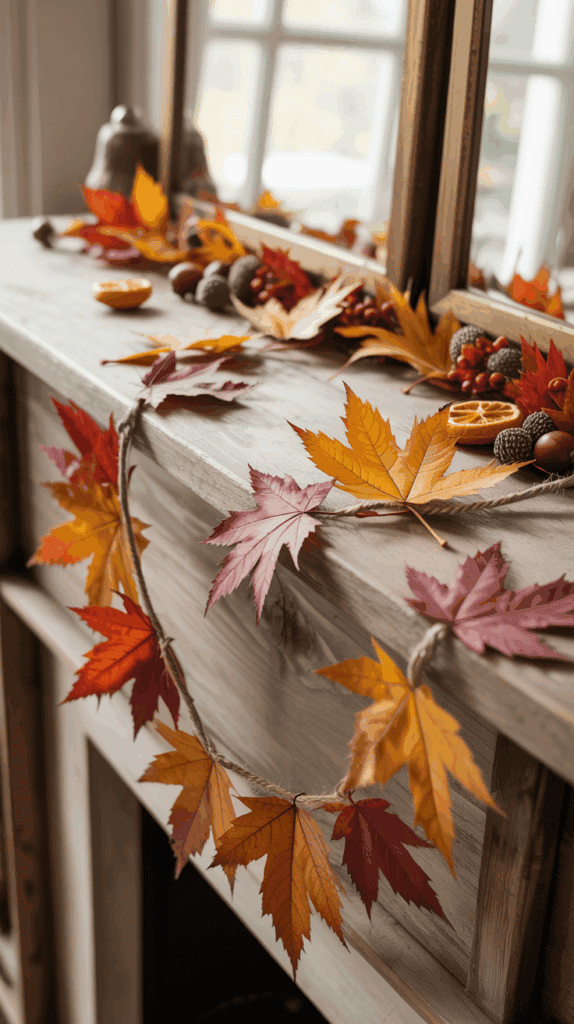
You don’t have to limit your diy fall leaf garland to the mantel or doorway. I love finding new ways to show it off. Sometimes we hang it across the front window, drape it along the stair railing, or even run it down the middle of the dining table with little pumpkins tucked in.
Here are a few of my favorite spots:
- Above doorways or windows
- On the fireplace mantel
- Along the staircase banister
- Over the headboard in the kids’ room
- Around a large mirror
Every year, the spot we choose changes, but the excitement never does. The garland finds a new home and brings instant color and warmth wherever we decide.
Making your diy fall leaf garland your own is where the real magic happens. There’s no right or wrong, only what feels right for your family. So grab those leaves, dig out the markers and extras, and make it an afternoon everyone will remember!
Displaying Your DIY Fall Leaf Garland: Family-Friendly Decor Tips

Once your diy fall leaf garland is finished, it’s time to show it off! Hanging up something you made with your kids gives your whole home a cozy, playful feeling that everyone can enjoy. You picked every leaf and clipped every acorn, and now your homemade masterpiece deserves a spot where everyone can see it. I love finding fun, safe ways to make our garland the centerpiece of our autumn decorating. With three boys running around, the display has to work for busy families and tiny hands alike!
Safe and Simple Hanging Ideas
I always think about kid safety first when putting up anything new, especially colorful things that are sure to grab attention! You want your diy fall leaf garland to last all season, no matter how much excitement is happening at home. Here are my top ways to hang a garland without worry:
- Use Command hooks or sticky tabs: These peel right off when the season’s over and don’t damage your walls or paint. I slide the ends of the garland onto each hook and adjust the swag until it’s just right.
- Tie or tape at both ends: If you’re hanging the garland along a window frame or banister, use painter’s tape or string. It’s fast, holds up, and removes cleanly—no headache later.
- Drape over existing nails or curtain rods: No tools needed! Sometimes I just hook the garland over the rods above our windows or tuck it into a few nails that are already in place.
For families with small kids or wild pets, keep the garland high enough so it won’t get grabbed or pulled down. Over the window, above doorways, or along the top edge of a bookshelf has worked best for us.
Kid-Friendly Display Spots
Once the technical stuff is sorted, the real question is where to put your garland for the most joy. My boys always get a say, and sometimes that means the garland moves around the house a few times! I like to keep the display interactive but not in the way of busy feet or snack time.
Here are spots in our house that have become fall favorites:
- Across the mantle: The mantle is a classic, and it frames all those rich colors beautifully. We tuck a few pumpkins and family photos underneath for a cozy look.
- Over bedroom headboards: Each of my boys loves having their own “mini garland” above the bed. It adds magic to bedtime.
- On the banister or stair rail: If you have stairs, drape the garland along the railing for a big, bold welcome.
- Around windows: Framing a big front window brings those colors to life, especially when sunlight hits the leaves.
- Above doorways: A garland above the playroom or kitchen door makes every entrance feel special.
Making Your Garland Fun for Kids
Every mom wants decor that feels warm, not stuffy. I always try to set up the garland so the kids can touch it or add new leaves as the season goes on. When they see their work front and center, they feel proud and connected.
Some easy ways to make your diy fall leaf garland truly family-friendly:
- Hang it at kid eye-level: In playrooms or bedrooms, keep it low enough for little ones to look at leaves, count beads, or touch the textures.
- Add clips or pins for “featured leaves”: Keep a bowl of extra leaves, and let your kids switch them out throughout the fall. It’s like giving your garland a wardrobe change!
- Invite kids to help decorate the area around it: Let them gather pinecones, use toy animals, or draw new decorations to place below or beside the garland.
This little tradition is always a big hit in our house—every time someone brings home a new find, we talk about which part of the garland it should join!
Creating a Seasonal Centerpiece
Not all garlands need to hang overhead! Sometimes I drape ours along the middle of the dining table. It sets the stage for family dinners, snack time, and even homework. If you want to use your diy fall leaf garland as a centerpiece:
- Lay it gently down the center of the table.
- Tuck in small pumpkins, apples, or jars filled with acorns.
- Sprinkle a few tea lights or string lights nearby for a soft glow in the evenings.
This setup feels festive, and my boys love pointing out their favorite leaves at every meal.
Display Maintenance with Kids in Mind
Life with kids is never static. Hands tug, chairs get pushed, and sometimes a garland needs a quick adjustment. I keep extra tape, a few spare clothespins, and replacement leaves handy for any mid-season fixes.
Simple tips to keep your display kid-proof:
- Check the ends regularly: Give them a quick tug to see if they’re still secure.
- Tighten up sagging spots: Just move a pin or snug up some tape. Three minutes, tops!
- Keep some leaves stashed: If one falls off, I swap in a new one without fuss.
The best part about a diy fall leaf garland is how forgiving it is. If something looks off, just move it! It’s a low-pressure way to let your family’s creativity shine, and everyone gets to help keep it looking its best.
Your home is now bursting with fall color, and every glance at your garland will remind you of those happy, messy moments you shared making it together!
Quick Cleanup & Storage Solutions for Busy Moms

Trying to keep my house tidy while crafting with three wild boys feels like a juggling act most days. When you’re making a diy fall leaf garland, the last thing you want is to spend more time chasing fallen leaves and string tangles than actually enjoying the project! Luckily, there are some smart cleanup and storage tricks that save time and sanity, letting you focus on the fun part and still keep your kitchen or playroom from turning into a leaf disaster zone.
Easy Cleanup Tips to Tame the Mess
Crafting with kids almost guarantees a sprinkle of chaos, but it doesn’t have to mean hours of cleaning afterward. Here’s what I do to keep mess under control while making a diy fall leaf garland:
- Lay down a washable mat or old tablecloth before you start. This catches all the crumbles and bits, so cleanup is a simple fold-and-shake outside. Trust me, it’s a total game saver!
- Use shallow trays or baskets for leaves and supplies. This keeps everything in one place and stops my boys from flinging tiny leaves across the room.
- Keep a damp cloth or baby wipes close by for quick finger and table wipe-downs. Quick swipes every 10 minutes keep sticky spots from building up.
- Encourage the kids to help by turning cleanup into a mini game. We race to see who can gather the most stray leaves or string pieces. This way, they feel involved and it speeds things up.
Even with three boys, these small habits mean we spend way less time tidying, and can jump into the next fun activity faster.
Smart Storage Ideas for Your DIY Fall Leaf Garland Supplies
I like to keep all my garland-making supplies ready for action whenever the mood strikes, without them taking over the house. Here’s how I organize my stash so it’s easy to grab and put away:
- Clear plastic bins or craft boxes with labeled compartments hold everything from faux leaves to mini clothespins. I can see what’s inside and the lids keep dust out.
- Repurpose a tackle box or cookie tin for smaller items like beads, clips, and needles. It’s compact and fits right on top of my craft cabinet.
- Wrap twine or yarn around empty paper towel tubes and store them upright in a jar or drawer to stop tangles.
- Keep scissors and glue guns tethered or in a dedicated craft pouch so they don’t wander off and get lost.
- Store leftover natural leaves between sheets of wax paper in a flat envelope to protect them and keep that “freshly picked” feel for next time.
Having everything organized means craft time can start without searching for that elusive pair of scissors or spooling out string. Plus, clean-up becomes just as smooth—you stash everything back, and it stays ready for the next project or seasonal decorating day.
Quick Hacks to Keep the Kids on Track and the House in One Piece
The best part about making a diy fall leaf garland is watching my boys get creative, but I also want the space to stay kid-friendly and safe. Here’s what works for us:
- Set clear boundaries for workspace—I usually say, “Leaves stay on the table, not on the floor,” and it helps curb the leaf explosion.
- Use kid-sized aprons or old t-shirts to keep clothes clean. No one likes fall leaf glue on their favorite shirt!
- Keep materials within arm’s reach but out of high-traffic zones to avoid tripping or accidental spills.
- Set a timer for active craft time—30 minutes is perfect for focused fun and ensures everyone knows when cleanup starts.
These simple rules turn a potential leaf tornado into a charming, controlled chaos. Plus, the kids learn habits that make crafting with mom smoother next time around.
With these quick cleanup and storage solutions, you can keep your focus on making a beautiful diy fall leaf garland with your family, not chasing fallen bits around the house. It’s all about easy routines that make decorating fun, stress-free, and fast enough for busy moms like us!
Conclusion
Making a DIY fall leaf garland in under 30 minutes is such a rewarding way to welcome the season with your family. It’s simple, fun, and fits right into even the busiest of days, especially when you have little helpers eager to join in. Watching my boys pick out their favorite leaves and help string them together always fills our home with laughter and warmth.
I hope you feel inspired to gather your own pile of colorful leaves and create a garland that’s as unique as your family. When you take time to make something together, it turns ordinary moments into lasting memories.
I’d love to see your diy fall leaf garland creations—please share your photos or stories so we can celebrate your autumn vibes! Let’s keep this fun tradition going, one colorful leaf at a time.
This post may contain affiliate links. Read the full disclosure here.