Halloween Front Garden Ideas to Set the Mood
Halloween makes my front garden the most festive place on the block! As a mom of three wild, sweet boys, I always look for halloween front garden ideas that let us play, create, and make memories right at home. Our whole crew gets involved, from picking fun decorations to chasing each other around while we set the scene!
If you want simple, hands-on ways to make your front yard wow the neighborhood and give the perfect trick-or-treat welcome, you’re in the right spot!
This Halloween garden stake set (that my three young boys LOVE) adds just the right amount of spooky charm to any yard!!
I’ll share my favorite ways to set the mood with easy setups, goofy props, and plenty of kid-approved fun. No need to spend a fortune or stress about perfection here. Let’s turn your garden into a place where every little monster can smile, explore, and feel the magic of Halloween!

Welcoming Entryways: First Impressions Count


If you ask my boys, the front porch is where the Halloween magic kicks off! It sets the tone for every neighbor, friend, and trick-or-treater who steps up for goodies or just stops to admire our handiwork. I’m all about easy halloween front garden ideas that kids can join in on, and the entryway is perfect for that. With some playful touches, a bit of paint, and hands-on fun, I turn our porch into an experience you can see, feel, and giggle about before you even ring the bell.
DIY Halloween Wreaths for Your Door


My boys love helping with the wreath for our front door. We never buy the fancy ones. Instead, we whip up a new one each year with supplies from the local craft store. The messier, the better!
Easy wreath supplies we use:
- Plain grapevine wreaths
- Spools of black, orange, or purple ribbon
- Sheets of felt in Halloween colors
- Mini craft pumpkins or gourds
- Googly eyes
- Glue dots or hot glue (with my help, of course!)
Steps are so easy even the littlest hands can help:
- Wrap ribbon around the wreath and tie big bows.
- Cut felt into simple shapes (think bats, ghosts, silly monsters) and glue them on.
- Stick on googly eyes for instant personality.
- Tuck in a few mini pumpkins or leaves for texture.
The best part? No two wreaths look the same, and each one shows off your family’s style. Last year, my youngest made a green “Frankenstein” face that got more comments than anything else did!
Doormats and Welcome Signs with Personality


A plain door mat is fine, but custom ones? That’s where the fun starts! Painting doormats or making quirky signs with my boys is now a tradition. We choose themes based on our favorite movies or silly family sayings.
Here are a few quick ways we jazz up the entry:
- Painted Doormats: Grab a coir mat, painter’s tape, and black or orange outdoor paint. We stencil messages like “Wipe Your Paws, Little Monsters” or “Creep It Real!”
- Wooden Welcome Signs: Use scrap wood, a bit of dark paint, and simple white markers. Let the kids draw ghosts or witches, then add something special like: “The Johnsons’ House of Tricks (and Treats!)”
- Door hangers: Cut foam sheets into pumpkin or skull shapes, tie them with ribbon, and let the kids embellish with stickers and glitter glue.
A quick rundown of ideas to try:
| Idea | Supplies Needed | Fun Factor |
|---|---|---|
| Stenciled Doormat | Mat, tape, paint, stencil | Messy and creative |
| Monster Sign | Wood, paint, markers | Personal and silly |
| Foam Door Hanger | Foam, ribbon, stickers | Best for little ones |
These all hold up to little hands and lots of giggles. Every time someone steps up to our door, our doormat or sign feels like a Halloween hello from us to them.
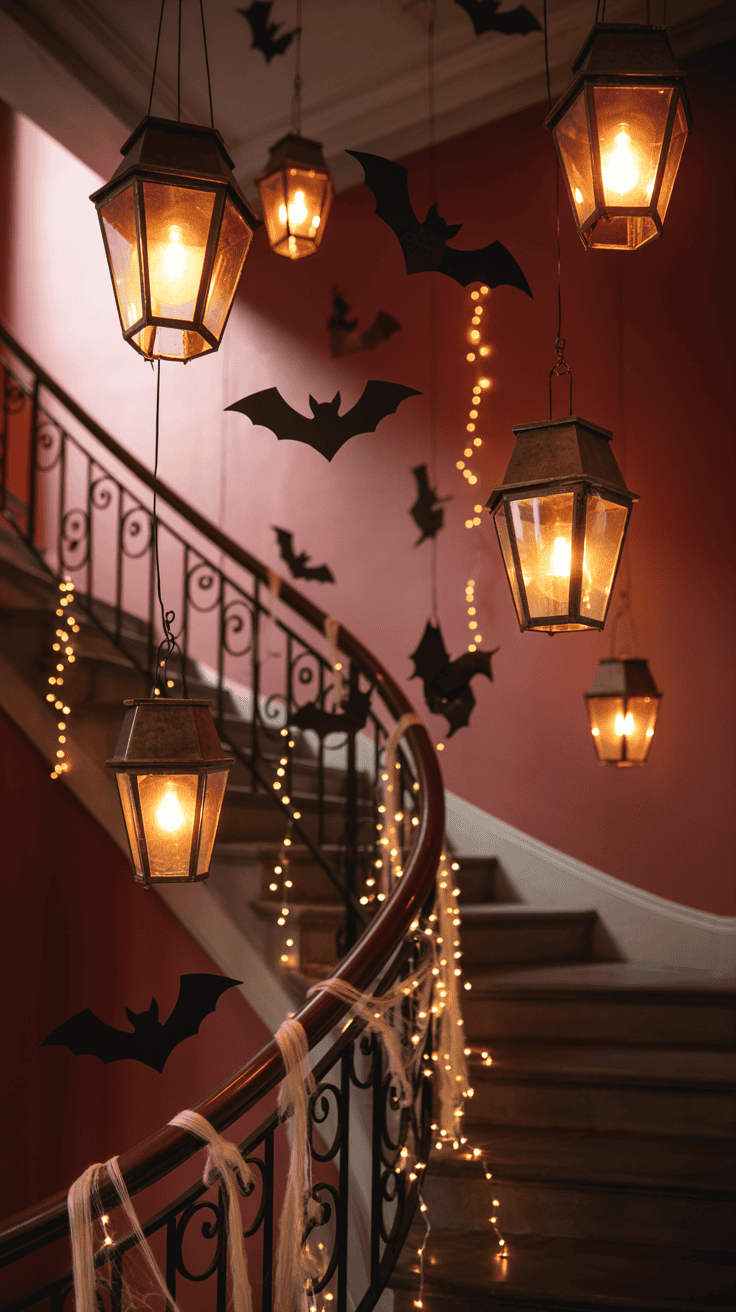
Creative Lighting for a Moody Entrance

Lighting makes your Halloween porch feel like another world! I use a mix of lights and lanterns to make our entry glow. Trick-or-treaters can spot us from the street, and it keeps everything bright enough to stay safe. You can let the kids help set them up, too!
Easy lighting for a magical effect:
- String Lights: Orange, purple, or ghost-shaped, we weave them around the railing or door frame.
- Mason Jar Lanterns: Drop in a battery candle and some faux cobwebs. The “flicker” looks spooky from afar and safe for kids.
- Pathway Lights: Solar stakes in fun shapes—think pumpkins, bats, or eyes—line the walkway.
- Porch Lanterns: Fill lanterns with fairy lights instead of real candles. Set them on steps or next to pumpkins for a cozy glow.
Safety is my top concern. Here’s what works for us:
- Stick to battery-operated lights. No cords for tripping!
- Place lanterns and lights out of the main path.
- Check everything before dark. If it flickers or won’t come on, replace batteries right away.
- Avoid open flames by using LED or flameless options everywhere possible.
A well-lit entry not only looks magical but also keeps your little monsters safe while they dart back and forth between the door and the candy bowl. I love watching their faces light up as much as the porch does!
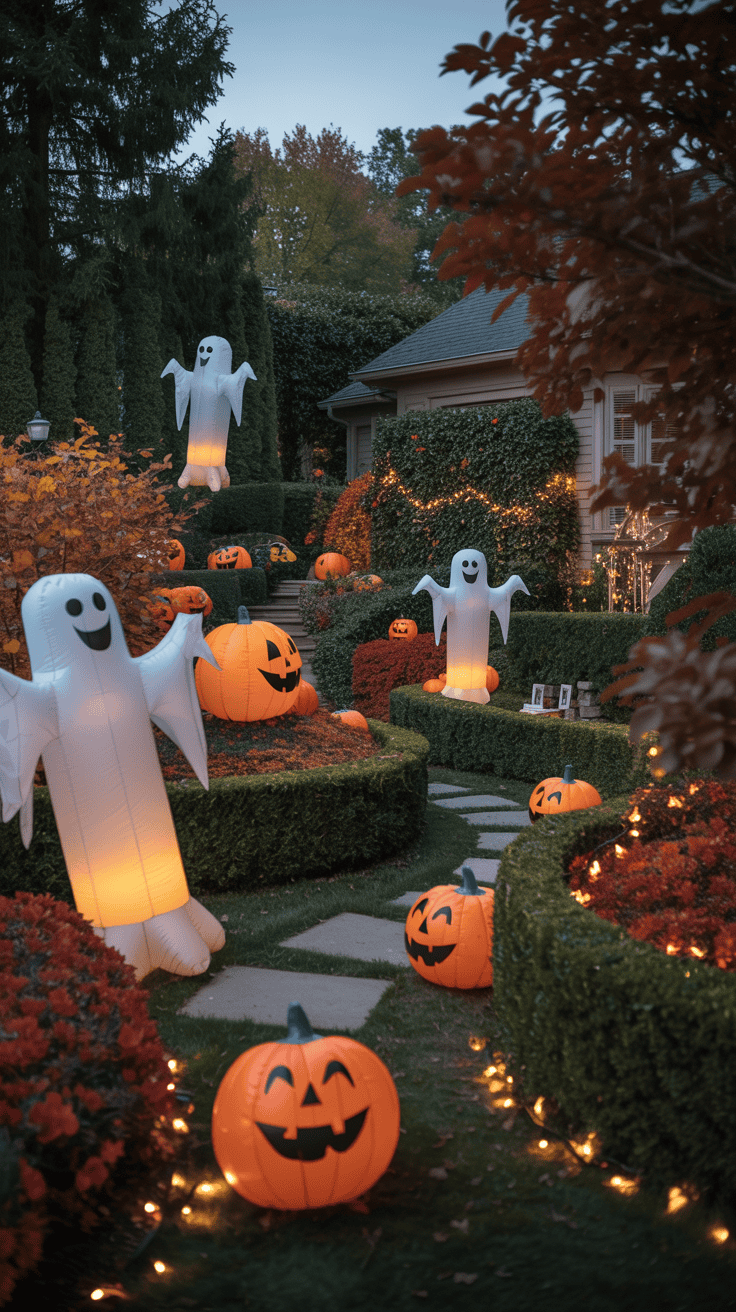
Lawn Displays: Set the Scene for Spooks and Smiles

Big or small, your front yard can turn into the perfect Halloween playground with a few cheerful ideas. Whenever I look for new halloween front garden ideas, I want decorations that get my boys grinning and neighbors talking. If you like hands-on fun (with just enough “spook” for the little ones), then lawn displays are where imagination comes alive! Here’s how we make our garden the spot for both giddy giggles and gentle chills.
Easy DIY Tombstones and Graveyards

Nothing gets my boys laughing faster than crafting our own graveyard display. You don’t have to spend much to make this work—just pick up some large pieces of foam board or cardboard. I love that the messier these look, the better! If you want a yard that draws a crowd, homemade tombstones do the trick every single time.
Our step-by-step system for silly headstones:
- Cut simple shapes out of foam or cardboard. Rounded tops work best but squares or funky shapes are great too.
- Spray paint each piece in gray or black (I use matte outdoor spray paint so they look old and spooky).
- Let kids draw cracks, moss, or spider webs—messy lines are perfect!
- Pick tombstone names together. We write things like “I. B. Missing,” “Noah Scape,” or “Frank N. Stein.” The sillier, the better.
- Add details with white paint or chalk for extra pop.
We stick our finished tombstones up with garden stakes or just prop them behind pumpkins along the walkway. One year, my youngest wrote, “Here lies my broccoli.” That made the neighbors laugh all month. If you want a true graveyard vibe, scatter some fake bones or a plastic hand reaching out from behind the stones. It’s quick, cheap, and gets everyone talking.
Tips for a DIY graveyard that lasts through the season:
- Spray a clear sealer over foam to protect from rain.
- If using cardboard, put it under a covered porch or wrap in plastic before painting.
- Anchor each prop well so nothing blows away.
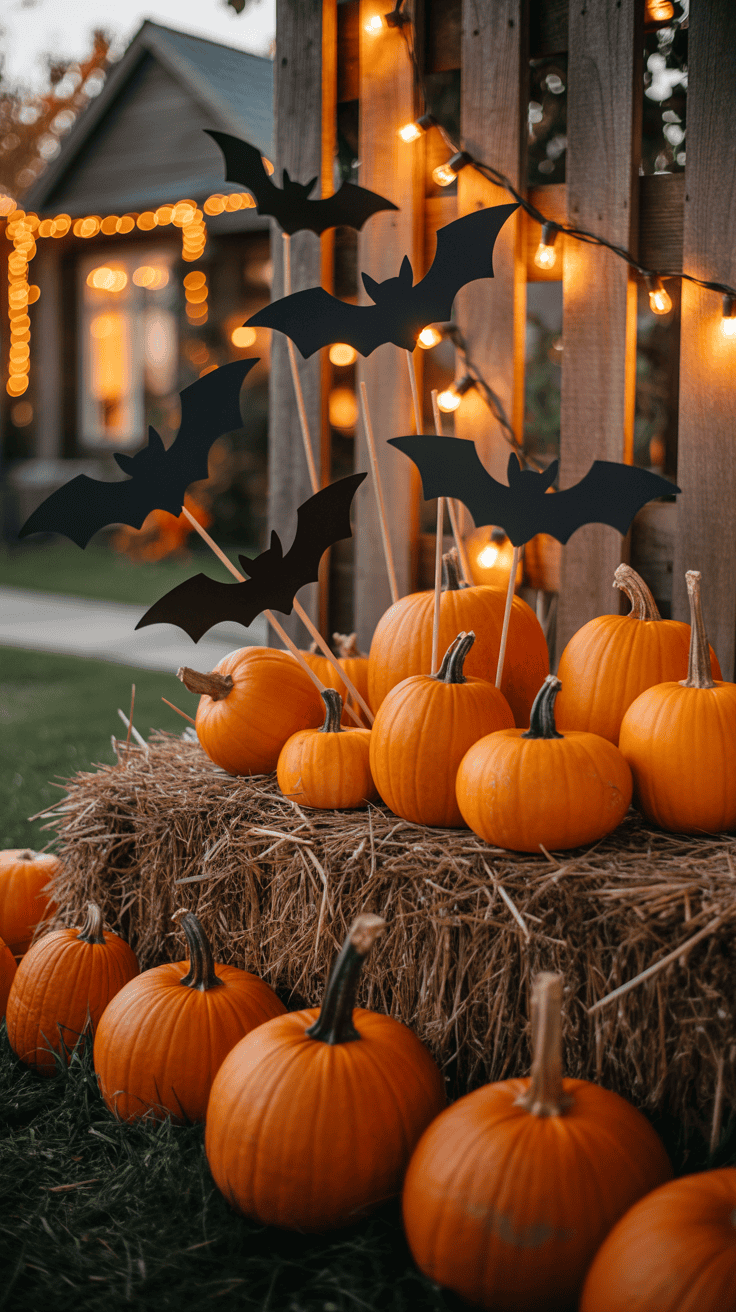
Festive Inflatables and Giant Decor

When it comes to big statements, you can’t beat the joy of a ten-foot pumpkin waving hello every morning! My boys love giant decorations and so do the trick-or-treaters. Halloween inflatables are the easiest way to make your lawn the talk of the street.
Some of our favorites:
- Classic pumpkins in a stack (looks great paired with real ones!)
- Silly ghosts floating over bushes
- Witch hats and cauldrons
- Black cats with light-up eyes
Here’s where you can make your display feel special: mix in homemade yard stakes or props. We add:
- Painted signs with jokes or “Keep Out” warnings.
- Wooden ghosts made from scrap wood and white paint.
- Bats glued onto sticks poked into flower beds.
It’s easy to build around the big inflatables with smaller, personal touches. My boys love racing to see who spots the new “guest” in the yard each day. Inflatables go up in minutes (just make sure to secure them with strong stakes) and are weather-proof, which keeps busy moms happy!
Personalization ideas:
- Hang a name tag from your giant ghost (“Boo Radley,” anyone?).
- Place DIY tombstones at the base of a big pumpkin to make a full scene.
- Use colored spotlights to give each inflatable a spooky glow at night.
Family DIY Scarecrows and Monsters

I’m always searching for ways to use what we already have. Enter: old clothes plus a little stuffing equals scarecrows and monsters with big personalities! This is one of those halloween front garden ideas that gets the kids giggling—and burns off energy on blustery fall weekends.
How we build our friendly monsters:
- Grab old jeans, shirts, and hats. Ask the kids to pick out pieces from the donation pile.
- Stuff with leaves or plastic bags. Tie the ends with twine so nothing leaks out.
- Build the “body” on a garden stake or patio chair for support.
- Use a pumpkin, pillowcase, or painted ball as the head. Mark on giant grins, goofy eyes, or even fangs if you want a scare.
- Let everyone accessorize! Scarves, sunglasses, fake spiders—bring it all.
One year we made a “Monster Family” to match each of us (even down to my oldest’s wild curly hair). They stood guard at the mailbox and drew smiles from every kid walking home from school.
Ways to make your creations unique:
- Use glow sticks or battery candles inside the head for a night-time surprise.
- Design costumes for each scarecrow: a superhero, a mad scientist, or a princess zombie.
- Switch out heads or hats each week to keep things fresh.
It’s simple, cheap, and encourages kids to put their own spin on the decorations. Every time we go outside and see our silly creations, we remember why Halloween is my favorite family tradition!
Pumpkin Magic: Classic and Creative Carving Ideas

When it comes to halloween front garden ideas, pumpkins are always center stage. There’s something about those big orange globes that just invite creativity and family fun. Whether you want to get messy with carving or keep it simple and safe for little hands, pumpkins offer endless ways to light up your garden and set the perfect Halloween mood. I love how pumpkins bring everyone together, from toddlers eager to paint to older kids excited to create spooky faces. Let’s talk about two of my favorite pumpkin traditions that fit right into family life: kid-safe no-carve decorating and carving as a family event.
Kid-Safe No-Carve Pumpkin Decorating

Not every pumpkin has to be cut open or poked with sharp tools to shine. For families with young kids, no-carve ideas are a lifesaver. They keep the mess and sharp edges away and still let little ones feel proud of their own Halloween display. Plus, these options are fun for all ages and build great hands-on memories without the fuss.
Here are some of my go-to no-carve pumpkin decorating ideas:
- Painting: Grab some acrylic paint or even washable tempera for young kids. Simple shapes like big polka dots, stripes, or silly faces let kids play with colors and patterns. Use sponges or brushes that fit their little hands, and don’t worry about staying inside the lines!
- Stickers and Decals: Halloween-themed stickers are an easy way to dress up pumpkins. Bats, ghosts, spiders, and smiley faces go on in seconds and peel off if you want to switch things up before Halloween night.
- Bedazzled Pumpkins: For a little sparkle, gather gems, sequins, or googly eyes. Use craft glue to stick them on in funky patterns, or create googly-eyed monsters that catch the light on your porch. These always steal the show with their quirky charm.
- Tape and Washi Tape: Kids love tearing and placing tape. Use bright Halloween colors or patterned washi tape to create geometric designs or stripes. The tape comes off easily if you want a fresh look the next day.
Tips for keeping it fun and easy:
- Lay down newspaper or a plastic sheet. This keeps cleanup simple and lets kids get messy without worry.
- Use large pumpkins with smooth surfaces for easier decorating.
- Let kids take the lead. I find that the best designs come from their imaginations, not mine!
- For little hands, pre-cut shapes or bigger stickers help avoid frustration.
No-carve pumpkins are my secret weapon for including everyone in halloween front garden ideas. They look just as charming lined up by the porch or nestled in a flowerbed. Best part? They last longer without the scoop-and-carve drying out.
Pumpkin Carving as a Family Tradition
Once my boys hit a certain age, pumpkin carving turned into the family night. It’s almost like a mini holiday party filled with laughs, pumpkin guts, and (lots of) carving tools. I love how carving pumpkins brings us together to slow down, share stories, and make something special every October.
Here’s how I keep carving safe and fun for kids while still making it an event:
- Easy Patterns: Start with big, basic shapes—think classic triangles for eyes and a wide grin. Use simple stencils or even freehand with markers. My boys love drawing their ideas first, then I help cut the outlines.
- Kid-Friendly Tools: Forget sharp kitchen knives. We use pumpkin carving kits with small serrated saws and scoopers made for kids. They’re easier to handle and much safer. You can find sets with safety features that protect fingers while carving.
- Set a Carving Zone: I lay down a plastic tarp or work outside on the driveway. This keeps pumpkin guts contained and makes clean-up quick. Plus, it makes it feel like a little party setup.
- Make It a Celebration: We put on Halloween music, light a pumpkin-themed candle, and even serve hot cocoa or apple cider. It turns a simple task into a memory I know my kids will treasure.
- Take Photos: Every year’s pumpkins go into our family album. Years later, the photos remind us of how tiny those hands were and all the funny faces we made from pumpkins.
I always supervise when kids are carving. The tools and pumpkin skins can be slippery, but with patience and clear guidance, it’s an activity that grows with your children. You can watch their confidence soar as they master each slice and scoop.
To keep carving night fresh, try alternating creative themes:
- Silly monsters
- Cute animals like cats or owls
Finishing Touches That Make Your Garden Stand Out

When it comes to Halloween front garden ideas, the little extras really pull everything together. After setting up pumpkins and spooky props, these finishing touches add mood, movement, and surprise that make your garden feel alive—and memorable. They don’t have to be complicated or expensive, just a few thoughtful details that create a scene everyone will want to visit. Here’s how I add those extra layers of fun that thrill my boys and keep neighbors coming back all October long.
Atmosphere with Sound and Fog
Sound is an easy way to bring your garden to life. I love setting up simple speakers near the walkway or porch that play playful ghostly groans, witch cackles, or the creak of old doors. It’s spooky without being too loud or scary for the little ones. You can find Halloween soundtracks online or on apps that run on a loop.
Fog adds something magical—it’s like a soft mist curling around your feet, perfect for making your yard feel like a haunted forest or mystery spot. The best part? You don’t need fancy machines. A few inexpensive fog machines on low settings, or even bowls of dry ice placed safely away from kids and pets, can do the trick. I always keep the fog light enough to stay friendly, so it sets a mood but keeps the space welcoming.
A few tips to keep this safe and fun:
- Place speakers or fog sources where kids won’t trip or touch them.
- Use battery-operated or outdoor-friendly devices to avoid cords.
- Keep fog machines outdoors or in open air; never inside.
- Pick sounds that are eerie, but not terrifying for younger children.
Together, sound and fog make your garden feel like it’s breathing Halloween magic—just enough to get everyone excited but still safe for family visits.
Creepy Crawlies and Hanging Decor
Helping the kids stretch spider webs across bushes is always a highlight in our decorating. My boys love tossing the faux webbing far and wide, watching it stretch like silly spider silk. It gets them moving, laughing, and right into the spirit!
Once the webs are up, we add plastic spiders in all sizes and stick some on tree branches or fence posts. Hanging bats and friendly ghosts from tree limbs is another simple way to fill the air with spooky charm. The kids enjoy choosing where to hang their creations, swinging them slightly in the breeze.
For those extra little scares, I tuck skeleton hands just barely sticking up out of shrubs or scatter pairs of glowing eyes between plants. They pop out just enough to catch a visitor’s attention without being too creepy for trick-or-treaters younger than my boys.
Easy ideas to try together:
- Stretch fake webs across open spaces or between lower branches.
- Use fishing line or clear thread to hang bats and ghosts so they look like they’re floating.
- Place plastic spiders or creepy fingers where hands might peek out naturally.
- Stick glow-in-the-dark eyes in dark corners or behind bushes for a playful surprise.
Letting the kids take charge here turns decorating into a game. They spot the best hang spots and get those proud smiles when neighbors admire their handiwork.
Blending Decorations with Your Garden’s Natural Features
Your garden’s shrubs, trees, and flower beds can do a lot of work for you in Halloween decorating. Instead of just placing decorations on the lawn, I like to use nature’s shapes to display spooky scenes. It makes every yard feel unique, since no two gardens are exactly the same.
For example, one of our bushes with dense leaves becomes a perfect hiding place for ghostly figures or glowing pumpkins poking out from inside, like a secret Halloween hideaway. The crooked branches of a tree are great for hanging bats, lanterns, or even a witch’s hat with just a bit of twine.
Garden beds filled with autumn flowers (like mums or ornamental kale) provide a wonderful natural backdrop for small tombstones, skeletal hands, or tiny pumpkins scattered around. This quietly pulls the decorations into the space so they don’t feel stuck on top of the lawn.
I recommend these ideas:
- Tuck decorations deep inside bushes to make them feel part of the garden.
- Hang decor at varying heights on trees to keep the eye moving and add depth.
- Fill garden beds with themed items that don’t overwhelm but add texture and color.
- Use natural curves and shapes (like twisting branches or curved flower edges) as guides for where to place items.
This approach turns your garden into a scene that feels natural and a little mysterious. It invites visitors to take a closer look, which is just the kind of curious fun I love for my boys and their friends. When decorations flow with the garden instead of sitting on top, it all looks more charming and less cluttered.
Adding these finishing touches is like icing on the spooky cake. They bring the whole space to life in ways that simple props can’t, making your Halloween front garden ideas memorable and welcoming for everyone who stops by!

Conclusion
Halloween front garden ideas are all about creating a space that feels welcoming, playful, and a little bit spooky, without any stress or big costs. I love involving my boys in every step because it turns decorating into a family adventure filled with laughter and memories. Whether you’re painting pumpkins, setting up silly signs, or lighting up the path with fun lanterns, the goal is to set the mood together and share that excitement with neighbors and friends.
Take the time to get creative and let the kids lead sometimes—it’s their energy and imagination that bring the magic to life. Have fun with it and enjoy the moments that come with decorating. If you try any of these ideas, I’d love to hear how your garden lights up this season!
This post may contain affiliate links. Read the full disclosure here.