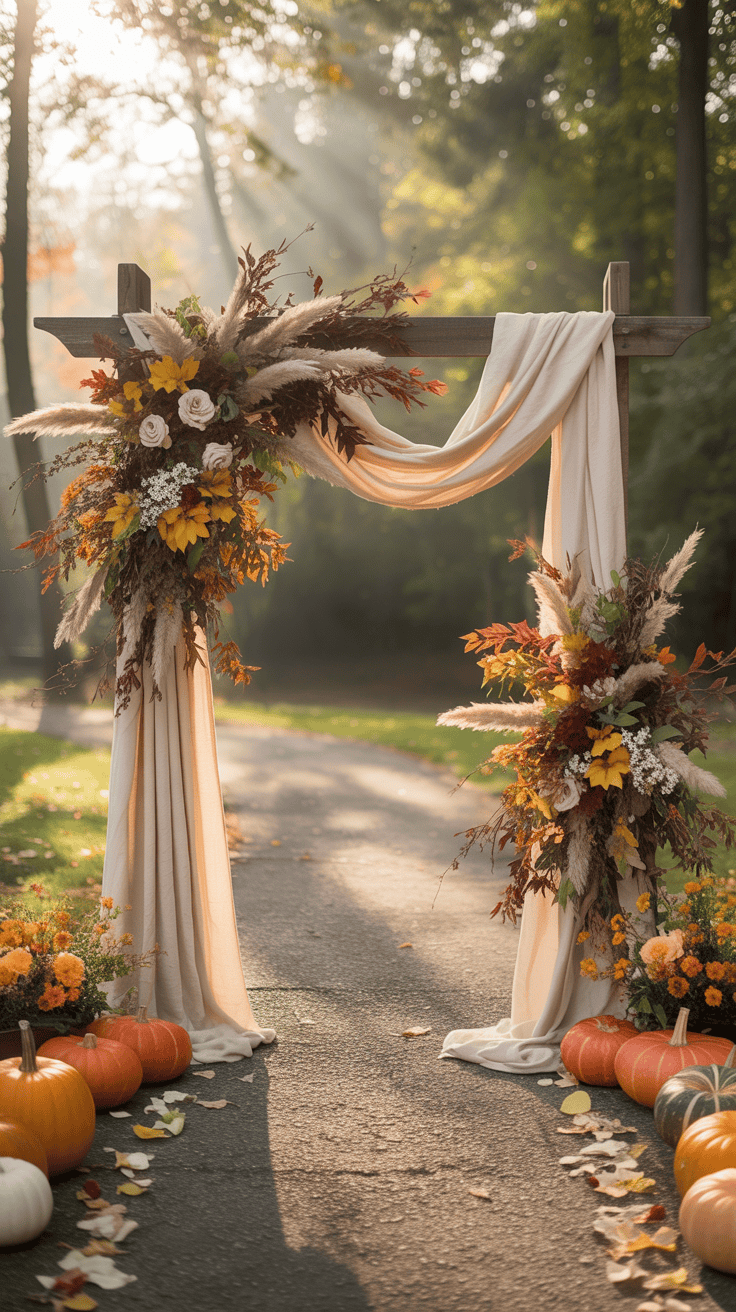
How To Build a DIY Halloween Archway Entrance
Every year, I want to wow the neighborhood with something special for Halloween, especially as a mom of three energetic boys who love all things spooky and fun. Building a diy halloween archway entrance has been one of our most enjoyable projects; it’s simple and fun, and it really transforms our yard into a FUN and playful (but spooky) wonderland!
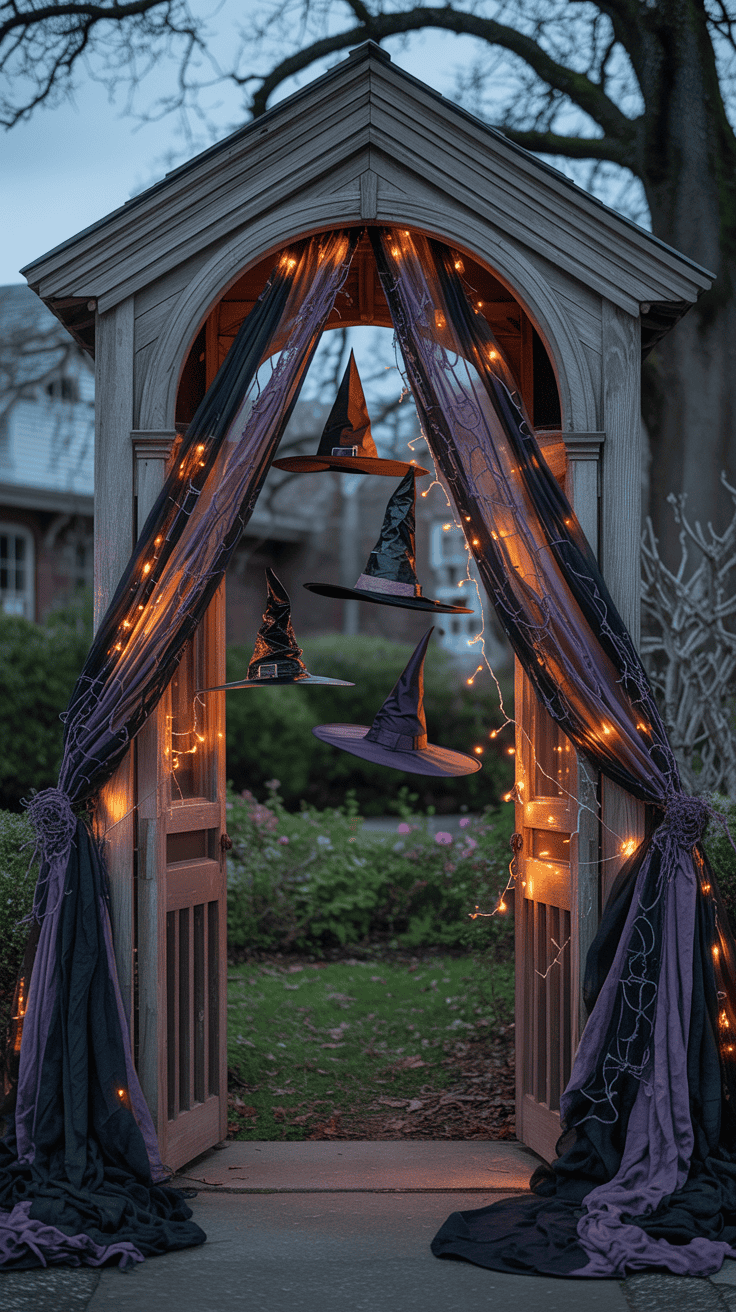
This Halloween archway kit makes a big statement without needing any tools or stress.
Plus, working on it together lets us share laughs and memories while making something that stands out on our block. Let me show you how you can create your own festive archway that brings that perfect Halloween magic to your home!

Planning Your Spooky Vision: Finding the Perfect Spot and Style


Before jumping into building your diy halloween archway entrance, it’s important to take a moment to plan out exactly what you want. This step can make all the difference between a rushed, stressful project and one that feels fun and rewarding from start to finish. I always find that imagining the final look first helps me stay focused and excited. It’s like drawing your own treasure map before hunting for the goodies!
Choosing the Perfect Spot

Picking the right place for your archway sets the tone for the whole setup. For me, the front yard entrance is always the top choice. It welcomes trick-or-treaters with that magical first impression and blends perfectly with the spooky decorations on the porch and walkway. Here are a few things I keep in mind when deciding on a spot:
- Visibility: You want your archway to grab attention but also let people pass through easily. The best spot should be right where guests enter your yard or home.
- Space: Measure the width and height to make sure there’s enough room for your arch. My boys always want to duck under, so I make it tall enough for them to walk through without a squeeze.
- Safety: Make sure the ground is stable and even. I avoid spots where cords or decorations could trip someone up in the dark.
- Lighting: Consider where you can add spooky uplights or string lights to highlight the arch at night. A well-lit spot makes your diy halloween archway entrance pop right after sunset!
Picking Your Style and Theme


Once the spot is decided, it’s time to think about the style that fits your family’s Halloween vibe. Are you more about creepy and haunted, or do you prefer whimsical and playful? I love to match the archway’s look with the rest of our front yard decor so it feels like one charming story.
Some fun style ideas to think about:
- Classic Creepy: Think black tulle, cobwebs, plastic spiders, and flickering (battery-powered) candles. Perfect if you want to lean into the haunted house look.
- Pumpkin Patch: Decorate your arch with mini pumpkins, orange lights, and fall leaves. It’s warm, inviting, and works great if you mix Halloween with harvest fun.
- Ghostly Glow: Use white fabric strips, ghost cutouts, and soft glowing lanterns or fairy lights. This creates a misty, otherworldly feel that’s simple but effective.
- Witchy Vibes: Green and purple lights, broomsticks, fake potion bottles, and spooky witch hats help craft a playful, magical entrance.
At this point, write down or sketch a rough idea of your vision. It doesn’t have to be perfect. Even a quick list of colors and key decorations helps keep everything clear. This sketch will guide you when it’s time to shop for supplies or gather materials at home.
Tips to Match Spot and Style
When finding your perfect spot and style, I always ask myself a few quick questions to pull it all together:
- Will my chosen materials hold up outside where I plan to build the archway?
- Does the style fit with my kids’ favorite Halloween themes? (My boys loved the witchy arch last year.)
- Can I add fun interactive touches like hanging bats or swinging lanterns at the chosen spot?
- How much time and budget do I want to spend on this project?
Answering these helps me keep a clear, doable plan in mind. The best part is, you don’t have to be a pro decorator to get this right. Just pick what feels fun for your family and it will shine!
Gathering Materials and Tools: What You’ll Need for an Awesome Entrance

Getting ready to build your diy halloween archway entrance starts with gathering the right materials and tools. Having everything on hand before you begin makes the process smoother and more enjoyable (trust me, I learned that the hard way!). Plus, it keeps the kids excited and involved without long pauses. I always think of this step as setting the stage for a fun family project that’s both creative and manageable. Now, let’s walk through the must-haves to get you started!
Basic Materials for Building the Archway
The foundation of your diy halloween archway entrance is mostly about sturdy, affordable supplies that you can find at any hardware or craft store. Here’s what I like to work with:
- PVC Pipes: These are lightweight, affordable, and easy to work with. I use 1-inch diameter pipes for a balance of strength and flexibility. They make a great frame for the arch.
- PVC Connectors: You’ll need elbow joints and T-joints to shape the arch and keep it stable. These little pieces hold everything together like puzzle parts.
- Zip Ties or Twist Ties: Perfect for securing decorations or additional materials to the frame without fuss.
- Heavy-Duty Tape: Duct tape or gaffer tape works well for extra reinforcement, especially if the arch will face wind or rain.
- Twine or Fishing Line: These are my go-to for hanging lightweight decorations like bats or ghosts from the arch.
- Lawn Stakes or Ground Spikes: To anchor the arch securely into the ground. Safety and sturdiness are always a priority with little ones running around!
Decorations That Bring the Archway to Life

What’s a Halloween entrance without a little flair? Depending on your style, you’ll want to gather a range of decorations. Here are some favorites that my boys and I can’t get enough of:
- Spider Webbing: Sticky or fluffy spider webs add instant creepiness and fill empty space easily.
- Outdoor Fairy Lights or String Lights: Orange, purple, or flickering lights give your arch that magical glow after dark.
- Plastic Pumpkins, Bats, and Skulls: Lightweight and easy to attach, these set the spooky mood quickly.
- Fabric Strips, Tulle, or Cheesecloth: Great for creating a ghostly or witchy vibe by draping it over the arch.
- Battery-Powered Flameless Candles: Safe to use outdoors and give a flickering, eerie effect.
- Props and Accessories: Think witch hats, broomsticks, or even a hanging ghost made from breathable fabric.
Essential Tools to Keep Handy
Even though this project doesn’t require heavy construction skills, a few tools make everything go much easier and safer. Here’s what I always have ready before starting:
- Measuring Tape: For sizing the arch to fit your space perfectly.
- Utility Knife or Scissors: Sharp enough to cut fabric, zip ties, or tape neatly.
- Rubber Mallet or Hammer: Useful if you’re pushing stakes or ground spikes firmly into the soil.
- Gloves: If you’re handling rough materials or wiring lights, gloves protect your hands from scrapes.
- Cordless Drill or Screwdriver (Optional): Helpful when attaching sturdier pieces or securing connectors tightly, but not a must-have if you want to keep it simple.
Tips for Gathering What You Need on a Budget

Since Halloween decorations can add up quickly, I try to keep costs down by focusing on multipurpose materials. PVC pipes and connectors are the backbone, but many decorations can be reused year after year. Sometimes, I raid dollar stores or check out craft sections for cheap lights and props. Another tip is to involve your kids in choosing or making simple decorations like paper bats or painted pumpkins. It makes the whole experience more personal and even more fun!
By collecting these materials and tools, you’re setting yourself up for a smooth build and an impressive DIY Halloween archway entrance that will wow the neighborhood. I love how this step turns excitement into action — it’s the first real sign that spooky season is here!
Building Your DIY Halloween Archway Entrance Step-By-Step

Creating a DIY Halloween archway entrance may sound tricky, but it’s actually a fun and manageable project that brings a big wow factor to your yard! When I built ours with my boys, the step-by-step process kept things simple and enjoyable, plus it gave us a chance to get creative together. Whether you’re a seasoned DIYer or just looking for a straightforward way to add some Halloween charm, following a clear plan makes the whole thing less stressful and more fun. Let’s break down exactly how you can build your own festive archway without any fuss!
Step 1: Assemble the Frame
The frame is the backbone of your archway. I use PVC pipes because they’re lightweight and easy to work with, even when the kids want to help. Here’s what I do:
- Cut two long pipes the height you want for your arch, usually about 6 to 7 feet tall. This gives plenty of headroom, even for adults or tall teenagers passing underneath.
- Cut a longer pipe for the curve; this piece will connect the two vertical pipes and form the top arch.
- Connect the pipes using elbow and T-joints to create a sturdy rectangle with a rounded top. The T-joints at the base let me anchor the arch securely to the ground.
- Use zip ties or duct tape for extra stability around the joints if needed. I always check for wobbliness and tighten where necessary. A wobbly arch is no fun for trick-or-treaters or kids running through!
Step 2: Secure the Archway in Place
Once your frame is ready, it’s time to anchor it so it won’t tip over in the wind or when kids bump into it. Stability is key, especially when little ones are excitedly squeezing through.
- Use lawn stakes or ground spikes to firmly push into the soil at the base of each leg.
- If you’re on a hard surface like a driveway or porch, heavy buckets filled with sand or bricks on each side work well to hold the arch steady.
- Sometimes I add extra stakes along the sides and tie the arch frame to them with twine. It’s a simple trick that makes a big difference on breezy nights.
Step 3: Add Base Decorations
Laying a decorative foundation sets the mood right from the bottom of the arch. I like starting here so the whole entrance begins to feel spooky or festive even before the top decorations go on.
- Wrap the base poles with fake spider webs or black tulle for a creepy vibe.
- Attach small plastic pumpkins, skulls, or hanging bats near the bottom corners using zip ties or tape.
- Place battery-powered candles or solar garden lights around the base to add soft lighting that shines upward as night falls.
This step makes the arch inviting and fun, not just a bare frame to walk through.
Step 4: Dress the Arch with Fabric and Lights
The arch’s personality really comes out when you add fabric, lights, and texture. My boys love helping here because it feels like we’re dressing a big Halloween puppet!
- Drape strips of cheesecloth or tulle over the arch to create ghostly curtains or webs. I usually twist the fabric loosely so it billows in the breeze.
- Wrap string lights along the pipes, using orange, purple, or flickering flame-effect lights. These make the arch glow and catch attention after dark.
- You can hang lightweight decorations like paper bats, plastic spiders, or glow-in-the-dark ghosts by tying them onto the frame with fishing line. They swing gently and add spooky movement.
Step 5: Finish with Extra Touches

The best part is adding those little details that make your DIY Halloween archway entrance unique and special. This is where you can really show your family’s style!
- Add broomsticks, witch hats, or fake potion bottles dangling from the arch for a magical touch.
- Hang a creepy welcome sign or a banner that says “Enter if you dare” to build anticipation.
- Use spray snow or pumpkin spice-scented spray around the arch to engage the senses beyond sight.
Putting little surprises around the archway keeps trick-or-treaters curious and delighted as they approach.
Building your own diy halloween archway entrance doesn’t have to be overwhelming. Taking it one step at a time and getting your kids involved makes the whole project playful and rewarding. You’ll be amazed at how quickly a few simple materials, some fabric, and lights transform a plain doorway into a charming Halloween gateway!
Finishing Touches: Decorating and Making It Memorable

After all the building and setting up, the real magic of a diy halloween archway entrance comes alive in the finishing touches. This is where your archway stops being just a structure and turns into a memorable Halloween experience for everyone who walks through it. I love this part because it’s all about personality and little details—things that create that wow moment and make the entrance uniquely yours. Adding the right decorations and memorable accents makes your archway feel playful, spooky, and perfectly festive for the season.
Layering Decorations for Depth and Interest
Think of your archway like dressing up for a costume party. You want layers, textures, and colors that catch the eye from every angle. Here’s what I do to bring that rich, inviting feel:
- Mix textures: Combine soft fabrics like tulle or cheesecloth with twinkling string lights and solid props (like pumpkins or skulls). This contrast keeps things interesting.
- Play with height: Hang decorations at different levels. Let some ghosts dangle low where little kids can touch them, while bats or lanterns hover high enough to sway in the breeze.
- Use natural elements: Adding real or faux branches, dry leaves, or pine cones gives a nice autumn vibe that fits Halloween perfectly.
This layering makes the entrance feel full and festive instead of flat or plain. It also invites visitors to slow down and explore all the spooky details you’ve worked hard to create.
Adding Lighting for Atmosphere That Lasts
Lights are the secret ingredient for making your archway feel alive after dark. Since Halloween is all about the evening glow, I always aim to include lighting that’s safe and easy to plug in or battery-operated. Some of my favorite light ideas are:
- Orange and purple string lights: They add a classic Halloween glow that pops against dark fabric or greenery.
- Flickering flameless candles: These give off just enough light to feel spooky without any fire hazard.
- Uplighting around the base: Placing small lights that shine upward onto the arch highlights textures and makes the archway super inviting.
You can find plenty of battery-powered options that are weather-resistant too. I make sure all cords are hidden or taped down for safety, especially with little kids running through.
Personalize with Creative Signs and Messages
Nothing says “welcome” or “beware” quite like a well-placed sign. I’ve found that a simple message can set the mood or share a bit of your family’s Halloween spirit. Some ideas I love to add are:
- A wooden or cardboard sign that says “Enter if You Dare” or “Welcome, Witches and Ghouls!”
- Chalkboard signs where the kids can write a spooky greeting or riddle.
- Personalized banners with your family’s name or a fun Halloween pun.
The signs don’t need to be fancy or expensive. Even something handmade with your kids adds a warm, playful vibe and makes your archway feel custom.
Adding Movement and Sound for Extra Fun
If you really want to make an impression, adding a bit of movement or sound can turn your entrance into a full-on sensory experience. For example:
- Hanging decorations that sway with the wind, like bats or ghosts on fishing line, create gentle movement.
- Small battery-operated fans or motorized props can add spinning or twirling effects.
- Halloween sound effects, like creaking doors or distant howls played through hidden speakers, add atmosphere without being scary for little ones.
The subtle motion and sounds catch attention and keep guests engaged from the moment they approach your arch.
Small Details That Make a Big Impact
At the end of the day, the little details are the ones your family and visitors will remember the most. I always add a few finishing touches that bring everything together:
- A sprinkle of fake cobwebs over the arch for that classic haunted look.
- Glitter or spray snow on leaves or fabric for a cool shimmer effect.
- Themed doormats or small props like a witch’s cauldron nearby to extend the feel beyond just the archway.
These small gestures feel like the sprinkles on a Halloween cupcake—they don’t take much time but really complete the look.
Finishing your diy halloween archway entrance with thoughtful decorating is where creativity and fun come fully alive. Taking a little extra time to layer decorations, light up the night, and add personal touches turns your project into a true Halloween highlight that everyone remembers. Trust me, the smiles you get when the kids and neighbors walk through are always worth every second you spend!
Tips for a Fun and Safe Halloween Archway Experience
Creating a diy halloween archway entrance is not just about making something cool to look at, it’s also about making sure everyone has a blast while staying safe. After all, the last thing I want on Halloween night is a worry about trips, falls, or decorations that aren’t holding up. Over the years, and with three energetic boys racing through our yard, I’ve learned some handy tips to keep our archway both fun and secure for big kids and little ones alike. Here’s what works for me!
Keep Safety Front and Center
When you’re thinking about a spooky entrance, safety might not be the first thing that comes to mind, but it should be just as important as how it looks. Here’s how I make sure no one trips, bumps, or gets tangled while enjoying the arch:
- Secure the base well: Use lawn stakes or heavy weights to anchor your arch. A stable arch keeps little ones safe when they run through.
- Check for sharp edges: Cover any rough spots on pipes or connectors with tape or fabric, so no scraped knees or hands happen.
- Avoid cords in walkways: If you use lights, hide or tape down all wires to prevent tripping hazards.
- Keep the height kid-friendly: Make your arch high enough so even tall teens can pass without ducking, while still feeling cozy for the little kids.
- Opt for battery-powered lights: Flames or open candles are a no-go. Flameless candles and LED string lights give the same glow without any risks.
Make It Easy to Walk Through
Nothing kills the spooky mood faster than a crowded, tricky entrance. I want my kids and trick-or-treaters to walk through feeling excited, not stuck. Here’s how I keep the flow smooth:
- Wide enough to fit groups: Aim for an arch width of at least 4 feet. That way, friends or siblings can pass through side by side.
- Clear the ground: Double-check the path under the arch for rocks, garden hoses, or toys that could cause a stumble.
- Avoid heavy or dangling decor: Keep hanging decorations light and securely tied so they don’t fall or block young kids.
- Add soft lighting on the footprint: Use small solar or battery lights along the path so steps are easy to see after dark.
Involve the Kids while Staying Safe
Since my boys love to help, I keep their safety in mind when they decorate or interact with the arch:
- Let them attach lightweight decorations like paper bats or fabric strips. This way, they feel part of the magic without heavy lifting.
- Supervise any hammering, cutting, or drilling. Kids are curious but need adult guidance with tools.
- Teach them to look out for electrical cords and not to pull on hanging decorations, which could topple the arch.
- Use gloves for handling rough materials or wire to protect small hands.
Weather-Proof Your Arch for a Worry-Free Halloween
Fall weather can be unpredictable, so I make sure the archway endures wind and moisture:
- Choose materials like PVC and plastic decorations that can handle damp or chilly nights.
- Use heavy-duty zip ties and tape for extra hold in breezy conditions.
- If rain is expected, cover fabric decorations or swap them for waterproof items like vinyl bats or plastic pumpkins.
- Consider setting up the arch the day before to test stability and add reinforcements if needed.
Keep It Fun with Interactive and Welcoming Features
A Halloween archway isn’t just passing space; it’s part of the fun! I like to add safe, memorable touches that invite everyone in happily:
- Hang friendly, swinging ghosts or light-up pumpkins that move gently in the wind. This adds charm without being scary.
- Place a small bowl of wrapped candy at the side (not blocking the way) for a little extra treat.
- Use signs with fun messages or riddles that encourage kids to lean in and smile.
- Play spooky but kid-friendly sound effects nearby to create atmosphere without startling little ones.
When you balance fun with safety, your diy halloween archway entrance becomes a highlight of the night for all ages. It’s possible to create a magical, playful gateway that welcomes kids—and keeps parents relaxed. Trust me, a little planning goes a long way to making Halloween feel exciting and safe!

Conclusion
Building a diy halloween archway entrance is such a fun way to bring the whole family together for a creative, hands-on project. It’s amazing how a few simple materials and some time with the kids can turn your front yard into a festive spot that everyone remembers. The best part is watching your little ones’ faces light up as they help decorate and see the final result welcoming friends and neighbors.
If you’re looking to make this Halloween extra special, I encourage you to give it a try! Grab your supplies, involve the kids, and enjoy the laughs and memories that come with every step. When you’re done, don’t hesitate to share your photos or tips—I’d love to see how your own diy halloween archway entrance turns out!
This post may contain affiliate links. Read the full disclosure here.