Hibiscus Flower Nail Art That Gave Me Vacation Vibes
As a mom of three energetic boys, finding a few minutes for myself can feel impossible. That’s exactly why I fell in love with hibiscus flower nail art! The bright colors and tropical style brought back memories of sunshine and calm breezes, even while I was loading the dishwasher or chasing little feet around the house!
Sometimes, a cheerful manicure is the closest I get to a real vacation. If you’re looking for a simple pick-me-up, this sweet floral look might just be the break your busy day needs.

The Inspiration: Bringing Sunshine to Mom Life
I’ll be honest, there are days when everything feels gray. Dishes pile up, dirty socks hide in corners, and my three boys somehow get louder every hour. That’s exactly when I reach for something bright—like hibiscus flower nail art. A pop of color can totally shift my mood, even if my “vacation” is just a five-minute break with strong coffee.
The beauty of hibiscus nail art is in how it brings those tropical, sunny vacation vibes to my most ordinary days. Even if I’m surrounded by toy trucks, not palm trees, these little bursts of color remind me that joy is close, and self-care can fit right in with the messiness of real mom life.
Why I Chose Hibiscus Flowers Over Other Designs
When I started exploring nail art, I saw everything from leopard prints to glitter marble. But hibiscus flowers drew me in for a few reasons. First, they’re stunning. Those bold petals and rich colors just glow—you can’t look at them without feeling even a little bit cheerful! I could have picked daisies, roses, or pastel ombre, but the hibiscus flower is special. It feels like a getaway on my fingertips.
Here’s what really sold me:
- Bright, bold, and full of joy. Hibiscus flower nail art just shouts happiness. The vibrant pinks, reds, and oranges look so lively.
- Not too fussy. I love detailed patterns on other people, but as a busy mom, I need something quick. Hibiscus petals are simple to paint, even if you’re distracted or short on time.
- Tropical and relaxed. Is there anything dreamier than a Hawaiian hibiscus? It’s a symbol of summer and calm. On tough mom days, flashing those nails is like carrying a secret slice of vacation.
- Stands out but matches everything. The style grabs attention but still works with grocery shopping, school pickups, or yoga pants.
- Perfect for moms with no time. I tried other floral nail art, but hibiscus is forgiving. A little wavy petal or uneven dot? Still cute! It’s the only design that made me smile every time I glanced down.
There’s just something about hibiscus that feels playful and light, but still polished enough for real life. If you’re craving a boost—even in the carpool lane—this is the look that delivers every single time.
Finding Time for Self-Care Amidst Chaos
Let’s be real. Most moms barely get time to brush their own hair, let alone sit down for nail art. I have three kiddos and it’s loud, messy, and wild around here! That’s why I started treating nail time as a mini escape, not a luxury.
Here’s how I squeeze in my island-inspired self-care without losing my mind:
- Quick sessions, big payoff. I break it up. Ten minutes for base color before breakfast, a few petals at nap time, then top coat before bed. Easy!
- Get the kids involved. Sometimes, my boys “help” by choosing polish colors or making me laugh while I’m painting. It turns into a fun family ritual rather than one more thing on my to-do list.
- Keep supplies handy. I stash a small nail kit in our kitchen drawer. If there’s a moment between snacks and homework, I can sneak in a coat of polish.
- Embrace imperfections. I stopped aiming for salon-perfect nails. If my hibiscus flower nail art looks a little wonky, I call it character! The joy is in the process, not perfection.
- Make it a reward. On tough days, I let myself look forward to nail art as a treat. It’s my signal that even just a few minutes are for me, which helps keep burnout at bay.
You don’t need a week at a spa. Sometimes, self-care is as simple as putting on a bit of color, taking a breath, and enjoying something that’s just for you. It’s sunshine in tiny, beautiful bursts—and trust me, that can change your whole day!
Step-by-Step Guide: Creating Hibiscus Flower Nail Art at Home as a Busy Mom

The first time I tried hibiscus flower nail art, I wasn’t aiming for anything fancy. I just wanted a bright, happy boost that made me smile between laundry loads. Trust me, if I can do this with three boys interrupting every five minutes, any mom can pull it off! You don’t need a salon. With the right tools and a little patience, you can bring those tropical vibes right to your fingertips, even if you’re squeezing it into nap time.
Must-Have Tools and Polishes for Bright Tropical Nails
A cheerful manicure is a lot simpler when you have the right supplies nearby. Over the years, I’ve put together a small, mom-friendly kit so I’m always ready for quick self-care (or kid-assisted chaos). Here’s what I keep on hand to make hibiscus flower nail art go smoothly.
Nail Art Tools:
- Detail brushes. Thin, pointed brushes are perfect for making petal shapes and tiny leaves without stress. Look for sets marketed as “nail art” on Amazon, Shein, or beauty supply stores.
- Dotting tools. These make easy flower centers, dots, and even tiny details if you flip them over. They usually come in a multipack with different sizes.
- Good nail files. I reach for glass files because they work fast and don’t shred my nails.
- Cleanup brush or angled brush. Great for fixing little slip-ups or cleaning polish off skin after.
Polishes You’ll Need:
- Base color. I love bright white or a pale pink for tropical nails, but pastel yellow or sky blue is beautiful too.
- Petal shades. You want hibiscus flower nail art to look bold! Try a punchy hot pink, coral, or orange.
- Green polish. For leaves and a little “jungle” effect.
- Yellow or gold. These work for flower centers and really pop.
- Fast-drying topcoat. I swear by quick-dry versions, because my kids rarely let me sit still long!
- Optional: A chunky glitter or shimmer topper adds sparkle.
Where to Shop on a Budget:
- Multipacks and family deals can help stock your kit for less. I’ve found great brush sets and polish bundles at Target, Walmart, and even Dollar General.
- Online deals: Amazon multipacks are perfect for busy families.
- Kids’ nail sets: These often come with fun, tropical colors (and they don’t mind sharing with mom!).
Honestly, you don’t need everything at once. Start with a couple of fun polishes, and add tools as you go. The whole idea is keeping it simple and playful!
Easy Tutorial: My Family-Friendly Hibiscus Nail Art Process

When I say this process is family-friendly, I mean it—my youngest has tried to “help” more than once. I’ve even painted a petal with a toddler bouncing nearby, and it still turned out cute. Here’s how I break it down, distractions and all.
Step 1: Prep and Base Color
I start by giving my nails a quick file and pushing back cuticles (if the boys aren’t pulling me away). A couple of swipes with nail polish remover helps get rid of old polish and oils. Then I brush on my chosen base color—usually something light and happy. I give it a minute to dry while I wrangle a snack for the kids.
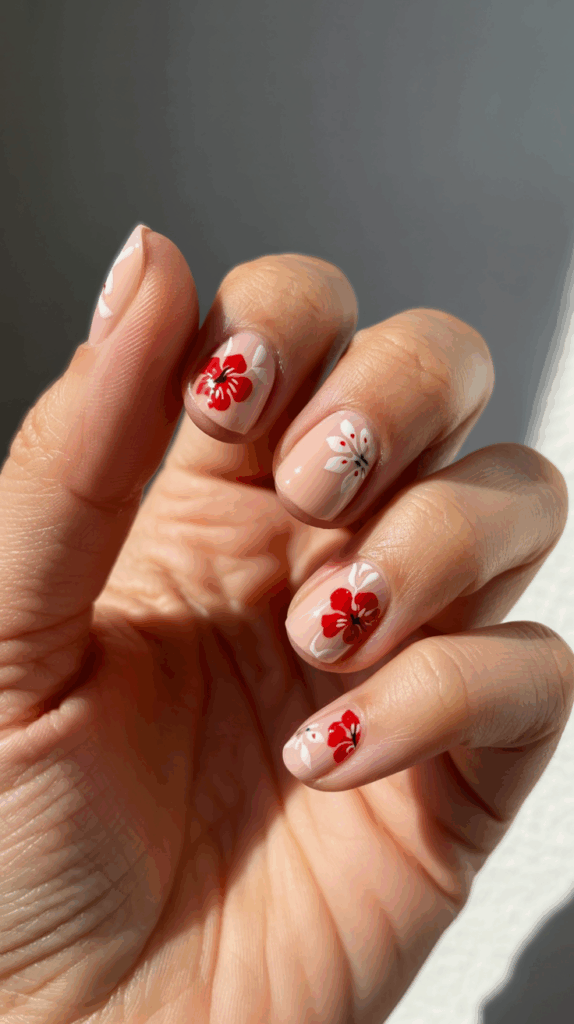
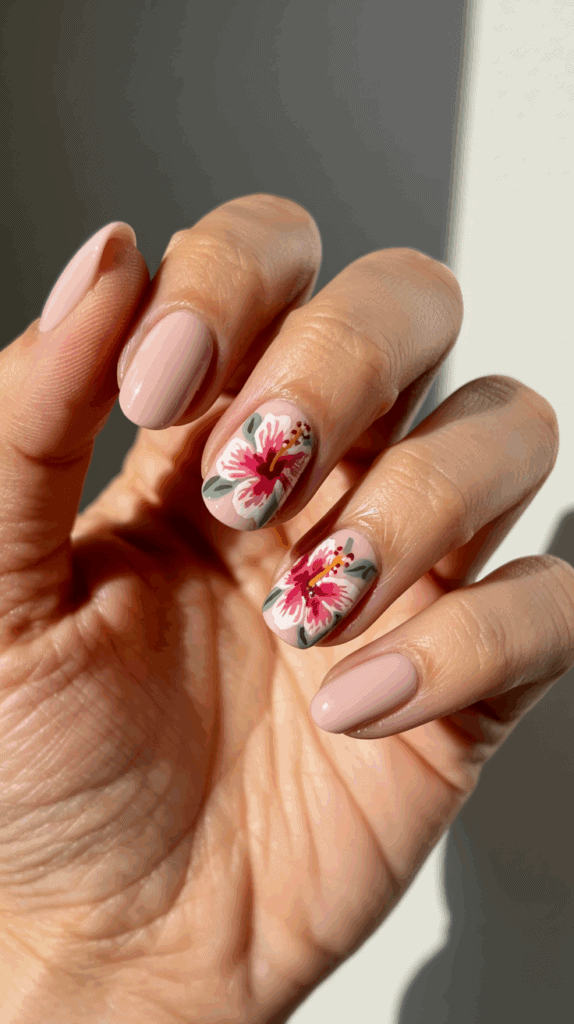
Step 2: Sketching the Hibiscus Petals
Here’s where the magic happens! Using a small detail brush, I paint five big petals on an accent nail (sometimes just two or three if I’m short on time). Each petal is kind of like a fat teardrop. If my hand wobbles—oh well! Hibiscus flowers are never perfectly even in real life, right? My middle son loves to count the petals with me, which somehow makes the process go faster.
Step 3: Adding Details and Leaves
Once the petals dry a bit, I dip my brush in yellow for the flower center. Sometimes I use a dotting tool if I want a bigger “pop.” For the leaves, I grab my little green polish bottle and sketch a couple of leaf shapes coming out from behind the petals. Nothing fancy. Messy leaves are just more “tropical.”
Step 4: Outline (Optional) for Extra WOW
If I have a few extra minutes and no one is yelling for juice, I might outline the petals with a thin stripe of darker pink or even a white line. This helps the flowers stand out. Sometimes my oldest son wants a flower on his thumb, too—who am I to say no to more family flair?
Step 5: Topcoat for Shine and “Kid-Proof” Nails
Once everything is dry, I swipe on a fast-drying topcoat. This not only seals the art but also helps stop chips when I’m opening applesauce pouches or scrubbing marker off the table.
Making It Fun for Kids (and Sanity-Saving for Moms!):
- Let kids pick the color combos. You never know what kid-logic will choose, but it makes the whole process giggly and fun.
- Keep cleanup wipes or Q-tips handy. Little hands = little messes.
- Turn “oops” moments into new ideas. One time, a smudge turned into a windy flower—now my kids think it’s a special style!
- Do just one hand or a single accent nail if time is tight. Any bit of hibiscus flower magic brightens the day.
This process isn’t just about pretty nails (although I love showing them off at school pickup). It’s about making simple moments together, letting creativity blossom, and treating yourself to a mini-vacation no matter how wild family life gets!
Tips, Tricks, and Mom Hacks for Long-Lasting Hibiscus Nails

If you’re loving your hibiscus flower nail art as much as I do, you’ll want it to last! Life gets wild around my house with three boys running circles, and a perfect manicure can turn into a smudged mess before lunchtime. I’ve picked up a few go-to tricks and backup plans to keep my bright tropical nails looking fresh, even through snack time, laundry, and sibling squabbles. Keeping those hibiscus petals vibrant isn’t as tough as you’d think—especially with a handful of easy mom-approved hacks that fit actual life!
Quick-Fix Solutions for Surprise Chips or Smudges
No matter how careful you are, surprise smudges and chips happen. Little hands, spilled juice, or even bumping your own nail before it dries can take the shine off your hibiscus flower nail art. Here’s how I bounce back fast:
- Keep a Nail Art Emergency Kit Handy: I stash a mini polish remover pen, a tiny detail brush, and a bottle of my Hibiscus petal shade in my kitchen junk drawer. Everything’s ready for a speedy fix even when chaos strikes.
- Q-tip Blotting: If someone smudges a nail mid-process, a lightly dampened Q-tip (with polish remover) can gently smooth out the worst of the mess before you repaint just that spot. It’s like having an eraser for real life!
- Layer, Don’t Strip: Unless it’s a mega disaster, don’t bother stripping all the polish off. I dab a tiny bit more polish on the spot, tap gently to blend, and seal it with a swipe of topcoat once dry. Honestly, nobody will notice unless they’ve got a magnifying glass.
- Accent or Camouflage: Sometimes, a kid’s fingerprint turns into “extra detail.” I’ve covered a smudge with a bonus leaf, a new swirl, or even a quick dot or two. Now it’s part of the design!
- Wet Polish Backup Plan: If your art is still wet and disaster strikes, gently press your whole finger pad (not the nail) onto the smudge, then repaint the spot. This picks up the worst of the mess without dragging polish everywhere.
If a nail gets chipped on day two or three, I’ll do a fast patch-up, then add a fresh topcoat on every nail. It blends everything together and gives you a few more days of “vacation vibes” before the next full re-do. Nothing makes you feel like Supermom more than tackling a boo-boo and saving your nails in sixty seconds flat!
Durability for Moms: Making Nail Art Last Through Busy Days
Keeping hibiscus flower nail art looking new through a regular mom day can feel like magic, but there are simple tricks to stretch that salon shine so much longer. With three kids, dishes, and the usual household chaos, these habits are my secret weapons:
- Always Use a Topcoat: Don’t skip this step! I love a quick-dry topcoat for speed, but sometimes I double up after two days. A second coat keeps your design glossy and strong, like a little raincoat for your flowers.
- Gloves Are Your Best Friend: I keep a pair of dish gloves by the sink. When it’s time for scrubbing pots or using strong cleaners, I slip them on. It takes five seconds and my nail art lasts twice as long.
- Moisturize Cuticles Nightly: Dry hands lead to cracks and chips. Rubbing in a bit of hand lotion or cuticle oil before bed keeps nails flexible and less likely to flake. I leave hand cream by my bed as a reminder.
- Gentle on Zippers and Cans: I avoid prying open tabs or wrestling tough toy packaging with my nails. I ask the kids or grab a butter knife instead. It’s such a simple swap that saves my polish every time.
- Fresh Topcoat Midweek: I add another layer of topcoat around day three or four, even if my art looks fine. This little shield refreshes shine and protects those petals from fading during more playdates and chores.
- Smart Nail Polish Choices: Not all polishes are made equal. Quick-dry, chip-resistant formulas work better for me. I invest a few more dollars in my main shades so I spend less time fixing later.
- Keep Play Light: I teach my boys to high-five instead of tugging on my fingers, especially when my nails are freshly painted. Fewer tugs and tumbles equal fewer chips!
With these daily habits, my hibiscus nails often come out looking nearly fresh at the end of the week (which is hard to believe with all the spills, crayons, and wrestling matches around here). These little habits mean I can keep my “vacation” on my fingertips, no matter how busy my mom days get!
How Hibiscus Flower Nail Art Brightened My Mood (and Even Inspired My Kids!)

After I started doing hibiscus flower nail art, I noticed something funny—my mood picked up, and my kids wanted to join the fun! Those bursts of pink and orange didn’t just make my hands look vacation-ready, they seemed to spread a happy energy through our whole house. Some days, we all need a lift, and this little splash of color brought us closer together in ways I didn’t expect.
Getting the Kids Involved: Turning Nail Time Into Family Fun
Let’s be honest, entertaining three boys takes some real creativity, especially when I need a few minutes of self-care. The magic happened when I stopped trying to keep nail time just “for me” and invited my kids into the activity. Suddenly, what started as a quick polish break turned into laughter, giggles, and real connections.
Here are a few ways we turned hibiscus flower nail art into family fun:
- Color Choosing Contests
I let my boys pick polish shades for my hibiscus petals. Sometimes the results are wild—think neon green petals with blue centers—but letting them decide keeps them invested and excited. The conversations that happen around our kitchen table while picking colors are just the best. Everyone gets a turn, and it’s a tiny way of sharing control and celebrating their quirky creative ideas. - Miniature Art Lessons
Instead of guarding my detail brushes, I shared them. I showed the kids how to make a “fat teardrop” for a petal, and soon our kitchen was full of little scribble-nails and half-finished flowers. The best part? They started seeing nail art as a mini art lesson, learning patience and hand control, even if the end results are a bit wonky (which, let’s be real, is half the fun). - Special “Kids’ Spa Night”
On rainy afternoons or lazy Saturdays, we spread out an old towel and created our own “spa.” Everyone picks a nail or two, and I paint tiny designs while the boys take turns telling jokes or making up silly stories. Sometimes I add a tiny hibiscus to their thumbs just to hear them brag about their “vacation nails” at school. - Turning Oops Moments Into Memories
Letting kids help means accidents. Smudged petals, huge globs of polish, or even a streak across the table—every mistake turned into laughter and a story we’d retell for days! One time, my youngest decided his big toe needed a ‘super hibiscus’ and ended up with a pink mess all over his sock. It was hilarious and oddly sweet. I always remind myself, it’s not about perfect nails, it’s about happy memories.
If you want to spark some playful bonding with your kids, here are some easy ways to get started:
- Set out all the polishes and let everyone choose their own “vacation color” combo.
- Create a rule that nobody needs salon perfection—mistakes are what make it memorable!
- Snap photos of your final creations (even if they’re lopsided) and make a little family nail art gallery on your fridge.
- Try doing accent nails on just a few fingers—less pressure, lots of color, and everybody gets a turn.
- Keep wipes or a bowl of warm, soapy water nearby for fast, stress-free cleanup.
Watching my boys chase each other around with half-painted nails, proud of their artwork, melted my heart! Nail time has turned into a new kind of family tradition for us—a moment of silliness and a break from chores. I get my sunny hibiscus flower nail art, and the kids get to feel like little artists. Everyone gets to enjoy a mini-vacation, right at home!
Conclusion
Hibiscus flower nail art gave me more than just cute fingertips, it turned every busy week into a mini getaway right at home. Even on those loud, messy days with my boys, a simple pop of color really lifted my spirits and made me feel a little more like “me.” It’s proof that joy can fit right alongside groceries, homework, and bedtime stories.
If you’re a mom looking for a quick mood booster, I hope you’ll give hibiscus flower nail art a try. Nothing beats the feeling of sharing that fun with your kids, seeing their wild designs, and snapping a photo of your own “vacation nails.”
Thank you for joining me on this happy journey! If you decide to try this look, or have your own family nail art stories, I’d love to hear about them in the comments. Let’s help each other find bright moments in the swirl of daily life—one cheerful manicure at a time!
This post may contain affiliate links. Read the full disclosure here.