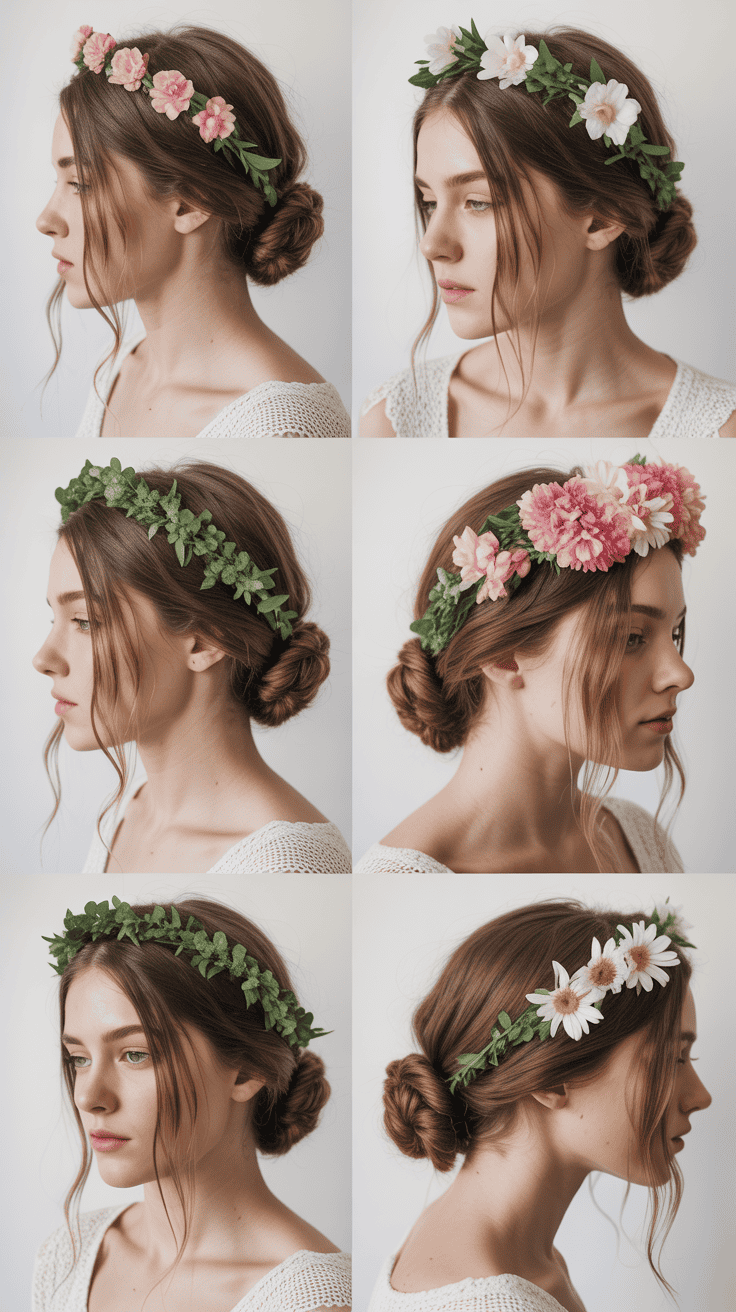
How To Do Hairstyles With Flower Crowns That Stay In Place
If your little ones are anything like mine, you know hairstyles with flower crowns are absolutely adorable, but getting them to actually stay put? That’s the real challenge! I’ve always wanted those sweet crowns to last through photo sessions, birthday parties, or just a regular Tuesday when someone feels extra fancy!
After years of trial and error (with help from my wild crew of three boys), I’ve found some tricks that keep those blossoms from slipping or falling apart. I’m excited to share the mom-tested ideas that make pretty, comfy, and sturdy hairstyles easy enough for real life—no fuss, just fun and flowers!

Choosing the Right Flower Crown for Moms and Kids


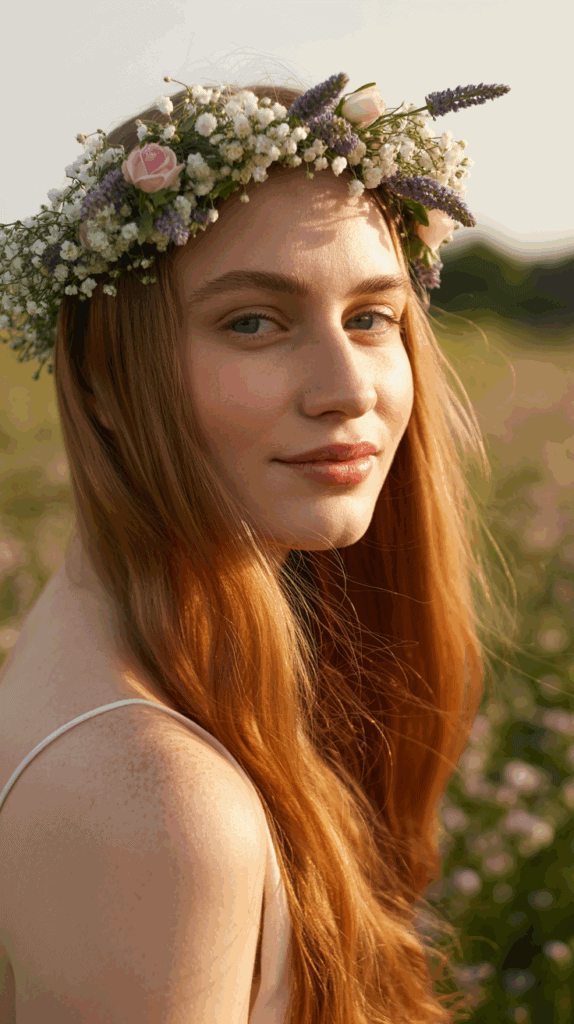
One thing I’ve learned about hairstyles with flower crowns is that having the right crown can make or break the look (and your patience!). Whether it’s a messy bun for mom or braids for your little ones, the right flower crown will help everything stay put and feel special. Picking flower crowns that fit well and feel comfy is just as important as figuring out the hair itself. If your house is like mine, full of wiggly kids and busy mornings, you want a crown that’s easy, cute, and won’t poke or slip after ten minutes. Let’s talk about how to pick the best flower crowns for both moms and kids so those lovely blooms don’t turn into a headache.
Styles and Materials to Fit Every Age
Kids and moms don’t always want the same look (and that’s okay!). For flower crowns, picking the right style and material sets everyone up for success.
- Soft fabric or felt flowers are a great choice for little ones, especially toddlers and preschoolers. They’re lightweight and usually have softer edges, which means no scratching or poking.
- Silk or faux blooms are perfect for older kids and adults. These look more realistic and add that “wow” factor for photos or special events.
- Elastic bands work for all ages. Adjustable elastic keeps the crown snug without feeling too tight.
- Wire-based crowns offer more structure if you want to bend the crown to fit a braid or bun, which is handy for older kids and adults but can sometimes feel stiff for tiny kids.
- Headband-style crowns are easy for everyone. Just slip it on like a regular headband, and you’re done! I love these for quick styles on busy school mornings.
Choosing the Right Size and Fit
Sizing matters more than I ever expected when wrangling crowns onto my boys (and sometimes myself for family photos!).
Here’s how I make sure the fit works for everyone:
- Measure head circumference with a soft measuring tape or even a piece of yarn. This step means no guessing and no tight headaches later.
- Pick adjustable designs if possible. Look for crowns with ribbon ties or stretchy backs. Kids grow fast, and an adjustable crown will last longer.
- Try before the big day if it’s for a birthday, holiday, or other special event. Let each person wear the crown around the house for a bit to check comfort.
- Avoid heavy crowns for little kids. If it feels bulky in your hand, it’s probably too much for a young child.
Color Choices That Pop
Getting everyone involved in picking out flower colors makes the experience more fun (and lets kids feel like they have a say—win!).
A few ways I keep color choices simple and happy:
- For kids, I go with bright, cheerful colors or match the flowers to their outfit. Pinks, lavenders, sunny yellows, and soft blues are always a hit here.
- For moms, I love classic white, blush, or even jewel tones for a more grown-up vibe. Sometimes I’ll mix in just a tiny pop of color so my crown coordinates with my boys’ without being too “matchy-matchy.”
- If we’re doing sibling crowns, I pick different shades of the same color or similar flowers to bring it all together without being identical.
Durability and Comfort for All-Day Play

A flower crown that’s cute but itchy is no fun! Here’s what I pay attention to when picking crowns we can actually wear longer than five minutes:
- Crowns with felt or ribbon bases are softer against the skin and less likely to snag hair.
- A little bit of padding underneath the crown (some come with a foam or cloth lining) adds a big comfort boost, especially if your child hates headbands.
- Avoid crowns with sharp wires or glue spots sticking out—trust me, you’ll hear about it seconds after the crown goes on.
Flower Crowns for Special Needs and Sensory Sensitivities
If you have a little one who is sensitive about textures or pressure on their head, you’re not alone. My youngest is picky, and we learned trial-and-error style what works best:
- Soft, wide headbands with lightly attached flowers keep the look but skip any pinching.
- Lightweight felt flowers instead of heavy silk ones cut down on bulk.
- Sometimes, a single flower clip feels better for a sensory-sensitive child than a full crown.
When you choose flower crowns that truly fit and feel comfy, everyone’s happier (and your chances of the crowns staying in place go way up!). Once you have the right crowns, styling becomes much easier and way more fun.
Prepping Hair for Long-Lasting Flower Crown Styles
When it comes to hairstyles with flower crowns, the real magic happens before you even slip the crown on. I learned this after seeing my kids’ flowers twist sideways or tumble off before I’ve even poured my first cup of coffee. Good prep makes all the difference, especially if you want those sweet blooms to sit tight through hours of play, cake, or chaos. The right base transforms flower crowns from a five-minute wonder into an all-day favorite. Here’s how I make sure our crowns have staying power (and save a little sanity, too!).
Start with Clean, Dry Hair
Nothing derails a hairstyle with flower crowns faster than limp, sticky, or greasy hair. I always start with freshly washed, completely dry hair.
- Skip heavy conditioners near the roots. These can make hair slippery, so I stick to regular shampoo or just a touch of conditioner on the ends if the hair feels dry.
- Dry thoroughly before styling. Damp hair doesn’t hold shape as well and can flatten under the crown.
Sometimes, if we’re in a rush, I’ll use a little dry shampoo at the roots. It gives fine or flat hair a boost and soaks up any last traces of oil.
Add Gentle Texture for Grip
Super-smooth hair is more likely to let flower crowns slide or spin. A little bit of texture works wonders! This goes double for straight or silky hair that just won’t cooperate.
- Lightly mist with texturizing spray or even salt spray, especially for older kids or moms. I like to spray and scrunch for some natural hold.
- Tease the crown section gently with a wide-tooth comb. Focus on the spot where the flower crown will rest.
- For extra fine baby hair, a spritz of leave-in detangler makes brushing easier but adds just enough resistance so the crown stays in place.
The goal is to get just enough “grip” so the crown has something to cling to, not create knots or stiff hair.
Styling Before the Crown
The base style can help lock that flower crown down all day. I rarely place a crown on loose hair and call it done (unless I’m up for chasing it all afternoon).
Some of my favorite prep styles:
- Loose braids across the top, around the sides, or down the back. Braids give something for clips or pins (or the crown itself) to grab onto.
- Low ponytail or bun. Secure the hair at the nape. This balances the weight and helps with comfort, too.
- Half-up styles. Take small sections from around the face and pin at the back, so the crown stays put without pulling on edges.
These styles not only make a nice anchor, but teeth or loops on the crown can grip them for better hold.
Secure with Invisible Helpers
Even mom-tested flower crowns sometimes need a little backup! I keep a secret stash of helpers for days that call for extra security.
Here’s what works best in our house:
- Bobby pins. I use pins that match our hair color and tuck them right through the base of the flower crown into the hair. Four or five spaced evenly can work wonders.
- Small, clear elastics. For braided or sectioned styles, I add a few elastics at key spots to keep things tight.
- Mini hair combs. Some crowns come with these built in, but you can slide a few extra under the base for more grip.
- Ribbon ties. If the crown allows, I tie thin ribbons under the hair at the nape or behind each ear, then tuck the ends in.
No one sees these once the flower crown is on, but they help keep every petal and loop exactly where it belongs.
Tame Flyaways and Baby Hairs
Tiny hairs around the hairline can ruin even the prettiest styles with flower crowns, especially after a few hours of running or dancing. My favorite tricks involve simple products and tools I already have on hand.
- Clear brow gel or gentle hair gel brushed over strands with a clean toothbrush works great (bonus, it doesn’t get crunchy).
- Silky scarf or bandana wrapped for ten minutes after styling helps hair “set” before the crown goes on.
- For curly kids or frizz-prone hair, a little leave-in conditioner or curl cream keeps things smooth and shiny.
Quick Checklist for Busy Mornings
Prepping for a flower crown shouldn’t add stress to the day. Here’s the fast version I use when we’re halfway out the door but everyone insists on their crowns:
- Brush hair and shake in a little dry shampoo if needed.
- Add gentle waves or a braid for grip.
- Place and secure the crown using pins or ribbons.
- Smooth any fuzzy bits.
- Double-check comfort. No one sticks with a style that hurts!
Prepping hair the right way means less fuss later and more fun all day. Those little moments spent now keep the magic of flower crowns going strong until bedtime (or at least until snack time!).
Step-by-Step Hairstyles with Flower Crowns That Last All Day

Flower crowns are the cherry on top of any sweet hairstyle, but if you’re like me, you want something that actually stays in place! After loads of experimenting (on myself and my busy boys), I’ve found a few hairstyles with flower crowns that won’t slip, flop, or wilt by lunchtime. If you’ve spent one too many mornings re-doing hair before a playdate or party, these styles will be a lifesaver. Let’s dive right in—here’s how you can get those dreamy, picture-perfect looks that last from pancakes all the way to bedtime.
Playful Loose Waves with a Flower Crown
Loose, bouncy waves and flower crowns are a match made in heaven! This is one style I turn to when I want an easygoing, cheerful vibe that isn’t fussy. Here’s how I make these waves last and keep the crown exactly where I want it.
- Start with dry, textured hair. I use a little dry shampoo or a touch of texturizing spray for grip. Super silky hair makes crowns slip more.
- Create the waves. I twist sections of hair and quickly run a curling wand over them. If you don’t have a wand, braiding damp hair the night before and letting it loose in the morning gives that soft, wavy texture.
- Set the style. I shake the waves gently and use a flexible hold hairspray. The trick is not to overload! I aim for hair that moves but isn’t slippery.
- Place the flower crown. I position it where I want it to sit, usually a bit behind the hairline for a natural look.
- Pin for security. I slide bobby pins through the crown base and into the hair, right behind the ears and at the nape. Four pins work most days.
- Smooth baby hairs. A dab of clear gel on a small brush tames any flyaways for that polished look.
Extra tip: If your crown still feels wobbly, sneak in one or two tiny clear elastics to anchor small sections of hair under the crown. No one will ever notice, and your flowers will stay bouncy and beautiful all day.
Easy Braided Crown for Little Ones
This is a go-to for school mornings and birthday parties! Braided hairstyles with flower crowns are adorable and help anchor those blossoms when your child is more interested in running wild than sitting still. Here’s how I get my wiggly boys to keep their flower crowns on, without tears or endless “sit still” reminders.
- Start with brushable, tangle-free hair. I use a little detangler spray and a soft-bristled brush for less tugging.
- Create two pigtail braids. Part the hair down the center and braid one section at a time, starting above the ear. Secure with clear elastics.
- Wrap and pin the braids. Cross the braids over the top of the head, just like a real crown. Tuck in the ends and pin them right behind the ears.
- Fit the flower crown. Place it gently, letting it rest atop the braids. The braid acts as a grip, helping the crown stay put.
- Secure with extra pins. This is the magic! I push a few bobby pins through the braid and into the crown’s base or ribbon. The combination works like Velcro for busy kids.
Getting little ones to sit still is half the battle. I’ve found a snack or letting them hold a mirror while I braid works wonders! Sometimes a favorite show on the tablet gives me those five precious minutes I need. If your child fidgets, try doing the braids the night before and just popping the crown on in the morning. Less hassle, happier kids, and the crown will last through playground adventures.
Effortless Low Bun for Busy Moms
Let’s be honest. Moms need styles that are chic, quick, and sturdy. Enter the low bun! This is a classic for a reason, and it works beautifully with all types of flower crowns. You’ll look pulled together, but there’s no need for a ton of products or hours in front of the mirror.
- Gather your hair at the nape. Brush it back softly for a relaxed feel. If you want more volume, tease the crown section gently or use a root-lifting spray.
- Twist into a loose bun. I wrap my hair into a bun shape and use a spiral hair tie, which keeps it snug without dents.
- Pin any loose sides. I use two to three bobby pins on each side for hold but don’t aim for total perfection—soft is better here!
- Add the flower crown. Sit the crown just above or around the bun, depending on its style.
- Secure everything. I always add a couple of bobby pins through the flower crown into the bun’s base. If your crown is a headband, slip it on before the bun for a sleek look.
- Boost volume and finish. Gently tug at the top and sides for a little lift, then mist with light hairspray.
This style is a best friend on field trip days or family photo shoots! If your bun tends to slip, try sprinkling some texturizing powder on your roots before styling. No more droopy hair by lunchtime.
Half-Up Style with Instant Flower Power
If you want the beauty of loose hair with the staying power of an updo, a half-up, half-down look gives you both. This is my personal favorite on sunny days when I want a soft, boho vibe but still need things tidy.
- Section off the top layer. From above the ear on both sides, pull back a small section of hair. I like to twist each piece for extra texture.
- Secure with a small elastic. Tie it at the back of the head, right where the crown will sit. For extra fun, braid these sections or leave them twisted.
- Create soft waves. Curl the loose hair or scrunch with mousse for that pretty, tousled look.
- Place the flower crown. Sit it so it covers the elastic and rests on those anchored sections.
- Pin in place. Add a few bobby pins through the base of the crown and into the twisted or braided hair sections. This keeps everything nice and snug.
- Fluff the waves. I run my fingers through the bottom layers and tug gently on the crown for a relaxed finish.
The beauty of this style is how it shows off both the flower crown and your natural hair. No stiff vibes—just soft, whimsical charm that lasts through playgroups, backyard picnics, and everything in between.
These styles are reliable, mom-tested winners. Whether you’re styling wild little ones or need something sturdy for yourself, these step-by-step looks help flower crowns stay cheerful all day long!
Essential Tips for Keeping Flower Crowns in Place All Day

When I first started playing around with hairstyles with flower crowns, I quickly realized it’s not just about putting a pretty band on top of some hair. Keeping those flowers sitting pretty from breakfast till sunset takes real mom tricks! Especially if your kids are like mine and bounce from the backyard to the living room in five seconds flat. I want to share the little things that make all the difference in making sure those crowns don’t budge. Whether you’re wrangling wild kids at a birthday party or want your own crown to stay put during family photos, these tips will keep the blooms locked in place and frustration low.
Pick the Right Crown Placement
Not all heads (or hair types) are the same, so the best spot for a flower crown can change. Here’s what helps me find the perfect position:
- For little ones, a crown fits best across the top, just a bit back from the hairline. Too far forward and it slides, too far back and it’s floppy.
- For adults or older kids, I place the crown where the skull curves. Right above the occipital bone (that bump near the back) is usually the sweet spot.
- If the crown is on a headband, I like to angle it slightly so it hugs the shape of the head.
- On super silky or fine hair days, I try using a loose braid or a twist as a base and tuck the crown on top.
A good fit from the start means fewer touch-ups, which saves so much time.
Secure, Secure, Secure (Without the Fuss)
I used to think flower crowns should just stay on by magic, but the real magic is in a little extra hold. Here are my go-to tools:
- Bobby pins: I can never have enough! Slide pins through the crown’s frame and into your hairstyle. I use at least three. For wild play, more is better.
- Mini hair combs: Some store-bought crowns come with these already. If not, you can buy them in packs and hot glue them to the inside of the crown.
- Ribbon ties: Crowns with a ribbon in the back can be adjusted and tied under the hair for a secure fit. I like to tuck loose ends back into the hair so nothing shows.
- Elastic bands: For stretchy crowns, I sometimes double wrap them for extra snugness (but not too tight, you want smiles, not headaches).
These helpers are my secret to making sure no crown becomes a round-the-neck necklace after snack time.
Use Texture for Extra Stay Power

Smooth, slick hair is an enemy for flower crowns. I always add a little texture:
- A spritz of dry shampoo or light hairspray before placing the crown helps add a touch of grip.
- Even on clean hair, I like to backcomb gently where the crown will rest. It roughs up the base just enough.
- For updos or braids, I twist and secure first, then fit the crown. The added structure helps keep everything in place.
Texture isn’t just for style, it’s my best friend for fighting slippage, especially on those silky-soft toddler strands.
Check for Comfort—And Recheck
Even the prettiest crown will come flying off if it itches or pinches! Before sending my kids out the door, I do a comfort check:
- Make sure nothing sharp is poking out. Sometimes a stray wire or bit of glue can hide under flowers.
- Ask your child to shake their head or jump up and down. If the crown slides, readjust and tuck in extra pins.
- If your child wears glasses, make sure the crown doesn’t press on the earpieces.
- For myself, if I notice a pinch right away, I redo it instead of hoping it’ll get better (spoiler: it never does).
When comfort is sorted out, kids are less likely to fuss with the crown, which means more play and fewer meltdowns.
Work with Your Child’s Hair Type
Not every trick works for every head of hair! Over time, with three boys and so many experiments, I’ve learned a few type-specific tricks:
- For straight, fine hair: Always use products for grip. Add a small braid or twist where the crown sits, so pins have more to hold on to.
- For thick or curly hair: Use stronger pins or skip pins and anchor the crown with built-in elastic or a thin satin scarf under the hair to anchor it.
- For short hair: Place the crown farther forward and secure with tiny jaw clips hidden at the sides.
- Sensitive scalps: Choose wide, plush headband crowns or use single flower clips for less pressure.
A little bit of hair knowledge (and a sense of humor) goes a long way.
Touch-Up Kit on the Go
I never leave home for a big event without a “mom pouch” filled with a few essentials:
- Extra bobby pins (I keep a whole stash in my car!)
- Mini hairspray or texturizing spray
- Spare elastics
- A small comb
- Tiny flower clips as emergency replacements
These quick tools make it easy to fix any sudden hair or crown problem, which, with kids, is always a good idea.
Teach Your Kids Flower Crown “Rules”
This is a big one at our house! With a gentle reminder or two, even little ones can help keep their flower crowns looking sweet.
- No tugging on the front or sides.
- Don’t let friends pull the crown off.
- If something feels itchy or loose, come to mom for help.
- Heads-up tricks: tilt the head down to check if the crown moves before heading out.
The secret weapon: snacks and a mirror while you put on the crown. If they feel part of the process, they’re less likely to mess with the finished look!
Be Ready for Weather and Activity
If a day is packed with playground runs or if wind is whipping like wild, I make small adjustments:
- For rain or heavy wind, skip heavy, droopy crowns and try small flower clips around ponytails or braids.
- For extra-active kids, double up on pins or elastic bands.
- Humidity or heat can make any style slide, so I use extra texturizing product and avoid styles that sit high on the head.
Planning for the day makes a world of difference, and saves a lot of headache (for everyone).
These tricks help make sure hairstyles with flower crowns stay where they belong—on happy, playful heads—instead of on the ground, the table, or the playground slide. With a little prep and the right tools, those flowers will keep looking lovely hour after hour!
Caring for Your Flower Crowns and Accessories

If your house is as wild as mine, then you know how fast a beautiful flower crown can go from perfect to squished, tangled, or even sticky (thanks, peanut butter fingers!). Whether you’re pulling together those beautiful hairstyles with flower crowns for a birthday party or just because someone’s feeling fancy, keeping them looking fresh and cute isn’t always easy. Over the years, I’ve picked up a handful of tricks to help our flower crowns last. These tips make them not just special for a day, but ready for the next round of play and pictures too!
Keep Them Clean (Even with Kids!)
Flower crowns can collect all sorts of surprises—dirt from backyard adventures, hair product, and more. I always take a quick look after each use and do a little cleaning before packing them away.
- Fabric or felt flowers: Spot clean with a damp cloth. I use a baby wipe for little smudges, then let them air dry.
- Silk or faux blooms: Gently dust with a soft brush (an old blush brush works great). For stuck-on messes, I use a slightly damp washcloth, but keep the base dry so the glue holds.
- Real flowers: These need special care. If you make your own with fresh flowers, spritz with water and store in the fridge in a paper towel wrap until ready to wear.
Avoid dunking any flower crown in water, because that’s almost a guarantee for droopy petals or floppy bands!
Store Them the Smart Way
I learned the hard way that flower crowns thrown in a toy bin or bathroom drawer come out crushed and sad-looking. The right storage keeps the colors bright and the shape perfect.
- Hang on a hook or a headband holder: I use adhesive hooks on the inside of a closet door. My kids can grab their favorites without squeezing or bending any blooms.
- Large zip bags: For seasonal crowns (like spring flowers or holiday reds), I tuck each in its own gallon zip bag before storing in a labeled bin. It keeps out dust and kid messes.
- Original packaging: If you have the box it came in, use it! Many store-bought crowns come with a shaped insert or box, and that’s perfect for long-term storage.
If your crown has real flowers (like from a wedding or special photo shoot), I press a few blooms in a scrapbook and let the rest dry out, creating a keepsake to remember the day.
Repair Them Like a Pro (Yes, You Can!)
Kids tug, crowns get dropped, and even the prettiest accessories sometimes fall apart. Don’t toss a flower crown just because a petal pops off! It’s usually easy to fix.
- Loose flowers: Hot glue is your best friend. I keep a mini glue gun stashed high up for fast repairs.
- Bent wire: Gently shape it back with your hands or small pliers. If any sharp ends stick out, cover with a dab of glue and a little felt.
- Ribbon ties come undone: Re-tie or add a dab of clear nail polish to stop fraying.
If a crown looks a bit tired, I sometimes add a few new faux blooms or fresh ribbon, giving it a whole new look for almost zero effort.
Protect Flower Crowns from Sun and Sprays
Hair spray, perfume, and even sunblock can stain or fade delicate flower crowns. Before spritzing, I slip the crown off for a minute and put it back on afterward. If we’re outside for pictures, I keep flower crowns in a bag until the last minute so they look bright for every photo.
- Direct sunlight: Prolonged sun exposure can bleach colors. Store crowns away from windows between uses.
- Products: Always apply hair product, perfume, or heat spray before putting on the crown. This keeps petals soft, not sticky.
A little prevention saves so much frustration later!
Dealing with Tangled Hair and Stuck Accessories
I have boys with all different hair types. Sometimes, we end up with hair tangled around flower crown wires or headbands. Don’t yank! Here’s what I do:
- Hold the base steady, then gently work any knots free with your fingers or a wide-tooth comb.
- If using bobby pins, remove them first before sliding off the crown.
- For kids with super fine or curly hair, I sometimes dab a bit of leave-in conditioner on stubborn tangles.
This keeps both hair and crowns intact and ready for next time.
Teach Kids to Treat Crowns with Care
Even little ones can learn how to be gentle with their flower crowns! I make it part of our routine, like putting shoes by the door.
- Remind them to take off crowns before running, jumping, or roughhousing.
- Practice putting on and taking off crowns in front of a mirror.
- Keep a special “crown spot” in their rooms to help them remember where to put accessories when not in use.
Turning care into a regular habit means fewer accidents and more happy, intact crowns.
Quick Fixes for On-the-Go
You don’t always have time for a delicate deep clean or a full repair job, especially on busy mornings or at parties.
Here’s what I keep handy:
- A few bobby pins for loose bases
- A small packet of wipes for sudden smudges
- A ribbon or two for quick replacements
With a little attention and care, flower crowns and fun hair accessories can look lovely again and again—no matter how busy your day, or how energetic your kids! Taking a few extra minutes to care for these pretty additions means you’ll always have the perfect accent ready for any “let’s wear flowers today!” moment.
Conclusion
Beautiful, lasting hairstyles with flower crowns are totally doable—even for busy moms of boys like me! With the right prep, a few trusty pins, and a little planning, those bright blooms can survive parties, playdates, and even wild backyard races. It took some practice (and patience) to figure out what really works in real life, but every success feels worth it when the kids run by, still wearing their crowns hours later.
I hope this guide inspires you to try a new style this week! Experiment with a playful braid, a sturdy bun, or even a quick half-up look. Share your wins (and even your funny fails) in the comments or with a friend. It always makes my day to hear from other parents in the same messy, happy boat.
Thanks for reading and joining me on this journey! I’d love to see how your own hairstyles with flower crowns turn out, so don’t be shy—post a pic or let me know your favorite tricks. There’s real magic in little flowers and big smiles.
This post may contain affiliate links. Read the full disclosure here.