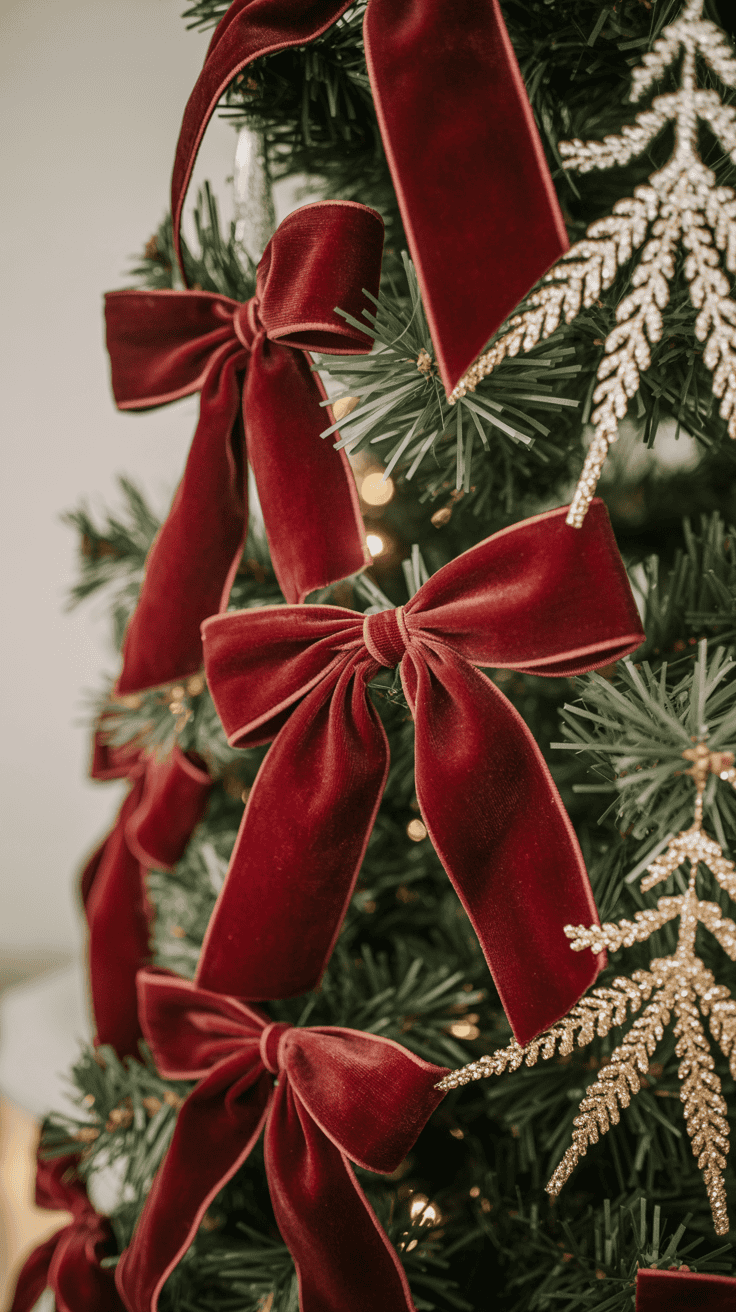
Burgundy Velvet Bows for Christmas Tree That Feel Luxe and Cozy
The boys are buzzing around with candy canes, and I’m eyeing the lights, ready to get this tree done fast and pretty. I’m using burgundy velvet bows for christmas tree to hit that luxe look that still feels cozy, without spending all day on it. The color is rich, the texture is soft, and it photographs so well. It’s also budget friendly and tough enough for little hands, which is key in my house!
In this post, I’ll share how many bows I use, the sizes that work, and where I place them for balance and depth. I’ll show how I tie them so they look full, plus the easiest ways to attach them that hold up with kids. I’ll cover styling ideas by theme, from classic to woodland to glam. I’ll also share smart shopping tips, how I care for velvet, and how I reuse these bows year after year!

Why Burgundy Velvet Bows Make the Tree Feel Luxe and Cozy

I add burgundy velvet bows for christmas tree every year because they do two jobs at once. They bring in that rich, elegant color, and they also make the tree feel soft and inviting. My boys can be wild, the tree still looks calm and polished. The bows catch the light, hide little gaps, and make every photo look warm. It is an easy win, which I love during a busy season!
Color that warms the room

Deep burgundy sits right against the green needles and feels balanced. The red has enough depth to hold its own, but it never shouts. Under warm white lights, the color glows like mulled wine in a mug. It adds mood, but still feels friendly for family nights.
I notice it in photos right away. Burgundy reads rich in low light and bright rooms. It does not blow out or look flat, which helps with family pics and holiday cards. Faces look rosy, the tree looks full, and the color stays true on phones and prints.
A quick pairing guide I use when I want extra glow:
- Gold clips or ornaments add a soft sparkle that hugs the burgundy.
- Clear or warm white lights keep the red tone clean and cozy.
- A few matte black accents ground the look and keep it from feeling sweet.
Velvet texture that looks high end

Velvet has a matte, plush finish that instantly upgrades the tree. It hides the shine of cheap plastic branches and fills visual gaps. Even if my tree is budget friendly, the texture reads luxury. It is the same idea as a good throw on a simple sofa, it smooths everything out.
Double-faced velvet is my favorite, because it looks beautiful from every angle. No shiny backing, no surprise flip sides in photos. The loops stay rich and lush, even when a bow twists a little during the week. The texture also photographs like a dream, soft and touchable.
Small details that make velvet feel luxe:
- Wider ribbon, 2.5 to 3 inches, looks full without drooping.
- A gentle tail shape, cut at an angle, adds polish.
- A tiny knot or center wrap cleans up the middle for a tailored finish.
Works with many decor styles

I keep burgundy on my tree because it flexes with my mood each year. Here is how I style it across a few looks.
- Traditional: I pair burgundy bows with glass balls, brass bells, and plaid ribbon. It feels classic and warm.
- Farmhouse: I mix in wood bead garland, twine stars, and burlap. The red keeps it cheerful, not plain.
- Modern: I use fewer bows, larger scale, and simple shapes. Matte black, smoked glass, and burgundy look chic.
- Scandinavian: I keep it light with white lights, paper ornaments, and wood tones. Burgundy adds a cozy pop without fuss.
Simple pairings that always work:
- Gold for glam and glow.
- Wood tones for rustic warmth.
- Ivory or linen ribbon for a soft, airy layer.
- Evergreen picks for texture that blends with the bows.
Real-life perks for busy moms

I need fast wins that hold up to three boys and a dog. Bows give me both style and sanity.
- Covers gaps: Big loops fill bare spots and make the tree look full in minutes.
- Safer than glass: No sharp shards, less stress near little hands.
- Less visual clutter: The bows create a clear color story, so I can skip extra ornaments.
- Easy to move: I tuck them onto branches and shift them as I go. No hooks to chase.
- Keeps shape: Wired edges hold their curves, even after curious fingers explore.
- Durable: Velvet handles gentle squishing and still springs back, which is hard to believe after a long afternoon.
I clip a few near the bottom where little ones play, then add the rest higher for balance. If a bow gets tugged, I pop it back and it still looks tidy. Quick, pretty, and mom-proof, which is my favorite combo!
Plan Your Bow Strategy: Sizes, Quantities, and Placement

Before I start tying, I map out sizes, amounts, and where each bow will sit. It saves time, and it keeps the look consistent while the boys bounce around me. I use burgundy velvet bows for christmas tree because the color holds its shape and adds instant polish, but the plan matters just as much as the materials.
Pick the right ribbon width and bow size

Getting scale right makes the whole tree feel balanced. Wider ribbon looks plush, but too wide on a small tree can swallow the branches. Here is my quick guide that keeps things simple.
| Tree Height | Ribbon Width | Loop Span (tip to tip) | Tail Length per Bow |
|---|---|---|---|
| 3 to 4 ft | 1.5 in | 4 to 5 in | 6 to 8 in |
| 5 to 6 ft | 2 to 2.5 in | 6 to 7 in | 8 to 10 in |
| 6 to 7.5 ft | 2.5 to 3 in | 7 to 9 in | 10 to 14 in |
| 8 to 9 ft | 3 to 4 in | 9 to 11 in | 12 to 16 in |
| 9 ft+ | 4 in | 10 to 12 in | 14 to 20 in |
A few notes I follow every year:
- For mini trees, 1.5 inch ribbon keeps the bows light and tidy.
- For standard trees, 2.5 to 3 inch ribbon looks full without drooping.
- For tall trees, 4 inch ribbon reads luxe and holds a bold shape.
- If your branches are sparse, shorten the tails by 2 inches. It helps the tree look cleaner and less heavy.
Example that works for me: on a 7.5 foot tree, I tie 3 inch ribbon with 8 inch loops and 12 inch tails. It fills the space, but you can still see ornaments and lights.
How many bows do I need?
I pick a coverage level before I cut a single ribbon. That way I know how many bows to prep and where they will go.
- Small trees, 4 to 5 feet: 12 to 18 bows
- Standard trees, 6 to 7.5 feet: 24 to 36 bows
- Tall or extra full look, 8 to 9 feet: 40 to 60 bows
What those numbers look like in real life:
- Light coverage: Spread bows
Step-by-Step: How I Tie, Fluff, and Attach Velvet Bows That Stay Put
When the boys are zooming circles around the tree, I need bows that look luxe and do not budge. I make it simple, repeatable, and fast. I’m talking zero slipping, smooth loops, and tidy tails. I use burgundy velvet bows for christmas tree to get that cozy shine and a polished finish that holds up to real life. Here is my exact process, with the little tricks that save my sanity!
Supplies I actually use

I keep a small toolkit on the coffee table so I can tie while the kids snack. These are the pieces that make bow-tying easy and clean.
- Double-faced wired velvet ribbon, 1.5 to 4 inches wide, depending on tree size.
- Floral wire or pipe cleaners, 18 to 22 gauge, cut to 8 to 10 inches.
- Sharp scissors, for crisp tail cuts.
- Ruler or tape measure, to keep loops consistent.
- Lighter or clear nail polish, for fray control on cut ends.
- Lint roller, to pick up fuzz and pet hair.
I plan ribbon yardage before I start. Here is a quick guide that works for light to full coverage. If you love a full bow look, pick the higher number.
| Tree Height | Ribbon Width | Yardage, Light | Yardage, Medium | Yardage, Full |
|---|---|---|---|---|
| 3 to 4 ft | 1.5 in | 8 to 12 yards | 12 to 18 yards | 18 to 24 yards |
| 5 to 6 ft | 2 to 2.5 in | 15 to 20 yards | 20 to 28 yards | 28 to 36 yards |
| 6 to 7.5 ft | 2.5 to 3 in | 20 to 28 yards | 28 to 40 yards | 40 to 55 yards |
| 8 to 9 ft | 3 to 4 in | 28 to 40 yards | 40 to 60 yards | 60 to 80 yards |
A simple rule I use: one medium bow usually takes about 1.25 to 1.75 yards. Larger statement bows can take up to 2 yards.
Pro tip I swear by: seal cut ends right away. A quick flick of a lighter near the back edge, or a thin swipe of clear polish, stops fraying fast.
Tie a neat bow every time
A pretty velvet bow comes down to even loops, a snug center, and clean tails. I keep it consistent with a few small habits.
- Measure the first loop. I set my ruler on the table and pull the ribbon to the same mark every time, usually 7 to 9 inches for a standard tree. I pinch the center with my thumb.
- Match the second loop. Fold the ribbon back and line it up with the first loop. Keep both pinches together so the center stays neat.
- Snug the center. Wrap a piece of floral wire around the pinched center, twist tight, then give it one more turn. You want firm, not crushed.
- Cut the tails. I like two finishes:
- Dovetail: Fold the tail in half, then cut from the fold to the edge at a 45 degree angle. You get that clean V shape.
- Angled: Cut the ends at a slight angle for a modern look and less bulk.
- Seal the ends. Touch up with lighter or clear polish to stop fraying.
My easy counting trick: as I make each loop, I count to four while pulling the ribbon across my palm. Same count, same pressure, same size. It keeps the loops even without constant measuring.
Two small tips that help so much:
- Keep the velvet nap smooth: Stroke the ribbon in one direction while shaping, it keeps the surface rich and uniform.
- Add a center wrap: If the knot looks messy, cut a 3 inch strip, wrap it over the wire, and tuck the ends into the back.
Short on time? Use pre-made velvet bows with hidden wires or clips. I grab a few each year for the back of the tree or high spots I cannot reach without the step stool.
Attach so it survives kids and pets
I need bows that stay put when little hands patrol the lower branches. The secret is how I attach them.
- Find the branch core: Slide past the soft tips and wrap around the sturdy inner part of the branch.
- Wrap the wire two to three times: Place the bow where you want it, pull the wire around the branch core two to three times, then twist the ends tight behind the branch.
- Tuck the ends: Fold the sharp wire ends back along the branch so they do not snag or scratch.
- Hide the hardware: Fluff the loops to cover the wire, then drape tails to hide any peek-through.
- Real trees: Choose inner, woodier branches close to the trunk. The natural grip holds the wire better.
- Artificial trees: Attach near the branch hinge or the main stem. You can also twist the pipe cleaner right onto the metal spine.
If a bow wants to tilt, add a second short piece of wire and anchor one loop to a nearby branch. It is invisible once you fluff, and it keeps the bow facing forward.
Kid zone tip: for the bottom third of the tree, I use pipe cleaners instead of wire. They bend soft, and they are easier to retwist after curious little helpers visit.
Fluff, fix, and keep bows looking fresh
Velvet loves a little shaping. A few seconds of fluffing makes each bow look plush and photo ready.
- Shape from the edges: Hold the loop base, then pull from the wired edges outward. Avoid tugging the center. It keeps the middle smooth and stops that crushed look.
- Steam from a distance: Use a handheld steamer 8 to 12 inches away. Short bursts only. It relaxes creases without flattening the pile.
- Roll away lint: A quick tap with a lint roller picks up fuzz, glitter, and pet hair. Do not rub hard. Light taps work best.
- Refresh mid-season: Give the tails a gentle tug after a week. Gravity and little hands can soften the shape.
- Store smart: After the holidays, lay bows flat in a shallow bin, loops facing up, with tissue between layers. Add a label so next year is easier.
If a bow gets a stubborn crease, I steam, reshape from the edges, and let it cool in place for a minute. It sets like a curl, which is hard to believe, but it works every time.
Style Ideas: Tree Themes and Color Combos That Love Burgundy Velvet

I build my color story around burgundy velvet bows for christmas tree, then layer textures that make it glow. These ideas are fast, pretty, and kid friendly, which keeps me sane!
Classic and cozy glow
I stick to warm white lights, gold or champagne ornaments, and mercury glass for soft shine. Add chunky knit textures for warmth, then do a stacked topper with a velvet bow under a slim gold star, and finish with a red tartan plaid tree skirt for that homey hug.
Rustic farmhouse warmth

I mix wood ornaments, kraft paper tags, burlap or linen ribbon, and pinecones. Keep the palette tight, think burgundy, wood, ivory, so the bows pop without visual noise.
Modern and a little glam
I pair matte black, smoked glass, and tiny hits of brushed gold. Use fewer, larger bows, place them slightly asymmetrical, and keep the topper simple, like clean branches or a minimal metal star.
Small spaces and kids’ rooms
I use mini trees, 1.5 inch ribbon, shorter tails, and half-bows on branch tips. Delicate pieces go high, shatterproof ornaments and felt buddies stay low for safe, happy hands.
Shop Smart, Save Money, and Reuse All Season

I want pretty, budget-smart decor that survives three boys and a dog. When I shop for burgundy velvet bows for christmas tree, I look for quality that lasts, prices that make sense, and ways to use the bows all season. A few smart choices now mean I can pull them out next year and they still look luxe. Less stress, more cheer!
What to look for when buying velvet ribbon or bows

A few details make the bows look rich and hold their shape. I check these every time.
- Wired edges: This is a must. The wire helps loops stay full, even after little hands touch them.
- Double-faced velvet: Velvet on both sides looks plush from every angle. No shiny backs, no surprises in photos.
- Colorfast fabric: Look for colorfast or “no bleed” on the tag. It keeps the burgundy true under lights and in storage.
- Low shed: A tight pile sheds less. Run your thumb across a sample. If fuzz flies, skip it.
- Best widths:
- 1.5 inch for mini trees, kids’ rooms, and small accents.
- 2.5 to 3 inch for most trees. Full, pretty, and easy to tie.
- 4 inch for tall trees or big statement bows.
- Tone matters: A deeper burgundy with a slight brown lean feels warm, not bright. It pairs beautifully with gold, wood, and greenery. It also photographs soft and cozy.
Quick test I do in store: bend the ribbon into a loop and let go. If it springs back with a clean curve, it will hold up on the tree.
Budget-friendly sources and timing

Good velvet can be affordable if you shop smart. I mix sources and watch the calendar.
- Craft stores: Great for wired, double-faced options with coupons. I stack sales with store apps when I can.
- Etsy makers: Lovely pre-made bows and custom sizes. Expect higher quality and unique tones.
- Local floral suppliers: Often have wide, luxe ribbons at fair prices. Ask about bulk rolls.
- Off-season sales: Late winter and summer can bring quiet markdowns.
- End-of-season clearance: My favorite for next year. I label the bin, then thank myself later.
If cost matters, compare DIY to pre-made. Here is a quick look at what I usually see.
| Option | Approx. Cost per Bow | Time per Bow | Notes |
|---|---|---|---|
| DIY ribbon | 2 to 5 dollars | 3 to 6 mins | Best value, custom sizes |
| Pre-made basic | 4 to 8 dollars | 0 mins | Fast, simple loops |
| Pre-made luxe | 8 to 15 dollars | 0 mins | Thick velvet, long tails, clips |
Tip I love: buy one big roll for the tree, then a smaller roll for gifts and wreaths so everything matches.
DIY or pre-made? Pick what fits your time

Both work. It comes down to how much time you want to spend and what look you want.
- DIY pros: Lowest cost, custom sizes and tails, perfect color match. You control the shape and fullness.
- DIY cons: Takes time, needs basic tools, and a little patience.
- Pre-made pros: Instant, consistent, and easy to attach. Great for high spots and the back of the tree.
- Pre-made cons: Higher cost per bow, fewer custom options.
Simple comparison from my living room reality:
- DIY, 24 medium bows, about 1 hour to 2 hours total, 60 to 100 dollars in ribbon.
- Pre-made, 24 medium bows, zero time, 120 to 240 dollars depending on quality.
My favorite hybrid plan:
- Buy 6 to 8 hero bows pre-made. Big loops, long tails, perfect fronts for photos.
- Fill in with DIY simpler bows. Smaller loops and clean tails for the sides and back.
- Keep 4 to 6 bonus half-bows ready. Great for gaps, wreaths, and last-minute gift wrap.
This mix looks polished, stays on budget, and saves my sanity when the boys need snacks mid-decorating.
Care, storage, and easy reuse

Good care means next year starts fast and stress free. I treat velvet like a favorite sweater.
- How I store bows:
- Lay bows on a piece of cardboard or a shallow bin with tissue.
- Place loops up, tails laid flat and straight.
- Add silica packets, then close the lid tight.
- Keep the bin in a cool, dry closet, not the attic or garage.
- Quick refresh next year:
- Fluff from the edges, not the center.
- Light steam from a distance if needed.
- Roll away lint with a soft lint roller.
I reuse bows all over the house:
- Wreaths: One big bow at the bottom, or off to the side for a modern feel.
- Garland: Even spacing on stair rails or a mantel looks polished and cozy.
- Stair rails: Tie at the posts, then let the tails trail. So pretty.
- Wrapped gifts: Short tails, small loops, instant wow factor.
- Centerpieces: Nestle a small bow near candles or greenery for a little glow.
One last habit that helps so much, I label the bin with size, count, and where I used them. Next year, I can decorate while the cocoa warms, which feels like a small miracle!

Conclusion
Burgundy velvet bows for christmas tree give me everything I want fast, luxe and cozy in one move. The rich color warms the room, the soft texture hides gaps, and the impact is instant. They hold up to kid energy, which is a big win with three boys racing by with cocoa and candy canes.
If you are short on time, try the plan this weekend. Start with a small batch, maybe 8 to 12 bows, then build from there. Place a few at eye level, add two or three as hero bows, and fluff the tails for a polished finish. Simple, repeatable, and stress free.
My favorite part, we make memories while we decorate. I let the boys pick a few spots, I fine-tune the shape, and the tree still looks pulled together. That balance keeps the season sweet and calm.
I would love to see what you create. Share a photo, or try the bows on a wreath or the banister next. Keep it warm, keep it easy, and enjoy that holiday glow!
This post may contain affiliate links. Read the full disclosure here.