Using a Wooden Crate for a Floral Fall Arrangement Ideas
Hi, I’m a mom of three busy boys who never stop moving, but I always find time for little seasonal projects that make our home feel warm and inviting! Using a wooden crate for a floral fall arrangement ideas is one of my favorite ways to welcome autumn without spending a ton. If you love simple, budget-friendly decor that you can put together in a snap, you’re in the right place.
I promise, you don’t need fancy skills or expensive supplies—just a hint of creativity, maybe some kid help, and you’ll have a gorgeous fall centerpiece in no time. Let’s make your living room or kitchen feel extra cozy with easy steps anyone can follow. Grab a crate and your favorite fall flowers, and let’s turn something simple into something truly special!

Choosing the Perfect Wooden Crate for Your Fall Arrangement
Every time I start using a wooden crate for a floral fall arrangement ideas at home, I feel like I’m choosing the stage for all those beautiful colors and textures. The right crate sets the tone for the whole display. Think of it as the cozy sweater that holds everything together! Picking one feels a little like picking pumpkins with my boys, you want to find the one that just feels right for your space and style.
Size Matters: Finding the Right Fit

When I’m juggling snacks, chores, and energetic kids, the last thing I need is a crate that won’t fit where I want to put my flowers! I always look at where my arrangement will go first. Is it going on the kitchen table, a living room shelf, or right by the front door?
- For smaller tables or shelves: Choose a crate around 10-12 inches long. It fits without crowding.
- For centerpieces or mantel displays: Go a little bigger, maybe 14-18 inches wide, so there’s plenty of room for flowers, pinecones, and little pumpkins.
- If your spot is tiny: Mini crates are adorable and work great on windowsills or in a bathroom for a simple touch of fall.
I always encourage my boys to help hold up the crate where I plan to use it. If we can’t put our cereal bowl next to it comfortably, it’s probably too big!
Wood Type and Finish: Cozy or Classic?
The finish of your crate really changes the look. I always try to match it with the vibe we want for the room.
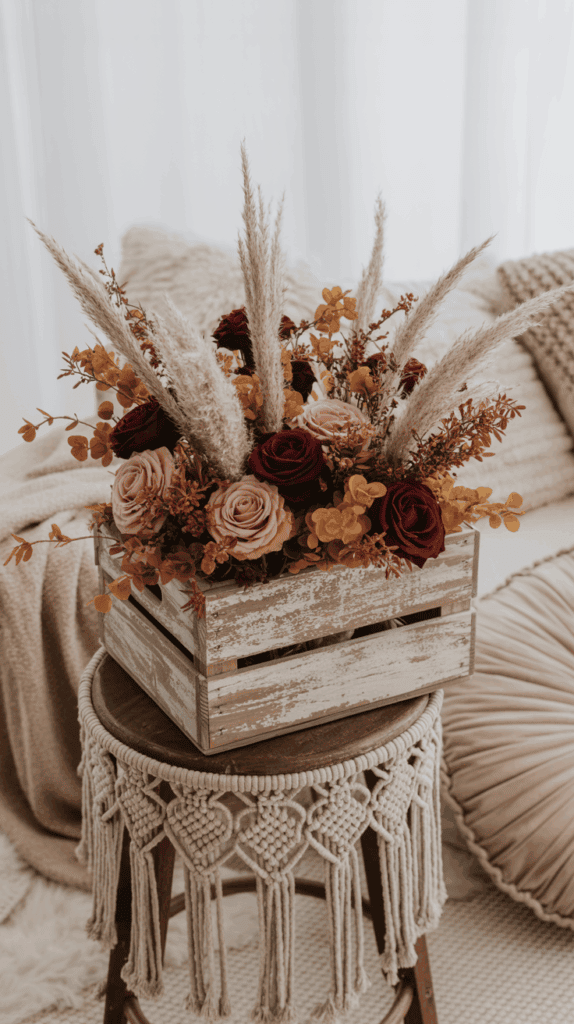
- Rustic, weathered crates: Perfect for that farmhouse, lived-in feel. The scuffs and faded paint make it cozy, like a favorite pair of jeans.
- Smooth, lighter wood: Feels more modern and bright. I use these when I want the flowers to really pop against the neutral tones.
- Dark or stained crates: Add warmth, especially if you love deep oranges and burgundies in your arrangements.
If you want the crate to last, check that the wood feels sturdy. I always give it a gentle shake to see if it wobbles—if it does, I pick another!
Handles or No Handles?
Handles can be a lifesaver, especially if you need to move the arrangement around (which I do all the time to make space for homework or family game nights).
- Crates with handles: Easy to grab and move, even if you’re balancing a baby on your hip!
- Crates without handles: Look a bit neater if you want the focus to stay on the blooms.
I love handles when I’m switching between rooms for different moods, but it’s totally a style choice.
Color and Customization

Don’t be afraid to get creative! Some years, I leave the crate as-is. Other times, we paint or stencil little leaves or pumpkins on the sides.
Simple ways to personalize your crate:
- Paint it in a fall color (burnt orange, mustard yellow, deep red).
- Add your family’s initials or kids’ names.
- Tie a gingham ribbon or twine around the handles.
- Glue on a burlap bow for instant charm.
Let your kids help—mine love painting and picking out stickers to dress up our crates.
Where to Buy or Find the Ideal Crate
You don’t have to spend a lot. Some of my favorite crates have come from:
- Local craft stores—they usually have every size imaginable.
- Thrift shops—perfect if you want a little vintage character.
- The garden section at big box stores.
- Sometimes, the grocery store (apple crates make awesome holders for flowers!).
If you want to be super thrifty, ask local shops if they’re getting rid of any old wooden boxes. A quick clean can turn a “junk” crate into the star of your fall table!
No matter what style or size you go with, choosing the crate is half the fun. It’s the first step in turning using a wooden crate for a floral fall arrangement ideas into something unique for your family. Let your space and your own style guide you!
Gathering Your Fall-Inspired Floral Materials
It’s finally that time of year when using a wooden crate for a floral fall arrangement ideas really brings the coziness home! I love how a new season gives me a reason to wander through craft stores, garden centers, and even my own backyard with my boys, searching for the perfect mix of flowers and nature’s treasures. Fall is all about the layers, the mix of rich colors, and the little surprises tucked between the petals. Let’s get ready to pick your autumn favorites! This step is not just about flowers but all the fun accents that make your arrangement pop, spark memories, and draw smiles from everyone who sees it.
Adding Texture and Depth with Unique Filler Items

Nothing brings a fall arrangement to life like a mix of textures and tiny surprises! Every year, my boys and I scout around the house and yard for bits and bobs to fill in the gaps between flowers. These little additions make your crate look lush, full, and so much more fun for the kids to help assemble.
Think beyond flowers. Look for items that feel cozy, rustic, or a little unexpected. Some of our favorites have become family traditions, and the boys are always excited to scatter their picks around the crate. Here’s what I love to use:
- Pinecones: These are a classic! They add a woodsy feel and are just fun for little hands to collect and tuck into the arrangement. Tiny or large, they look amazing nestled among roses or sunflowers.
- Mini pumpkins and gourds: These always feel like tiny treasures. Try white baby pumpkins, bumpy gourds, or even the plastic kind if you can’t find fresh (honestly, the kids don’t mind either way). Place them at the edges or even on top for a farmhouse touch.
- Branches and twigs: Add height and character. Sometimes my youngest brings in sticks with a few leaves still clinging, and those make the arrangement look like it came straight from a walk in the woods.
- Dried orange slices: These are pure magic! They add a dash of color, smell sweet, and remind me of old-fashioned kitchens. You can pick them up at craft stores or slice and dry them in your own oven. The boys love how shiny they turn out.
- Acorns and chestnuts: Small and shiny, these fit perfectly into little gaps. They’re an easy way to involve the kids and keep their hands busy while you arrange.
- Berries (artificial or real): Red or deep purple berries add color and are safer if you choose the faux variety—the real ones can be tempting for little ones, so just keep an eye on them!
What’s great about fillers is you never have to settle for boring. I lay out all the options on our kitchen table and let the boys pick their favorites to scatter in the crate. It makes the whole thing feel playful and personal, like a family nature walk captured in one place.
If you’re gathering items from outside, just give everything a quick shake and brush to keep your crate clean. And remember, there are no strict rules here—mix textures, colors, shapes, and let your creativity (and your kids!) take the lead.
Adding all these textures and natural fillers is what makes the wooden crate arrangement come alive. It’s like baking a pie with just the right spices and extras, each little touch brings the whole thing together for a look that feels warm, welcoming, and totally unique to your family.
Arranging Your Florals: Step-by-Step Guide for a Stunning Fall Display

The fun really starts once I gather my flowers and filler bits and begin arranging them in the wooden crate. Trust me, using a wooden crate for a floral fall arrangement ideas is the moment when your fall table or mantel truly comes alive. With the right mix of blooms and textures, your crate can go from an empty box to a family-loved centerpiece in less than an afternoon. I’ll walk you through the easy steps I follow, using simple tricks and honest mom advice. This method lets the kids join in, too, and turns the whole thing into a quick, happy memory!
Step 1: Prep Your Crate and Line the Bottom
First things first, I make sure my crate is clean and ready. If you’re reusing one from last year, a quick wipe with a damp cloth does the trick—no one likes dust near fresh flowers. Next, I line the inside with plastic or a trash bag. This keeps water from leaking out if I use real flowers, and it also protects the crate from dirt or stains. For faux flowers, I sometimes skip this, but a liner can still help hold everything steady.
If your crate has gaps or spaces, pop in some floral foam or even crumpled newspaper to help secure your main flowers and keep things from shifting. It’s a neat trick that always saves me time!
Step 2: Start with Your Greenery or Base Layer
To me, a beautiful fall crate always starts with a lush, natural base. I grab my greenery, faux or real, and tuck pieces all around the edges. This works like the crust on a pie—nothing fancy, but so important for the rest of the arrangement.
Some of my favorites for fall:
- Eucalyptus branches (real or faux)
- Dusty miller leaves
- Magnolia leaves for something shiny
- Ferns for a wild, woodsy look
Working from the outside in, I anchor each piece at a slant. If the boys are helping, I let them poke the greens right into the corners. There’s no wrong way to do it—just aim for full and fluffy.
Step 3: Add Your Focal Flowers
Here’s the magic part! Pick out your favorite big blooms. Sunflowers, mums, and dahlias are always a hit this time of year. I like to start with three or five main flowers (odd numbers always feel more natural). Space them out so the color and texture is balanced.
Tips for a mom-friendly way to arrange focal flowers:
- Stick taller ones toward the back so they peek out
- Place the brightest color near the center—draw those eyes in!
- Fluff the petals so they look as open and full as possible
I love seeing the kids pick out where each flower goes, maybe even naming them as they go along. It doesn’t have to look perfect—just happy and full of color!
Step 4: Fill in with Secondary Blooms
Now it’s time for the support squad. Fill in the spaces between your focal flowers with smaller fall favorites, like asters, marigolds, or snapdragons. This is how the whole thing starts looking finished and full.
Keep it simple:
- Tuck these around the bigger flowers and between greenery
- Use different colors to add depth (burgundy next to gold, cream near deep orange)
- Keep some blooms a bit lower, which gives a “spilling out” look that feels extra cozy
The best part is, no two sides need to match perfectly. Wherever I see a gap, I ask the boys what color should go there. They love turning it into a mini decorating challenge.
Step 5: Add Accents and Textural Fillers
Here’s where the fun fall details come in. All those pinecones, berries, tiny gourds, and dried fruit get nestled into open spots. This layer gives the arrangement personality and charm.
Ways to bring your crate to life:
- Place mini pumpkins or acorns in the front for extra autumn flair
- Drape berry sprigs for pops of bright red or orange
- Scatter pinecones or seed pods to break up blocks of color
Sometimes, my youngest will “hide” a toy animal in the crate for a silly surprise. I leave it for the season—it always makes us smile!
Step 6: Finish with a Tidy Touch
I stand back and look at the crate from all sides. Fluff, tuck, or swap anything that looks out of place. If I want a bit more shine, I spray a little faux floral mist or pop in just a hint of gold ribbon.
A quick checklist before I call it done:
- Are any stems sticking out too far? I gently push them in.
- Are there bare spaces? Add more leaves or a final flower.
- Is the arrangement blocking a view or too tall for the table? Snip stems as needed.
Little tweaks here and there always turn “almost finished” into something I’m proud to show off.
Kid-Friendly Tips for Family Arranging
Because real life means kids running through the kitchen, I keep things simple and safe when my boys want to help. Here’s what’s worked for us:
- Use blunt scissors or pre-cut stems for little hands
- Assign each child their own bloom or filler to place
- Keep hearty faux florals lower in the crate so if it gets bumped, nothing falls out
- Add a special ribbon, pick, or keepsake (my boys love tying a bow on the handle!)
Making it a family activity means it’s not just about pretty blooms—it’s about the giggles and little hands working together.
With each step, your wooden crate goes from simple to stunning, full of color and the stories that only you and your family can tell! Arranging flowers with my crew always makes me grateful for noisy, messy, laughter-filled afternoons—exactly what fall should feel like.
Personalizing and Placing Your Wooden Crate Arrangement
There’s something magical about using a wooden crate for a floral fall arrangement ideas because every detail tells a story about your family and your home. The crate isn’t just a box for flowers; it’s a canvas for you to share your family’s style and add those heartwarming touches that say, “This is us!” Once the flowers are ready, it’s time to make your arrangement truly yours and find the perfect spot where your cozy fall creation can shine.
Adding a Personal Touch: Make It Yours
Every family has its quirks, memories, and inside jokes. Why not bring that spirit to your fall crate? Personalizing it is half the fun. You can make small changes or go all out. The best part? The little details are what make it truly special for you and the kids.
Here are my favorite ways to give our crate some family flair:
- Keepsake add-ons: Tie on a small charm, like a vintage key or a family photo in a tiny frame. My boys love picking out something small to add each year, and it sparks sweet conversations.
- Hand-painted accents: Use acrylic paint or paint pens to add your own designs. Simple patterns like hearts, autumn leaves, or your kids’ handprints make the crate a keepsake for years to come.
- Ribbons and bows: I love wrapping fall-colored ribbon or twine around the crate. Gingham or burlap always looks extra homey for autumn. A bow on the corner just says “look here!”
- Name tags or wood signs: Write your family name or a cheerful fall greeting on a mini chalkboard or wooden tag and hang it from the handles. Sometimes I draw a silly pumpkin face with the boys for a touch of whimsy.
- Seasonal stickers or stencils: Stickers are quick and involve zero mess—always a win with three boys running around. Fall leaves, pumpkins, or apples are charming and easy to swap out next year.
Personal touches don’t need to be perfect. The fun is in the doing, and those little fingerprints and splashy paint marks become part of your family’s story.
Picking the Perfect Spot in Your Home
The crate arrangement looks best when it fits in with the flow of your daily life. I always think about foot traffic and places where our family gathers. I want everyone to enjoy it without worrying about knocking it over when things get busy.
Some of my favorite spots:
- Kitchen table or breakfast nook: This is where our family meets each morning, so starting the day with a splash of fall color feels special. If your table is small, keep it compact.
- Living room centerpiece: Place the crate on your coffee table or a sideboard. It sets the mood for fall movie nights and adds instant coziness.
- Entryway bench or mudroom: Greeting yourself with fall flowers when you come in from the cold? Yes, please! A wooden crate in the entryway gives guests a warm welcome.
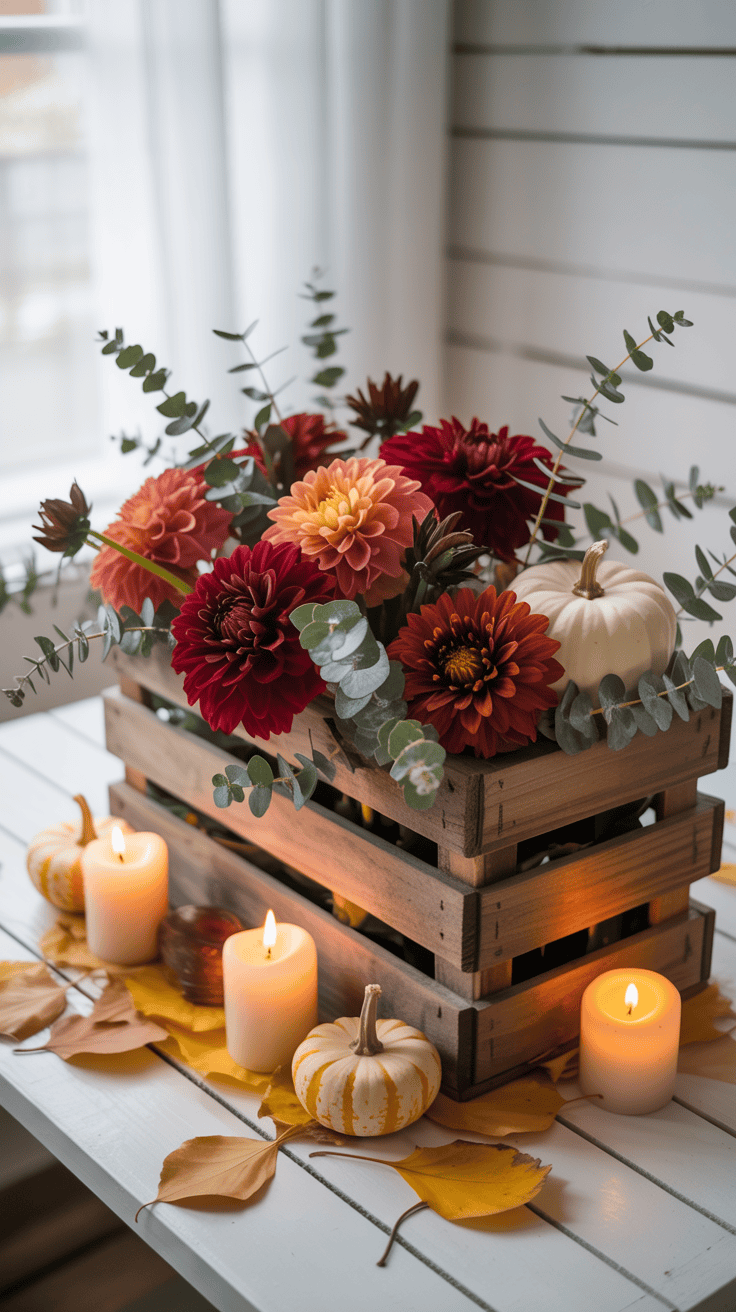
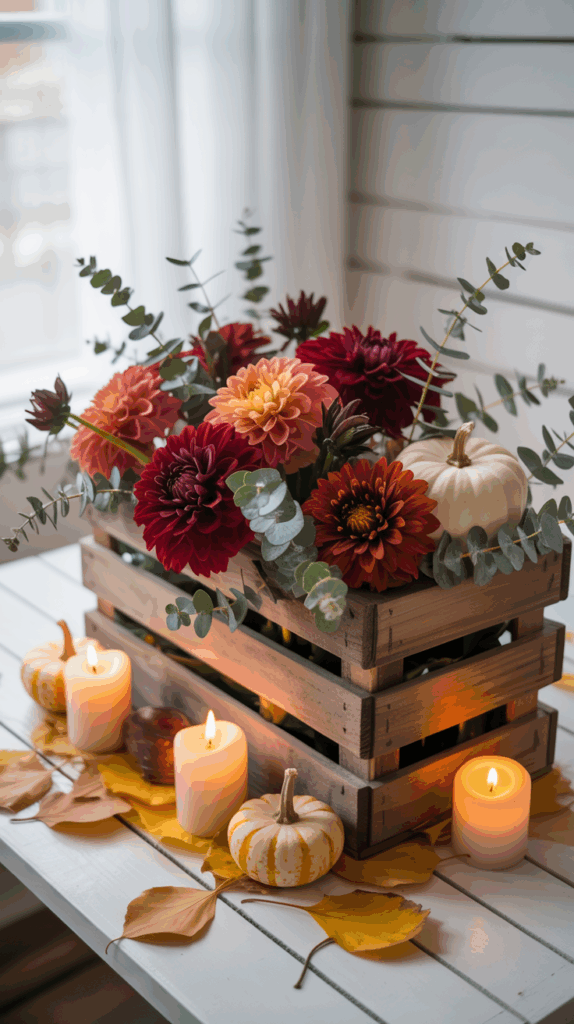
- Mantel or fireplace hearth: The gentle, natural look of wood pairs perfectly with a rustic mantel. Arrange the crate with candles or little pumpkins for a picture-perfect look.
- Bathroom counter: Even a small crate brings charm to the bathroom. It’s unexpected, but it always earns compliments! Tuck in a scented sachet for a fresh surprise.
I always pick a spot that’s easy to see but not in the way of little feet racing through the house. Sometimes I move the crate just to change things up. The boys even help me vote on the best spot, and it turns into a family event.
Adjusting for Family Life and Busy Spaces
Moms, you know the chaos of kids running in and out, toys overflowing, and snacks everywhere. I’ve learned to style our arrangement with that real-life messiness in mind. Here’s how I keep things both pretty and practical:
- Go low and stable: Keep tall stems in the middle, not near the edge. I make sure no big pieces stick out, so nothing snags as the kids walk by.
- Weight it down: If the crate feels light, I tuck a bag of beans or stones under the liner. That way it’s not a rocket ship if someone bumps it.
- Use faux in high-traffic spots: Faux flowers stay perfect longer. I save real blooms for spots where they’re safe from sticky hands.
- Skip anything fragile for now: Glass vases or tiny trinkets can wait until the boys are older. Fabric and wood are sturdy and bounce back from little accidents.
Even if things shift or a flower goes missing, it just adds to the charm. That’s life in a busy house!
Using Lighting to Highlight Your Arrangement
Lighting turns your crate from cute to absolutely magical. I like to place it where the afternoon sun hits just right for a soft, golden glow. If natural light isn’t quite enough, these little tricks help:
- String fairy lights: Tuck a battery pack inside and wind tiny lights around the flowers. It makes every color pop once the sun goes down.
- Set near a lamp: Place the crate by a table lamp for extra warmth and sparkle. The shadows make the layers of your arrangement look even richer.
- Use candles (safely): Put LED candles next to the crate for a soft, flickering light. They’re safe for family homes and look just as pretty.
A little sparkle always draws a smile and gives your fall arrangement a cozy evening glow.
Change It Up Through the Season
Fall is long and full of celebrations, so I like to update our crate every couple weeks. It’s a great way to keep things fresh without making an entirely new arrangement.
Ideas to refresh your arrangement:
- Swap in new colored ribbons or add a fresh bow for Thanksgiving.
- Replace a few flowers with fir sprigs as winter nears.
- Add seasonal touches, like Halloween spiders in October or mini corn husks in November.
This keeps your display just as lively as family life, and the kids love checking out “what’s new this week.” It keeps using a wooden crate for a floral fall arrangement ideas feeling fun and different all season long.
Personalizing and picking the perfect spot for your wooden crate brings your whole arrangement to life. It’s those extra small touches, the laughter while decorating, and the little shifts you make for real family life that turn your fall crate from just décor into a special piece of your family’s story.
Conclusion
Using a wooden crate for a floral fall arrangement ideas is truly one of the easiest, most family-friendly ways to bring a bit of autumn joy right into your home. I love how quick it is to pull together, especially with my boys adding their own flair (and sometimes a little mess, but that’s real life!). When we get creative as a family, our home feels warmer, happier, and a whole lot more us.
Don’t worry about making your crate look perfect. The best memories come from letting the kids jump in and enjoying every wonky flower or smudged ribbon. Snap a picture of your finished arrangement and share it with friends or family. You’ll spread a little extra fall cheer and maybe even inspire someone else to try it too.
Thank you for spending time with me! If you give these ideas a try, I’d love to see what you create. Happy arranging, and have fun making autumn memories with your crew!
This post may contain affiliate links. Read the full disclosure here.